Showing posts with label vintage. Show all posts

Tuesday, April 30, 2019

Dainty Congrats

I don't really make vintage cards, but there's something about that soft and dainty look that I just can't resist. So, I thought I'd try with this sweet little cup and some pretty patterned paper. I really like the sage green and the bright pop of pink with cream as a palette and plan to use it again. I'm also digging this textured cardstock from Bazzill. It's not heavy enough to use as a base, but it's really fun as a layering piece.

Thanks for reading!
~Elle~

Tuesday, April 16, 2019

Super News

When I was a kid, my brother and I used to get up early every Saturday morning to watch super hero cartoons. It's one of my fondest memories, so I tried to capture that nostalgic feeling in a slightly-vintage kind of card featuring a newspaper print. I opted for sepia colors and made a subtle citiscape background for the superhero to stand against.

I think it turned out pretty fun and it's going to make a superhero-loving guy happy.


Thanks for reading!
~Elle~

Thursday, June 14, 2018

Aloha Summer!

There's something so iconic about the VW bus and palm trees - they just whisper "summer", and I couldn't resist making a mini scene to celebrate the season. I opted for minty cool tones, along with a few brighter colors to play up the contrast.

For the background, I dug into my scraps folder and found several bits of patterned paper that worked just wonderfully together.

Thanks for reading.
~Elle~

Friday, February 10, 2017

Some Odd Girl: Valentine's Blog Hop!


Welcome to my stop on the Some Odd Girl Valentine’s Day Blog Hop! You should have arrived from Ria’s blog but if you just stopped by then head back to the beginning to get started so you don’t miss any stops.
Whenever I think of love, my mind always goes back to old vintage photographs of happy couples. I like the warmth of the tones and how it seems to capture a moment in time. So, I decided to make a vintage photograph featuring the Grands couple. I used my Warm Greys Copic marker - and it was an interesting challenge to make sure there was enough contrast to make all the details stand out. I also brushed the images lightly with a blending tool using Gathered Twigs distress ink. I used Gathered Twigs along with Pumice Stone on the background, too. A bit of gold glam on the "Love" die cut and a couple hearts tie everything together.

Be sure to check in and comment on each blog, including this one, to be the most eligible. Since we’re spreading the love so hardcore, everyone gets 14% off at the Some Odd Girl shop using code SOGLove! But, we'll also be choosing 2 lucky winners from those of you who comment on every blog, each receiving a $14 spending spree in our shop. 
Here’s our hop list...
Elle * You are here
Alexis

Thanks for reading!
~Elle~

Wednesday, April 22, 2015

OHC 67 - Vintage

Today, I'm sharing another card for my One Hundred Cards challenge (read more about it here). I'm using a super cute set from WPlus9 called Pick of the Litter. This set is smaller (and more affordable!), and it features sweet vintage-style images.

I started by stamping the girl and the kitten in brown ink onto some Copic marker paper. I used brown because it's softer and gives a slightly faded look. I colored my images as I usually do, using the B41 and B45 for the dress because they were a little less bright than my other blues. I trimmed the image down to a small size. I used the chisel tip of a YR82 (Mellow Peach) for the background. I simply covered the whole background, then switched to E84 to add in some subtle lines.

Then came the fun part! Making the image look older. I grabbed my trusty mini-blending tool and the Antique Linen distress ink, and went over any parts of the image that were very pale/white -- the girl's stockings, kitten, and a bit on her arms and face. I then blended in just a bit of that same antique linen ink into her dress - taking care with this one so it just looked aged, rather than turning her dress green.

I then switched to Vintage Photo and deepened the edges of the image.

I found some fun papers in my paper stash that weren't labeled vintage, but I think they still worked. The small flower print was a very popular motif in vintage, so a small pretty print from a card kit was perfect. And just to add a bit of contrast, I layered the image panel with some striped black and white paper.

As a last touch, I adhered a piece of flair from a Studio Calico's Darling Deer flair pack I found in my stash.

Thanks so much for reading!
~Elle~

Monday, August 11, 2014

Birthday Cup Mouse

And my adventures in watercolor continue! I feel like I'm finally getting somewhere, and gaining more control over the brush strokes and the amount of water I'm using.

For this card, I decided to use Meljen's adorable Birthday Cup Mouse stamp. I love the whimsical storybook look of the stamp, and it seemed like the perfect stamp to watercolor with. I only have this one Meljen stamp so far, but I'm definitely planning on getting loads more!

I started by stamping the mouse onto the smooth side of Tim Holtz's distress watercolor paper, using Ranger Archival black ink. After giving the ink a minute to dry, I used distress markers and a watercolor brush to color the image. I colored different elements of the image, making sure to work with areas that didn't touch so the colors wouldn't bleed.

After the mouse, cup and candles were colored, I started on the background. Initially, I used shabby shutters, but the color was so light that it didn't show on the image. So, I used peacock feathers instead and went around the entire image.

Once the image was completely dry, I used one of my Sizzix circle dies to cut it out. I also cut out a slightly larger circle that would act as a frame for the watercolor image. I adhered the stamped circle to the frame circle with foam squares.

I created a base by cutting and folding a piece of MFT's Sno-Cone cardstock in half to create a standard A2 base (4 1/4 by 5 1/2"). I wanted to have a patterned paper background that was both soft and tied in with the mouse, so I went with the cream and brown polka dot background.

 After adhering the patterned paper and the circles to the card, I realized there wasn't much room for a sentiment. I spent some time looking for a stamp that was small enough to fit the card, and still had a whimsical look, but I couldn't find one. So, I pulled out a Simple Stories journaling card and cut the sentiment from it, giving it a banner edge. I adhered it to the card with foam squares and with one of its ends tucked under the watercolor panel.

Supplies:
Whimsy Stamps Meljen's Designs Birthday Cup Mouse stamp
Ranger Archival Ink in Jet Black
Tim Holtz Distress Watercolor paper
MFT Heavyweight Cardstock in Sno Cone
Little Yellow Bicycle Vintage Summer 6x6 paper pad
Simple Stories Birthday Sn@p cards
Distress Markers (peacock feathers, shabby shutters, fired brick, dusty concord, squeezed lemonade, wild honey, picked raspberry, spiced marmalade, salty ocean, brushed corduroy, vintage photo)
Scrapbook Adhesives 3D foam squares
Small round paintbrush
Water

Saturday, August 9, 2014

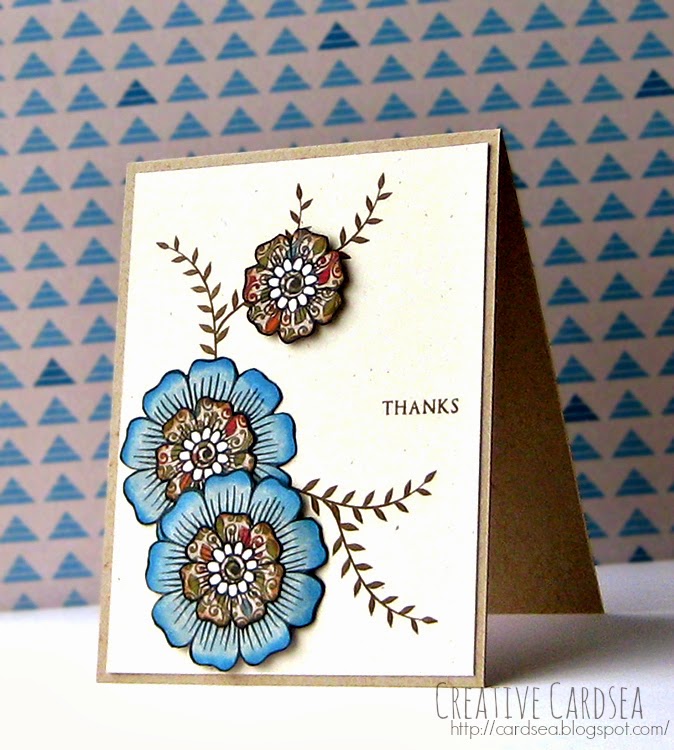
Stamp Trio: Hennah Paper

This is the second entry in my Stamp Trio challenge, using Altenew's Hennah Elements. For the second card, I decided to use paper piecing and go with a more vintage feel. The flowers in the stampset are perfect for the paper piecing technique, as they're both large and simple.

I started by stamping the two large flowers on some blue patterned paper. I stamped the 3 smaller flowers onto some more detailed cream patterned paper. After cutting them out with my scissors, I used my foam blending tool to ink the edges with a bit of distress ink (Salty Ocean for the blue flowers and Vintage Photo for the cream). After this, I filled in some ovals near the small flower centers with white gel pen to create a little more contrast. I adhered two of the cream flowers to the centers of the blue flowers.

I cut a piece of MFT's Primitive Cream cardstock to measure 4 by 5 1/4". While I had my paper cutter, I also cut a piece of Neenah Desert Storm cardstock in half to create a top-folding A2 card.

After deciding where to position the flowers, I stamped a few of the flower vines around the card front in Soft Suede brown ink. I also stamped the small thanks sentiment from the Hennah stamp set.

I adhered the cream panel to the card front, then adhered one of the blue flowers straight onto the panel with tape adhesive. I layered the second flower with foam squares, then added the last small flower to the top.

Supplies:
Altenew Hennah Elements
MFT Hybrid Ink in Black Licorice
Stampin' Up Classic inkpad in Soft Suede
K & Company Tim Koffey Journey 6x6
MFT Heavyweight cardstock in Primitive Cream
Neenah Desert Storm Environmental cardstock 100#lbs
Distress ink in Salty Ocean and Vintage Photo
Uniball Signo Broad white gel pen
Stampin' Up dimensionals foam adhesive
Tombow Dot adhesive runner (pink)

Sunday, July 13, 2014

Retro Kitchen Lulu

Whenever I'm buying a new stamp, I always have a person or an occasion in the back of my mind. That person is almost never me. Out of all the supplies I've bought, there's maybe 3 or 4 things that I got because they appealed to me and me alone. So, during my last big shopping splurge (yes, it was pretty huge trip - but in my defense, there were some major sales going on!), I bought a few stamps for just me. And I'm really glad I did, because at least one of the stamps seems to be gone. The adorable stamp in this card is from Stamping Bella and it's called Lulu's Two Pies. I wanted to link to it, but I couldn't find it anymore. I apologize for that!

I started this card by stamping Lulu on some Copic Marker Paper and coloring her in with Copic markers. She has a fantastic retro look, so I tried to go for retro colors - red, blue and a touch of yellow. After she was colored, I fussy-cut the image, leaving a small white border. Since the white of the marker paper was so much brighter than the cream color of the base and patterned paper, I went around the edges with E53 to soften the transition.

The rest of the card came together very easily.

I cut a piece of MFT's Primitive Cream cardstock in half, and scored it for a top-folding A2 card (4 1/4 by 5 1/2"). I also cut out a panel for the sentiment from the same cardstock, using EK Success Real Estate Sign paper punch. I used the mini round blending tool and Ranger Distress ink in Tea Dye around the edges of the sentiment panel, then stamped the sentiment in brown ink.

I cut a panel from Bazzill Peppermint cardstock to measure 4 by 5 1/4". The patterned paper is from Carta Bella's Homemade With Love collection. I chose the paper with pies, which was just perfectly matched with the stamp. After adhering two strips of paper together, I added a red polkadot ribbon to the top of the panel.

Lastly, I adhered the sentiment panel and Lulu to the card with foam squares. Since the card was rich in color and pattern, I didn't add any other embellishments.

Supplies:
Stamping Bella - Lulu's Two Pies
MFT Hybrid Ink in Black Licorice
Ranger Archival Ink in Coffee
Ranger Distress Ink in Tea Dye
Copic Marker Paper 70lbs
Copics (E00, E11, E13, C2, R05, R29, R59, Y21, B000, B00, B01, B45, YR27, E53, E23, 100 - Black)
MFT Heavyweight Cardstock in Primitive Cream
Carta Bella Homemade With Love 
EK Success Real Estate Sign paper punch
Scrapbook Adhesives Thin 3D foam squares

Saturday, May 17, 2014

Vintage Octopus

I have a soft spot for vintage things, especially if they're Victorian vintage. As a result, I find myself drawn to vintage things and buying many vintage-inspired crafting supplies. And yet, I don't think I've ever made a vintage card. Maybe I felt intimidated, or maybe I just needed to find the right inspiration.

But taking another look at the gentlemanly Mr. Octopus inspired me to try vintage. And this card was made.

I started by stamping the octopus in brown ink and coloring him with my Copics. I grabbed a piece of brown card-stock cut to 4x5.25" and used it as a panel for all the other elements. I cut a piece of striped paper to 3.45x5" and adhered it to the brown cardstock. I layered another piece of paper at an angle.

For the sentiment, I cut out a frame from one of the papers and matted it to the same brown cardstock as the pannel. I stamped a simple sentiment from Simon Says Stamp's Perfect Love stamp set. I also cut out a few feathers from the same paper as the middle panel.To make the feathers more visible, I used Vintage Photo distress ink around some of the edges.

I layered the feathers onto the sentiment panel, then added a paper flower. A last touch was a few pearls, scattered to pull in the pearls on the paper flower.

Supplies:
Stamps: Some Odd Girl - Mr. Octopus, Simon Says Stamp - Perfect Love
Ink: MFT Hybrid Ink in Hot Fudge (octopus) and Black Licorice (Sentiment), Ranger Distress Ink in Vintage Photo
Base: MFT Primitive Cream card stock
Paper: Bazzill Chocolate Canvas card stock, Prima Cartographer 6x6, Prima The Stationer's Desk 6x6
Simon Says Stamp Feathers Craft Die 
Copics: E11, E92, E23, E35, E57, E59, E79
Prima Flowers Cartographer - Sightseer paper flowers
Melissa Frances Cream Pearls