Wednesday, August 13, 2014

Happy Summer Henry

Summer's really winding down around here, and we're already seeing a drop in temperature and a few rainy days on the horizon. I've been meaning to create quite a few summer cards this year - goodness knows I've bought a-plenty of stamps and papers that have to do with summer. But I suppose creativity just took me elsewhere and before I knew it, we're halfway to September.

But when I came across this Wednesday's challenge over at Simon Says Stamp, I just took it as a sign that I really ought to make a summer card right now. So, I pulled out many summer goodies and got to work on a card.

For this card, I'm using Roberto's Rascal's Summer Henry stamp (which you can find over at C.C. Designs). I started by stamping him out in MFT's Chocolate Brown hybrid ink, then colored him in with Copics. I wanted the image to look warm and summery, so I mainly used warm earthy tones with a touch of bright blue. I also took the time to scribble in a quick background, with a sand under their feet and bright sky around them.

I wanted to make a more interesting shape, so I loosely cut around the image, allowing for some curves and squiggly lines. After the image was completely cut out, I used Vintage Photo distress ink and a foam applicator to lightly ink up the edges.

I created a standard A2 card base from a piece of white cardstock. While I had my paper cutter out, I also cut a 4 by 5 1/4" piece of dark navy cardstock. I grabbed a lovely sheet of paper from Echo Park's Walking on Sunshine 6x6. I just couldn't decide which side of paper to use - the fish, or the art deco waves, so I settled on both! I cut a fish panel to measure 3 3/4 by 5", and the waves to measure 2 1/4 by 5".

I adhered the art deco wave straight to the fish panel with my standard dot adhesive, then adhered it to the navy panel with foam squares. I then adhered the whole front panel to the card base.

I used foam squares to adhere Henry at the bottom of the card. I was a bit stumped as to what I wanted to do for a sentiment. I couldn't find a stamp set in my stash that was both about summer and in a font I liked. But then I came across these Elle's Studio Serendipity labels. The top label bad both the perfect colors and the sentiment I wanted to convey. So, I cut it out, matted it onto a piece of navy cardstock for support and adhered it to the card with foam squares.

Lastly, I added a few green and blue enamel dots in a few random spots.

Supplies:
Roberto's Rascals Summer Henry stamp (C.C. Designs)
MFT Hybrid Ink in Chocolate Brown
MFT Heavyweight Cardstock in Nightshift Blue
Neenah Solar White cardstock 110#lbs
Echo Park Walking on Sunshine 6x6 patterned paper
Elle's Studio Serendipity Label Snippets
Copics (E00, E11, E13, R20, R22, R35, R46, Y15, YR23, E35, E37, E42, E44, E47, B11, B32, B47, C4, C6, C8, E33, E39, E29, B000, B00)
Freckled Fawn Neon enamel dots
Tombow dot adhesive (pink)
Scrapbook Adhesives 3D foam squares 

I'm entering this card in Simon Says Stamp's Wednesday challenge, theme: Summer.


Tuesday, August 12, 2014

Topsy Birthday

Today's card features a digital stamp designed by my friend Paola, from My Whimsical Little World. The minute I saw this adorable topsy-turvy cake, I just knew I had to make a birthday card with it! How adorable are the 3 tiers and the loopy, whimsical decorations?!

After picking out a good size, I printed the stamp onto some Copic X-Press it blending paper. I colored it in with my Copics. I initially wanted to go with some really crazy colors, but in the end, decided to go with favorite flavors: vanilla, chocolate, strawberry and caramel. I colored the bow and little round decorations in minty colors for some extra contrast.

Once the image was colored, I cut it down into a rectangle and rounded the corners with the 1/4" corner chomper. I adhered it onto a piece of Bazzill's Fawn cardstock. I also rounded the corners with my corner chomper.

I really liked the colors I used for the stamp, so I decided to carry them over to the rest of the card. I created a standard A2 card base out of kraft cardstock, then I grabbed a piece of coral cardstock and a doily patterned paper from the Basic Grey Paper Cottage collection. I cut the coral cardstock to 4 by 5 1/4" and the patterned paper to 3 3/4 by 5".

I decided to use some gorgeous tan satin ribbon, so I tied it around the middle of the patterned paper. I matted the patterned paper onto the coral cardstock with foam adhesive, then adhered the entire panel to the card base. I added the birthday cake panel to the card front with foam squares.

Lastly, I scattered a few coral enamel dots to complete the card.

Supplies:
My Whimsical Little World Birthday Cake digital stamp
Neenah Desert Storm Environmental Cardstock in 100#lbs
Stampin' Up Crisp Cantaloupe cardstock
Basic Gray Paper Cottage 6x6 patterned paper
Copic X-Press it blending paper
Scrapbook Adhesives 3D foam squares
Tan satin ribbon
Freckled Fawn Pinks enamel dots
Copics (R11, R22, R35, E23, E37, E39, E81, E50, E33, Y32, YG41, YG45, R05, R46, R59, YR32, YR15, Y13, B000)

Monday, August 11, 2014

Birthday Cup Mouse

And my adventures in watercolor continue! I feel like I'm finally getting somewhere, and gaining more control over the brush strokes and the amount of water I'm using.

For this card, I decided to use Meljen's adorable Birthday Cup Mouse stamp. I love the whimsical storybook look of the stamp, and it seemed like the perfect stamp to watercolor with. I only have this one Meljen stamp so far, but I'm definitely planning on getting loads more!

I started by stamping the mouse onto the smooth side of Tim Holtz's distress watercolor paper, using Ranger Archival black ink. After giving the ink a minute to dry, I used distress markers and a watercolor brush to color the image. I colored different elements of the image, making sure to work with areas that didn't touch so the colors wouldn't bleed.

After the mouse, cup and candles were colored, I started on the background. Initially, I used shabby shutters, but the color was so light that it didn't show on the image. So, I used peacock feathers instead and went around the entire image.

Once the image was completely dry, I used one of my Sizzix circle dies to cut it out. I also cut out a slightly larger circle that would act as a frame for the watercolor image. I adhered the stamped circle to the frame circle with foam squares.

I created a base by cutting and folding a piece of MFT's Sno-Cone cardstock in half to create a standard A2 base (4 1/4 by 5 1/2"). I wanted to have a patterned paper background that was both soft and tied in with the mouse, so I went with the cream and brown polka dot background.

 After adhering the patterned paper and the circles to the card, I realized there wasn't much room for a sentiment. I spent some time looking for a stamp that was small enough to fit the card, and still had a whimsical look, but I couldn't find one. So, I pulled out a Simple Stories journaling card and cut the sentiment from it, giving it a banner edge. I adhered it to the card with foam squares and with one of its ends tucked under the watercolor panel.

Supplies:
Whimsy Stamps Meljen's Designs Birthday Cup Mouse stamp
Ranger Archival Ink in Jet Black
Tim Holtz Distress Watercolor paper
MFT Heavyweight Cardstock in Sno Cone
Little Yellow Bicycle Vintage Summer 6x6 paper pad
Simple Stories Birthday Sn@p cards
Distress Markers (peacock feathers, shabby shutters, fired brick, dusty concord, squeezed lemonade, wild honey, picked raspberry, spiced marmalade, salty ocean, brushed corduroy, vintage photo)
Scrapbook Adhesives 3D foam squares
Small round paintbrush
Water

Sunday, August 10, 2014

Stamp Trio: Hennah Ink

Apologies if the quality of the image is not ideal. My camera's been acting up...

This is the 3rd and final card in my Stamp Trio challenge, still using Altenew's Hennah Elements. I had originally planned to do some Copic coloring, but I decided to instead work with just stamping and different colors of ink. One thing that initially drew me to Hennah Elements was that there were many small elements that could be used to construct a more complex image. Having many decorative elements helps create one-layer cards that are still elaborate and unique.

I started by creating a standard A2 card base out of plain white cardstock. While I had my paper cutter out, I also cut a couple of panels out of the same white cardstock.

I started by inking the border stamp in chocolate chip ink. After stamping it twice, I switched to a couple of flourishes to embellish the border.

I switched to a blue ink and stamped the small flower 3 times.

Then, I switched to the coral ink and stamped a few leaves around the flowers.

Lastly, I stamped the sentiment in the same coral ink.

I matted the two panels together with foam squares, then adhered it to the card front.

Supplies:
Altenew Hennah Elements stamp
Simon Says Stamp Friendship Messages stamp 
Stampin' Up classic inkpad in Chocolate Chip, Pacific Point and Crisp Cantaloupe
Neenah Solar White cardstock in 80lbs and 110lbs
Stampin' Up dimensionals

Saturday, August 9, 2014

Stamp Trio: Hennah Paper

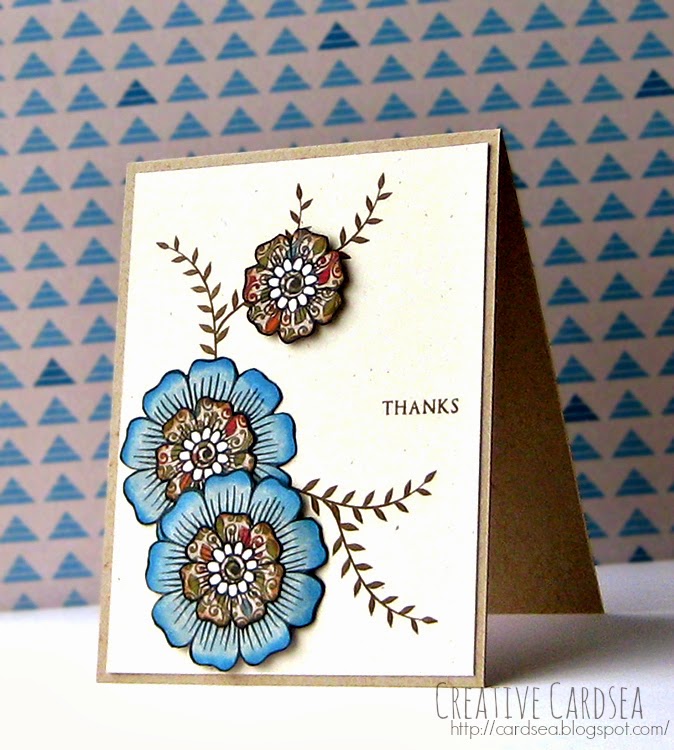
This is the second entry in my Stamp Trio challenge, using Altenew's Hennah Elements. For the second card, I decided to use paper piecing and go with a more vintage feel. The flowers in the stampset are perfect for the paper piecing technique, as they're both large and simple.

I started by stamping the two large flowers on some blue patterned paper. I stamped the 3 smaller flowers onto some more detailed cream patterned paper. After cutting them out with my scissors, I used my foam blending tool to ink the edges with a bit of distress ink (Salty Ocean for the blue flowers and Vintage Photo for the cream). After this, I filled in some ovals near the small flower centers with white gel pen to create a little more contrast. I adhered two of the cream flowers to the centers of the blue flowers.

I cut a piece of MFT's Primitive Cream cardstock to measure 4 by 5 1/4". While I had my paper cutter, I also cut a piece of Neenah Desert Storm cardstock in half to create a top-folding A2 card.

After deciding where to position the flowers, I stamped a few of the flower vines around the card front in Soft Suede brown ink. I also stamped the small thanks sentiment from the Hennah stamp set.

I adhered the cream panel to the card front, then adhered one of the blue flowers straight onto the panel with tape adhesive. I layered the second flower with foam squares, then added the last small flower to the top.

Supplies:
Altenew Hennah Elements
MFT Hybrid Ink in Black Licorice
Stampin' Up Classic inkpad in Soft Suede
K & Company Tim Koffey Journey 6x6
MFT Heavyweight cardstock in Primitive Cream
Neenah Desert Storm Environmental cardstock 100#lbs
Distress ink in Salty Ocean and Vintage Photo
Uniball Signo Broad white gel pen
Stampin' Up dimensionals foam adhesive
Tombow Dot adhesive runner (pink)

Friday, August 8, 2014

Stamp Trio: Hennah Water


 It's been a little while since I've done my Stamp Trio challenge, where I take one stamp set and use it to create 3 very different cards. This time, I decided to use Altenew's Hennah Elements stamp. Hennah Elements has flowers and swirls that are very clear and bold, as well as plenty of flourishes and small decorative elements.

Normally, stamp trio challenge has me creating 3 different card that could be masculine, feminine or neutral. With Hennah Elements, however, I want to focus more on coloring techniques. So, all 3 of the cards in this challenge will be thank you cards with graphics elements from the stamp set. But I will be using different coloring techniques for each card.

For the first card, I decided to use watercolor. I've been wanting to practice watercolor for a while now, as I feel like I've still got tons to learn.

I started by taping down a piece of Tim Holtz distress watercolor paper and stamping the 3 flowers and 2 large leaves in Ranger Archival Jet Black ink. I colored in the flowers using Festive Berries distress marker and water. Since I wanted to add a little depth, I used more watter on some petals and less on others.

While the flowers were drying, I used Mowed Lawn distress marker to color in the leaves. I zapped the flowers and the leaves with my heat gun until they were dry, then layered the shadows by scribbling directly on the paper wit the two distress markers. I used very little water to blend out the scribbles, then zapped it with my heat gun again.

I used Spiced Marmalade distress marker to color in the flower centers, adding just a touch of Ripe Persimmon distress ink in some spots for depth. After drying the paper once more, I got to work on the background. I used the Salty Ocean distress marker and a lot of water to create a background on the bottom and left side of the panel, then faded into white in the top/right side.

After the background was dry, I added the color splatters by loading the brush with watercolor and tapping it against my finger (it's messy, but it works!).

The last step was adding a sentiment from Simon Says Stamp's Thanks set. It was still looking a bit plain, so I stamped a decoration from Hennah Elements by the sentiment and two leaf vines between the watercolored flowers.

I cut down the panel so it was even on all sides and adhered it to a standard A2 card base with lots of foam squares.

Supplies:
Altenew Hennah Elements stamp
Simon Says Stamp Thanks stamp
Ranger Archival Ink in Jet Black
Tim Holtz Distress Watercolor cardstock
Distress markers in Festive Berries, Mowed Lawn, Spiced Marmalade, Ripe Persimmon and Salty Ocean
Bazzill Marshmallow cardstock (base)
Scrapbook Adhesives 3D foam squares

Thursday, August 7, 2014

SOG- Genie Gwen

This is my second card of the day, but I'm just so excited that I had to share it right away! I finally got myself a good printer and I'm now dipping my feet in the fun world of digital stamping.

For this card, I used Some Odd Girl's Genie Gwen stamp. I printed her out on some Copic X-Press paper and colored her in. I cut her out carefully and set her aside while I worked on the rest of the card.

I made the card base out of some dark chocolate cardstock but cutting and scoring it in half for a standard A2 card. I also cut a piece of light blue cardstock to measure 4 by 5 1/4". For the background, I used a couple of papers from My Mind's Eye Sherbet 6x6.

To add in a bit more interest, cut the purple panel into two strips and used a piece of gold washi tape between them. I layered all the papers onto the front panel and adhered it to the card with foam squares. I then added Genie Gwen, also using foam squares.

Lastly, I added the embellishments - and lots of them! Some sequins, wood veneer stars, pearls and dots from the good ol' white gel pen.

Supplies:
Some Odd Girl Genie Gwen digital stamp
Copic X-Press it marker paper
Simon Says Stamp Heavyweight cardstock in Dark Chocolate and Sea Glass
My Mind's Eye Jubilee collection Sherbet 6x6 paper pad
Scrapbook Adhesives 3D foam squares
Doodlebug sequins in Pool
Studio Calico Star Essentials wood veneer
White pearls
White Gel Pen
Copics: Skin  (E11, E13, E15, R22), Eyes (V12, V06, V17), Hair (YG23, YG25, YG17, G29), Outfit (B00, B02, B05, C6, C8, 0), Smoke (R81, R85), Gold (Y21, Y28, YR15, Y35)

Sweet Stamp Shop - Elegant Flower Cheers

Whenever I buy a new stamp, I try to challenge myself to think of a few ways to use it. Sometimes it's as simple as a color combo. Other times, I'll jot down an idea. When I saw Sweet Stamp Shop's Elegant Flowers stamp, I knew I wanted to do a window trio of flowers.

For this card, I decided to pull out some Stampin' Up inks and coordinating cardstock. I decided to go with Daffodil Delight (yellow), Crisp Cantaloupe (coral) and Pool Party (blue). I cut a 1 1/2" square of each cardstock color.

I then cut a slightly smaller squares from white cardstock. I stamped the solid stamp in each color, then used a darker ink to stamp the outline. I tried not to stamp them perfectly on top of each other, just to add a bit of interest.

I adhered the white squares onto the co-ordinating colored squares with foam squares. I then adhered them onto an A2 white card base. I used a t-square ruler to help me keep the squares straight.

As a last step, I stamped the "Cheers" sentiment from Elegant Sentiments in chocolate ink. I kept the rest of the card clear.

Supplies:
Sweet Stamp Shop Elegant Flowers stamp
Sweet Stamp Shop Elegant Sentiments stamp
Stampin' Up Classic Inkpad in Daffodil Delight, Pumpkin Pie, Crisp Cantaloupe, Strawberry Slush, Pool Party, Coastal Cabana and Chocolate Chip (sentiment)
Stampin' Up cardstock in Daffodil Delight, Crisp Cantaloupe and Pool Party
Neenah Solar White 100#lbs cardstock
Scrapbook Adhesives 3D Foam Squares

Wednesday, August 6, 2014

Lawn Fawn - Get Well

I have been meaning to photograph and write about this card for a while. It feels like I created it ages ago, and it's just been sitting on display in my craft closet. I'm not really sure why I haven't written about it yet. Maybe I just got excited about other cards I've made after? Well, I decided I better post this before I've sent it away to someone.

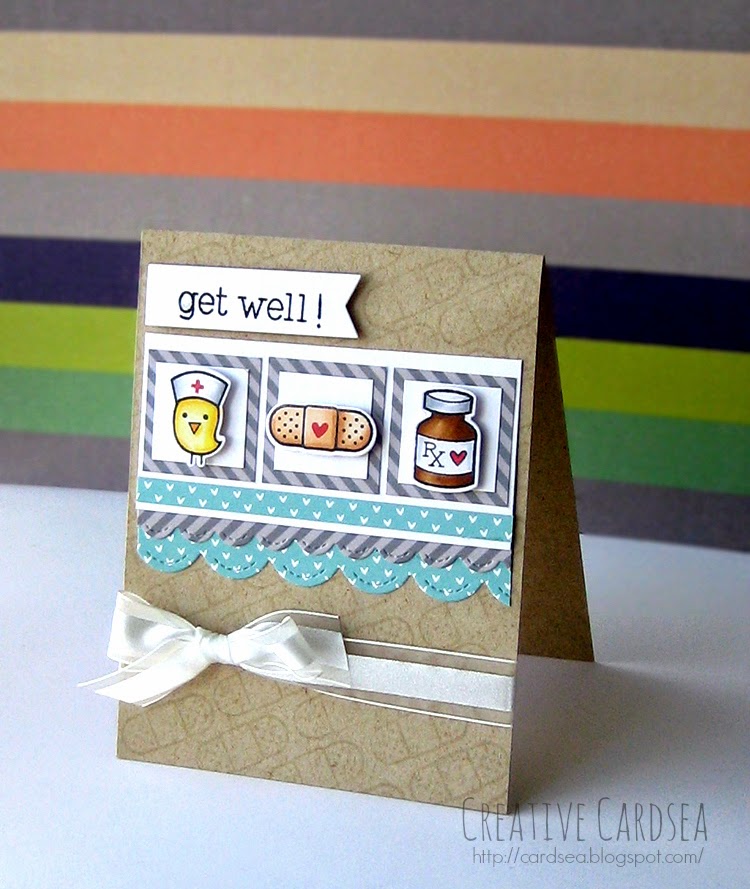
This card started with Lawn Fawn's Get Well Soon stamp set and coordinating dies. I stamped out the nurse bird, bandaid and pill bottle in MFT's black licorice hybrid ink and colored them in with Copics. I then cut them out with the coordinating dies. While I had my Bigshot out, I also cut out a flag banner from Stitched Journaling die. I stamped "get well" from the stamp set on the banner.

I prepared the card base by cutting and scoring a sheet of Neenah Desert Storm environmental cardstock in half to create a standard top-folding card. I then used the bandaid and MFT kraft ink to create a custom tone-on-tone background.

I used Lawn Fawn's Stitched Scalloped Borders die to cut two borders from Let's Polka petite patterned paper. I also cut out a thin strip of the blue paper and a thicker strip of the striped gray paper, as well as a plain white cardstock rectangle. I adhered the layers together and added them to the card base.

I created the window trio by cutting the striped gray strip into 3 equal squares, then cutting 3 smaller squares from white cardstock and layering them together. I adhered the stamped images and the sentiment banner with foam squares.

As a last touch, I tied a piece of white ribbon to the bottom of the card.

Supplies:
Lawn Fawn Get Well Soon stamp
My Favorite Things Hybrid Ink in Black Licorice and Kraft
Lawn Fawn Get Well Soon Die
Lawn Fawn Stitched Scalloped Borders Dies
Lawn Fawn Stitched Journaling Card Die
Lawn Fawn Let's Polka Petite 6x6 patterned paper
Neenah Desert Storm Environmental Cardstock 100lbs
Neenah Solar White Cardstock 80lbs
Copic Mini Marker Pad 70lbs
Scrapbook Adhesives 3D Foam Squares
Stampin' Up Whisper White Organza ribbon
Copics

Monday, August 4, 2014

SOG - Midnight


This card started with Some Odd Girl's Royal stamp set. After stamping the princess on Copic marker paper, I colored her in with my Copics. I spent quite a while debating which colors to use for her dress, until I finally settled on darker blue-violet hues. Once the coloring was done, I carefully cut the image out with my scissors.

Since the image had rich and dark colors, I decided on a darker background. I created a standard top-folding A2 card (4 1/4 by 5 1/2") from Some Odd Girl's Black cardstock. While I had my paper trimmer out, I also cut a few panels from Simply Gorjuss patterned paper. The large panel measures 4 by 5 1/4", and the smaller panel measures 3 by 4".

The small panel was blending into the background too much, so I matted it onto a piece of dark purple cardstock and adhered it to the large panel. I tied a black ribbon around the bottom of the card, then adhered the background to the base.

I adhered the girl to the card with foam squares. It needed a little something extra, so I also added 3 paper flowers to the bottom right corner of the panel.

Supplies:
Some Odd Girl Royal stamp
MFT Hybrid Ink in Black Licorice
DoCrafts Simply Gorjuss 6x6 paper pad
Simon Says Stamp Heavyweight Cardstock in black
Avery Elle Heavuweight cardstock in Sugar Plum
Black Ribbon
Prima Flowers paper flowers
Copic Mini Marker Paper 70lbs
Scrapbook Adhesives 3D foam squares
Copics: Skin (E00, E11, E13, E15, R20, R22, 0), Eyes (BG11, BG32, BG49), Lips (R35), Hair (E23, E25, E27, E29), Gloves/shoes (B000), Dress (BV11, BV13, BV17, BV29)