Everyone loves a cute kitten, right?
Thanks for reading!
~Elle~
Showing posts with label Paper Smooches. Show all posts
Tuesday, November 19, 2019
Sunday, November 17, 2019
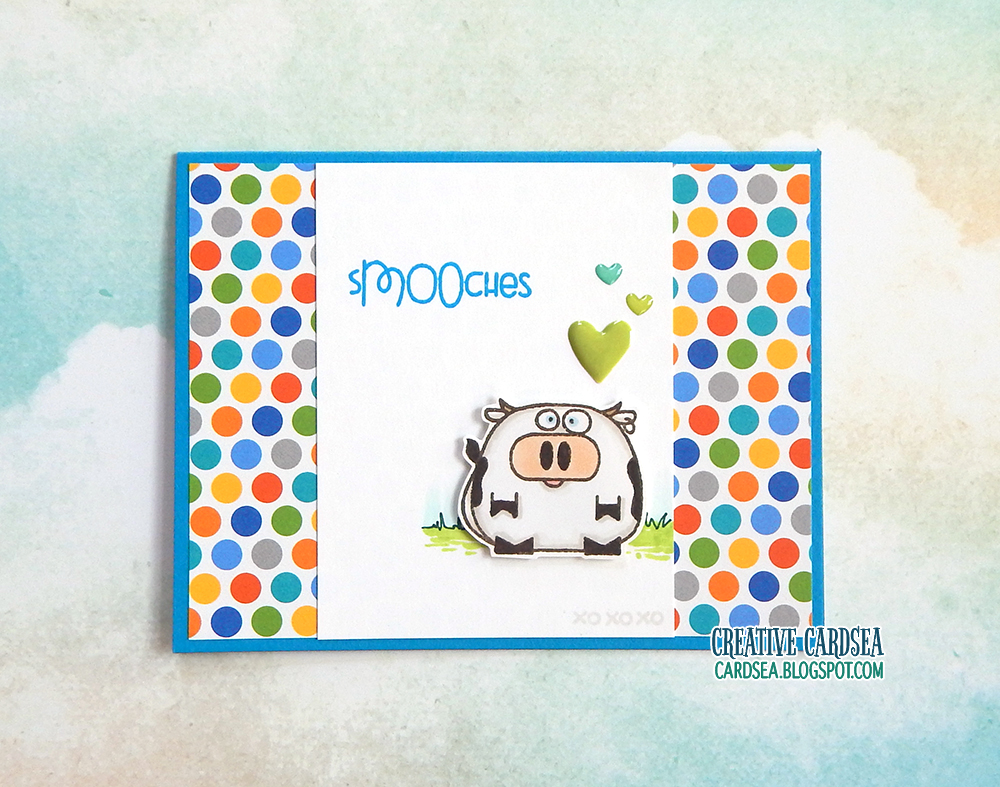
Smoooooches
While making this card, I imagined the cow saying "Smooooooches" and it cracked me up. I love a pun (or ten).
Thanks for reading!
~Elle~
Thanks for reading!
~Elle~
Monday, October 28, 2019
Happy Owl
A little fall project with a cute owl from Paper Smooches. I used a patterned paper scrap, too - happy to find more use for those 6x6 strips of paper I have so many of.
Thanks for reading!
~Elle~
Thanks for reading!
~Elle~
Friday, June 21, 2019
Hey Chickie Friday!
It's Friday! And I'm sharing the final card in the patterned paper CAS challenge. Once again, quirky Paper Smooches chickie is adorable and the sentiment and font just works perfectly. I played with some contrasting colors here, and I like the bright palette look of the card.
~Elle~
~Elle~
Wednesday, June 19, 2019
Let's Play!
Next up, we have this cute and playful pup from Paper Smooches. Paper Smooches was one of the first companies I bought stamps from when I first started card-making, and I still absolutely adore their quirky and fun style.
~Elle~
~Elle~
Tuesday, December 11, 2018
Thank you Deer
Thank you card #1 is a mini scene with distress oxide inks and a lovely deer from Memory Box. I like how it turned out.
Thanks for reading!
~Elle~
Thanks for reading!
~Elle~
Thursday, December 6, 2018
Merry Christmas, Dude!
Today's card is a masculine card with a fresh and frosty palette. I love the skiing bears from My Favorite Things for guy cards - that extreme sport element is always fun, but the bear adds a bit of cuteness too. A quirky sentiment from Paper Smooches ties everything together.
Thanks for reading!
~Elle~
Thanks for reading!
~Elle~
Tuesday, November 6, 2018
Pink Rock
Today, I'm sharing another fun and girly card - though with a palette swap, this could easily be a boy card. I love the little rocking critters from Mama Elephant and I'm happy to use them on another card. The sentiment from Paper Smooches fits just perfectly, doesn't it?
Thanks for reading.
~Elle~
Thanks for reading.
~Elle~
Labels:
animal,
girl,
Mama Elephant,
music,
Paper Smooches,
pink
Sunday, November 4, 2018
Peachy Note
I'm still a little obsessed with stickers and that yellow-to-peach gradient, so I thought I would put them together on a fun not-a-summer card. I really like how it turned out and how happy the palette is. It reminds me of a paper pad I bought ages ago that had this lovely palette and some office elements (like pushpins and paper clips).
Thanks for taking a look!
~Elle~
Thanks for taking a look!
~Elle~
Friday, November 2, 2018
Purple Hugs
For today's card, I decided to play around with creating an artistic background. I have a watercolor texture stamp and a splatter stamp that work really great together. I can use my dye inks and have absolute control over how the background looks - yet still keep that messy artistic look.
Thanks for reading!
~Elle~
Thanks for reading!
~Elle~
Wednesday, October 17, 2018
Appreciated
I've been going through my stamp stash and pulling out different stamps I want to use. There's a lot of stamps I want to use and a lot of them that I absolutely adore. I'm thinking of starting a little series where I go over some of my favorites and why they're my favorites, but I don't know how entertaining that would be to read.
For today's card, I whipped up something really simple and autumnal. It think it turned out sweet.
Thanks for reading!
~Elle~
Saturday, June 30, 2018
Suns(hi)ne
It just wouldn't be a unicorn card if I didn't try for a pink creation. With the scalloped border and plentiful hearts, this turned into a very girly and cute little card.
Thanks for reading,
~Elle~
Thanks for reading,
~Elle~
Friday, June 15, 2018
Sunshine and Rainbows
I've been reorganizing my stamps (again), and I came across this fun stamp from Paper Smooches. I got this set back in September of 2014 and somehow I'd never gotten around to inking it up - which, of course, is something that needs to be remedied immediately.
I paired the unicorn with a fun hexagon patterned paper and a few enamel dots.
Thanks for reading!
~Elle~
I paired the unicorn with a fun hexagon patterned paper and a few enamel dots.
Thanks for reading!
~Elle~
Monday, March 16, 2015
PS - Healthy Vibes
It's been a while since I've used a Paper Smooches stamp. And it's not because I've suddenly developed a dislike for them. I think they're just as adorable and as quirky as ever. But for some reason, I kept feeling drawn to other stamps over the past few months.
I had a friend who fell ill recently, and I wanted to make a card for her. So, I pulled out my teeny (compared to other stamps, anyway) collection of get-well stamps and found Paper Smooches' First Aid Kit stamp. I thought it would be perfect for a cheery get-well card.
I stamped and colored the ambulance with my Copics, using the classic white and red palette. I liked the combination of white and red, so I thought I'd echo it in the rest of the card. I used the Borders 1 die to cut a white stitched rectangle, and put some dimension in the card with foam squares.
The rest of the card is really simple. I used a light blue paper to create a border, so the front panel wouldn't blend in with the card base. And I scattered a few enamel dots for fun.
Since the challenge for PS - Sparks this week is Anything Goes, I'm going to go ahead and enter there.
Supplies:
Paper Smooches - First Aid Kit stamp
Paper Smooches - Borders 1 die
Neenah Solar White #80lbs
My Favorite Things - Blueprints 13 die
Mama Elephant - Femme Frames die
My Favorite Things - Hybrid Inkpad in Black Licorice
Patterned Paper
Copics
I had a friend who fell ill recently, and I wanted to make a card for her. So, I pulled out my teeny (compared to other stamps, anyway) collection of get-well stamps and found Paper Smooches' First Aid Kit stamp. I thought it would be perfect for a cheery get-well card.
I stamped and colored the ambulance with my Copics, using the classic white and red palette. I liked the combination of white and red, so I thought I'd echo it in the rest of the card. I used the Borders 1 die to cut a white stitched rectangle, and put some dimension in the card with foam squares.
The rest of the card is really simple. I used a light blue paper to create a border, so the front panel wouldn't blend in with the card base. And I scattered a few enamel dots for fun.
Since the challenge for PS - Sparks this week is Anything Goes, I'm going to go ahead and enter there.
Supplies:
Paper Smooches - First Aid Kit stamp
Paper Smooches - Borders 1 die
Neenah Solar White #80lbs
My Favorite Things - Blueprints 13 die
Mama Elephant - Femme Frames die
My Favorite Things - Hybrid Inkpad in Black Licorice
Patterned Paper
Copics
Monday, September 1, 2014
Paper Smooches - Welcome Autumn
This week's Paper Smooches SPARKS challenge is Anything Goes, so I took that as an opportunity to make a fun autumn card. I've been meaning to use the fun Paper Smooches Autumn Groves stamp set for ages now, but I kept getting distracted. With this card, I'm also trying out a new coloring medium - colored pencils.
I started by cutting a piece of white cardstock to measure 3 3/4 by 5 1/4". I used chocolate brown ink to stamp the scarecrow, pumpkin, two apples and the leaves, along with stitched trails. I then used my new Prismacolor pencils to color in the image. I only got a small set of pencils, so I used a combination of colors to add depth to the image. I tried not to blend the colors in completely, leaving a bit of pencil texture.
After everything was colored in, I masked off the images and grabbed a paintbrush and a couple of distress markers. Using Vintage Photo and Spiced Marmalade, I created a bunch of splatter dots on the right side of the card. Once the splatter was dry, I stamped the Welcome Autumn sentiment from Autumn Groves in brown ink.
For embellishments, I turned to my Pretty Pink Posh stash. I started by tying some brown ruffle ribbon around the top of the panel. I love this ribbon, and I've been coveting it since I got it, but I think it fits perfectly with the card. I used a simple knot and trimmed the ends.
Then I added some sequins! I used Pretty Pink Posh's Tangerine (in 6mm), Marigold (in 6mm) and Mossy Green (in 4mm) along with Ranger Studio Multi-Matte glue.
I found some fun plaid paper in Webster's Pages Happy Camper paper pad. I used Mama Elephant's Femme Frames to cut a scalloped panel out. For the card base, I cut a sheet of brick red cardstock in half, and scored it for a standard A2 card. I adhered the patterned paper at the bottom, then adhered the main panel.
Supplies:
Paper Smooches Autumn Groves stamp set
My Favorite Things Hybrid Ink in Chocolate Brown
Prismacolor Pencils
Neenah Solar White 80lbs cardstock
My Favorite Things Heavyweight cardstock in Brick Red
Webster's Pages Happy Camper 6x6 patterned paper
Mama Elephant Femme Frames dies
Distress Markers in Vintage Photo and Spiced Marmalade
Pretty Pink Posh brown ruffle ribbon
Pretty Pink Posh sequins in Tangerine (6mm), Marigold (6mm) and Mossy Green (6mm)
Ranger Studio Multi-Matte glue
Tombow Dot Runner Adhesive (pink)
I started by cutting a piece of white cardstock to measure 3 3/4 by 5 1/4". I used chocolate brown ink to stamp the scarecrow, pumpkin, two apples and the leaves, along with stitched trails. I then used my new Prismacolor pencils to color in the image. I only got a small set of pencils, so I used a combination of colors to add depth to the image. I tried not to blend the colors in completely, leaving a bit of pencil texture.
After everything was colored in, I masked off the images and grabbed a paintbrush and a couple of distress markers. Using Vintage Photo and Spiced Marmalade, I created a bunch of splatter dots on the right side of the card. Once the splatter was dry, I stamped the Welcome Autumn sentiment from Autumn Groves in brown ink.
For embellishments, I turned to my Pretty Pink Posh stash. I started by tying some brown ruffle ribbon around the top of the panel. I love this ribbon, and I've been coveting it since I got it, but I think it fits perfectly with the card. I used a simple knot and trimmed the ends.
Then I added some sequins! I used Pretty Pink Posh's Tangerine (in 6mm), Marigold (in 6mm) and Mossy Green (in 4mm) along with Ranger Studio Multi-Matte glue.
I found some fun plaid paper in Webster's Pages Happy Camper paper pad. I used Mama Elephant's Femme Frames to cut a scalloped panel out. For the card base, I cut a sheet of brick red cardstock in half, and scored it for a standard A2 card. I adhered the patterned paper at the bottom, then adhered the main panel.
Supplies:
Paper Smooches Autumn Groves stamp set
My Favorite Things Hybrid Ink in Chocolate Brown
Prismacolor Pencils
Neenah Solar White 80lbs cardstock
My Favorite Things Heavyweight cardstock in Brick Red
Webster's Pages Happy Camper 6x6 patterned paper
Mama Elephant Femme Frames dies
Distress Markers in Vintage Photo and Spiced Marmalade
Pretty Pink Posh brown ruffle ribbon
Pretty Pink Posh sequins in Tangerine (6mm), Marigold (6mm) and Mossy Green (6mm)
Ranger Studio Multi-Matte glue
Tombow Dot Runner Adhesive (pink)
Monday, August 25, 2014
Blog Hop: Warm Wishes Coffee
This card is my second entry to Pretty Pink Posh's Cutting Edge blog hop.
For this card, I decided to use the Hot Concoctions set by Paper Smooches, as well as a few fun dies. I stamped the coffee cup twice onto some Copic marker paper, and colored them in with my Copics. I also stamped out a couple of hearts and colored them in as well. I carefully cut them out and set them aside while I worked on the rest of the card.
The first step was to make a watercolor background. I wanted it to look a bit like the paper was coffee-stained. So, I used the Brushed Corduroy distress marker to create a warm brown-toned wash on some watercolor paper. While it was still wet, I made some splatters with a brush, using Gathered Twigs distress marker for color. This created soft and diffused texture you see in the upper left of the panel. I wanted to make sure there were some detailed drops, as well. I waited for the background to dry, then I splattered some more drops of Gathered Twigs. Then I set it aside to dry completely.
It was time to have fun with dies! I started by grabbing My Favorite Things' Blueprints 13, Mama Elephant's Femme Frames and Pretty Pink Posh's newest Stitched Duo II dies. The awesome thing about all 3 of these dies is that they each make a stitched rectangle of a different size, and they nest together just perfectly!
I cut the biggest panel with Blueprints 13 out of brown cardstock. For the medium panel, I used Femme Frames and a piece of patterned paper. Lastly, I cut a panel from the watercolor background with the rectangle from the Stitched Duo II dies.
Before assembling the card, I adhered the two coffee cups and hearts with Tombow Mono-Multi glue. I also drew in a couple teeny hearts under the red heart. I stamped some curly steam as well as the sentiment in brown ink. Then, I put the card together. I used a combination of my standard dot adhesive and foam tape.
Once all the layers were ready, I adhered it to a white standard top-folding A2 card (4 1/4 by 5 1/2").
Supplies:
Paper Smooches Hot Concoctions
My Favorite Things Hybrid Ink in Black Licorice
My Favorite Things Blueprints 13 dies
Mama Elephant Femme Frames dies
Pretty Pink Posh Stitched Duo II dies
Stampin' Up Classic Inkpad in Baked Brown Sugar
Stampin' Up Cardstock in Baked Brown Sugar
Neenah Solar White 110#lbs Cardstock (base)
Stampin' Up Retro Fresh Designer Paper
Tim Holtz Distress Watercolor Paper
Copics (E81, E42, E35, E37, E29, G12, G24, YG63)
Distress Markers in Brushed Corduroy and Gathered Twigs
Tombow Mono-Multi Liquid glue
Tombow Dot Adhesive (pink)
3M Double-Sided Foam Tape (permanent)
For this card, I decided to use the Hot Concoctions set by Paper Smooches, as well as a few fun dies. I stamped the coffee cup twice onto some Copic marker paper, and colored them in with my Copics. I also stamped out a couple of hearts and colored them in as well. I carefully cut them out and set them aside while I worked on the rest of the card.
The first step was to make a watercolor background. I wanted it to look a bit like the paper was coffee-stained. So, I used the Brushed Corduroy distress marker to create a warm brown-toned wash on some watercolor paper. While it was still wet, I made some splatters with a brush, using Gathered Twigs distress marker for color. This created soft and diffused texture you see in the upper left of the panel. I wanted to make sure there were some detailed drops, as well. I waited for the background to dry, then I splattered some more drops of Gathered Twigs. Then I set it aside to dry completely.
It was time to have fun with dies! I started by grabbing My Favorite Things' Blueprints 13, Mama Elephant's Femme Frames and Pretty Pink Posh's newest Stitched Duo II dies. The awesome thing about all 3 of these dies is that they each make a stitched rectangle of a different size, and they nest together just perfectly!
I cut the biggest panel with Blueprints 13 out of brown cardstock. For the medium panel, I used Femme Frames and a piece of patterned paper. Lastly, I cut a panel from the watercolor background with the rectangle from the Stitched Duo II dies.
Before assembling the card, I adhered the two coffee cups and hearts with Tombow Mono-Multi glue. I also drew in a couple teeny hearts under the red heart. I stamped some curly steam as well as the sentiment in brown ink. Then, I put the card together. I used a combination of my standard dot adhesive and foam tape.
Once all the layers were ready, I adhered it to a white standard top-folding A2 card (4 1/4 by 5 1/2").
Supplies:
Paper Smooches Hot Concoctions
My Favorite Things Hybrid Ink in Black Licorice
My Favorite Things Blueprints 13 dies
Mama Elephant Femme Frames dies
Pretty Pink Posh Stitched Duo II dies
Stampin' Up Classic Inkpad in Baked Brown Sugar
Stampin' Up Cardstock in Baked Brown Sugar
Neenah Solar White 110#lbs Cardstock (base)
Stampin' Up Retro Fresh Designer Paper
Tim Holtz Distress Watercolor Paper
Copics (E81, E42, E35, E37, E29, G12, G24, YG63)
Distress Markers in Brushed Corduroy and Gathered Twigs
Tombow Mono-Multi Liquid glue
Tombow Dot Adhesive (pink)
3M Double-Sided Foam Tape (permanent)
Sunday, May 25, 2014
PS- Congrats
This week is another designer drafts sketch challenge on SPARKS, and the sketch inspired me to make a graduation card. I've only ever made one graduation card and it was very feminine and specific for the recipient. So, I wanted to challenge myself to make a more general card.
I started with picking out a fun star patterned paper from Fancy Pants Memories Captured. I die-cut it with Paper Smooches Borders I die. I also die-cut a circle from plain white cardstock. While I had my Bigshot out, I also die-cut congratulations from Paper Smooches Congratulations die.
For the background, I cut a piece of light-gray cardstock to 4x5.25 and adhered it to my card base. I adhered the white circle, then layered the star panel over it. I cut a strip of stripped yellow paper and adhered it to the star panel.
I cut apart the Congratulations letters and shortened it to say "Congrats". I glued it to the circle with a glue pen. As a last touch, I stamped a few solid stars.
Voila! Simple grad card is done.
Supplies:
Base: Simon Says Stamp White Woodgrain card stock
Paper: Bazzill Taffy card stock (panel), Fancy Pants Memories Captured 6x6, Lawn Fawn Let's Polka 6x6
Dies: Paper Smooches Borders I, Paper Smooches Congratulations, Sizzix Circles
Stamp: Paper Smooches Space Cadet
Ink: MFT Hybrid Ink in black licorice
Tombow Mono Glue Pen
I started with picking out a fun star patterned paper from Fancy Pants Memories Captured. I die-cut it with Paper Smooches Borders I die. I also die-cut a circle from plain white cardstock. While I had my Bigshot out, I also die-cut congratulations from Paper Smooches Congratulations die.
For the background, I cut a piece of light-gray cardstock to 4x5.25 and adhered it to my card base. I adhered the white circle, then layered the star panel over it. I cut a strip of stripped yellow paper and adhered it to the star panel.
I cut apart the Congratulations letters and shortened it to say "Congrats". I glued it to the circle with a glue pen. As a last touch, I stamped a few solid stars.
Voila! Simple grad card is done.
Supplies:
Base: Simon Says Stamp White Woodgrain card stock
Paper: Bazzill Taffy card stock (panel), Fancy Pants Memories Captured 6x6, Lawn Fawn Let's Polka 6x6
Dies: Paper Smooches Borders I, Paper Smooches Congratulations, Sizzix Circles
Stamp: Paper Smooches Space Cadet
Ink: MFT Hybrid Ink in black licorice
Tombow Mono Glue Pen
Sunday, May 18, 2014
PS- Kitchen Thanks
One of the things I remember most vividly about my childhood kitchen is that my mom had a teapot that was bright red with white polka dots. She would use it to warm up milk for hot cocoa or boil water for Chamomile tea we had every Sunday for breakfast. We lost that red teapot in one of our many moves, but it still remains one of those iconic images of my childhood.
I fell in love with Paper Smooches' Kitschy Kitchen stamp set as soon as it was announced. There are many adorable pieces to the set and I just had to have it. And the free TAM stamp Recipe for Success that came with my order was a perfect companion.
For this card, I kept things really simple. I didn't want any embellishments or complicated techniques, so I focused on keeping the card clean and clear.
I started by grabbing a piece of patterned paper from Carta Bella's Homemade With Love paper pack. This paper pack has the retro kitchen feel and it fits amazingly with the Kitschy Kitchen stamp set. I cut the paper to 4x5.25 and adhered it to the base. I die-cut a piece of white cardstock and added it to the middle of the card.
I stamped a few of the kitchen elements and colored them in using my Copics. I layered them onto the two opposite edges of the sentiment panel.
Lastly, I stamped the sentiment in the middle.
Since the theme for this week's SPARKS challenge is anything goes, I'm entering this card into the challenge.
Supplies:
Stamps: Paper Smooches Kitschy Kitchen, Paper Smooches Recipe for Success (sentiment)
Ink: MFT Hybrid Ink in Black Licorice
Base: MFT Primitive Cream Card Stock
Paper: Carta Bella Homemade With Love, Bazzill Marshmallow (sentiment panel)
Die: Spellbinders Nestabilities Dies Labels 18
Copics: Teapot (R08, R46, R59), Bowl (R46, R59, G67, B000, B91), Toaster (W2, W4, W6), Rolling Pin (E11, E23, E35)
Scrapbook Adhesives Foam Squares
I fell in love with Paper Smooches' Kitschy Kitchen stamp set as soon as it was announced. There are many adorable pieces to the set and I just had to have it. And the free TAM stamp Recipe for Success that came with my order was a perfect companion.
For this card, I kept things really simple. I didn't want any embellishments or complicated techniques, so I focused on keeping the card clean and clear.
I started by grabbing a piece of patterned paper from Carta Bella's Homemade With Love paper pack. This paper pack has the retro kitchen feel and it fits amazingly with the Kitschy Kitchen stamp set. I cut the paper to 4x5.25 and adhered it to the base. I die-cut a piece of white cardstock and added it to the middle of the card.
I stamped a few of the kitchen elements and colored them in using my Copics. I layered them onto the two opposite edges of the sentiment panel.
Lastly, I stamped the sentiment in the middle.
Since the theme for this week's SPARKS challenge is anything goes, I'm entering this card into the challenge.
Supplies:
Stamps: Paper Smooches Kitschy Kitchen, Paper Smooches Recipe for Success (sentiment)
Ink: MFT Hybrid Ink in Black Licorice
Base: MFT Primitive Cream Card Stock
Paper: Carta Bella Homemade With Love, Bazzill Marshmallow (sentiment panel)
Die: Spellbinders Nestabilities Dies Labels 18
Copics: Teapot (R08, R46, R59), Bowl (R46, R59, G67, B000, B91), Toaster (W2, W4, W6), Rolling Pin (E11, E23, E35)
Scrapbook Adhesives Foam Squares
Sunday, May 11, 2014
PS- Thanks Teacher
As the school year is slowly coming to a close, I find myself with the need to make quite a few thank you cards for teachers. I'd actually bought several stamp sets throughout the year so I could have a nice variety of cards to send out, and it's time to pull them out and get creative!
For this card, I went with Paper Smooches' Smarty Pants set. I love how the professor in that set looks, so I stamped him and colored him in with my Copic markers. Then, I layered a few book stacks together and stamped an apple on top. I chose different bright colors for the books and red for the apple.
After I carefully cut the stamped pieces out, I got to work on the background. I pulled out the Simple Stories Smarty Pants 6x6 paper pad and took out a few of the fun patterns. First, I adhered a piece of green paper to the base. Then I created the center panel by adhering the white lined paper to the orange at an angle, and cut off the excess.
I adhered the professor and the book stacks and added a simple white rectangle at the top with the greeting. As a last touch, I added a couple of red enamel dots. And voila! Simple teacher card. :)
Paper Smooches is currently holding a guest designer search, so I'll be entering this card. I don't think I can really compare to the amazing talent that's out there, but it'll be nice to get a tiny bit more exposure and maybe meet another crafty friend or two. :)
Supplies:
Stamp: Paper Smooches Smarty Pants
Ink: MFT Hybrid Ink in Licorice Black
Base: Neenah Desert Storm 80lbs
Paper: Simple Stories Smarty Pants 6x6
Copics: Professor (E00, E11, E13, E15, B000, W2, B91, B95, G21, E15, E18), Books (Y15, G21, BG01, YR15, B05, R55, YG67, R29, E35, W2), Apple (R08, R46, R89, G67)
For this card, I went with Paper Smooches' Smarty Pants set. I love how the professor in that set looks, so I stamped him and colored him in with my Copic markers. Then, I layered a few book stacks together and stamped an apple on top. I chose different bright colors for the books and red for the apple.
After I carefully cut the stamped pieces out, I got to work on the background. I pulled out the Simple Stories Smarty Pants 6x6 paper pad and took out a few of the fun patterns. First, I adhered a piece of green paper to the base. Then I created the center panel by adhering the white lined paper to the orange at an angle, and cut off the excess.
I adhered the professor and the book stacks and added a simple white rectangle at the top with the greeting. As a last touch, I added a couple of red enamel dots. And voila! Simple teacher card. :)
Paper Smooches is currently holding a guest designer search, so I'll be entering this card. I don't think I can really compare to the amazing talent that's out there, but it'll be nice to get a tiny bit more exposure and maybe meet another crafty friend or two. :)
Supplies:
Stamp: Paper Smooches Smarty Pants
Ink: MFT Hybrid Ink in Licorice Black
Base: Neenah Desert Storm 80lbs
Paper: Simple Stories Smarty Pants 6x6
Copics: Professor (E00, E11, E13, E15, B000, W2, B91, B95, G21, E15, E18), Books (Y15, G21, BG01, YR15, B05, R55, YG67, R29, E35, W2), Apple (R08, R46, R89, G67)
Tuesday, April 29, 2014
PS - What's Up?
This is the 5th and last card in my masculine card series.
I created this card especially for the current Sparks challenge, which is based on this sketch:
Challenges are a fantastic way to get more experience with making cards that fit a specific theme. Not only do you get to be creative with the stamps you own, but you also have a chance to be inspired by other participants.
Now onto the card itself...
I started by inking up the astronaut, planets and the alien spaceship from Paper Smooches Space Cadet and stamped it on some white Copic marker blending paper. I colored them in using my Copics and carefully cut them out. I cut a piece of patterned paper to 4x5.5" and adhered it to the card base.
For the rocket, I first die-cut a tag from light gray cardstock. I trimmed it to measure about 3 inches. Then, I cut a circle from a darker gray cardstock and glued it to the straight edge of the tag. I cut 2 dark grey triangles and glued them to the sides of the rocket.
The rocket looked too plain, so I used my Copics to add a bit more color, texture and some shading. I drew a few highlights with a white gel pen. Then, I attached a few pieces of red, orange and yellow ribbon to the rocket tail. I used a piece of red and white twine to keep the ribbon together.
After adhering all the elements to the card, I embossed a simple greeting with silver embossing powder. However, because of the star patter on the paper, it was getting lost. So, I outlined it in white gel pen and added a small black shadow under the letters.
Supplies:
Stamps: Paper Smooches Space Cadet, Paper Smooches Good Gab (sentiment)
Ink: Memento Tuxedo Black, Versamark Water Resist
Embossing: Ranger Super Fine Embossing Powder in Silver
Cardstock: Bazzill Marshmallow (base), Bazzill Rock Candy, Bazzill Taffy
Copics: Rocket (W2, W4, W6, B45, B99), Astronaut (W2, W4, W6, W8, B45, B99, R08, R59), Planets (B00, BG01, BG45, G21, G67, BG11, BG32, V12, V06, R46, R59, Y35, YR15, YR68), Alien (B00, BG01, B45, YG00, YG06, G07, W2, W4, @6, Y35, YR15, YR68)
Ribbon & Bakers' Twine
White Gel Pen
I created this card especially for the current Sparks challenge, which is based on this sketch:
Challenges are a fantastic way to get more experience with making cards that fit a specific theme. Not only do you get to be creative with the stamps you own, but you also have a chance to be inspired by other participants.
Now onto the card itself...
I started by inking up the astronaut, planets and the alien spaceship from Paper Smooches Space Cadet and stamped it on some white Copic marker blending paper. I colored them in using my Copics and carefully cut them out. I cut a piece of patterned paper to 4x5.5" and adhered it to the card base.
For the rocket, I first die-cut a tag from light gray cardstock. I trimmed it to measure about 3 inches. Then, I cut a circle from a darker gray cardstock and glued it to the straight edge of the tag. I cut 2 dark grey triangles and glued them to the sides of the rocket.
The rocket looked too plain, so I used my Copics to add a bit more color, texture and some shading. I drew a few highlights with a white gel pen. Then, I attached a few pieces of red, orange and yellow ribbon to the rocket tail. I used a piece of red and white twine to keep the ribbon together.
After adhering all the elements to the card, I embossed a simple greeting with silver embossing powder. However, because of the star patter on the paper, it was getting lost. So, I outlined it in white gel pen and added a small black shadow under the letters.
Supplies:
Stamps: Paper Smooches Space Cadet, Paper Smooches Good Gab (sentiment)
Ink: Memento Tuxedo Black, Versamark Water Resist
Embossing: Ranger Super Fine Embossing Powder in Silver
Cardstock: Bazzill Marshmallow (base), Bazzill Rock Candy, Bazzill Taffy
Copics: Rocket (W2, W4, W6, B45, B99), Astronaut (W2, W4, W6, W8, B45, B99, R08, R59), Planets (B00, BG01, BG45, G21, G67, BG11, BG32, V12, V06, R46, R59, Y35, YR15, YR68), Alien (B00, BG01, B45, YG00, YG06, G07, W2, W4, @6, Y35, YR15, YR68)
Ribbon & Bakers' Twine
White Gel Pen
Subscribe to:
Posts (Atom)