Showing posts with label card-making basics. Show all posts

Sunday, July 19, 2015

Chatty Sunday: Choosing Patterned Paper

Warning! Rambling long post ahead! For the tl;dr version, head down to Paper Checklist.

My wonderful friend Ka (check out her blog here!) left a question on my last post about how I choose what patterned paper to buy. And at first, I started answering in a comment, but as the reply started getting longer, I thought I'd better turn it into a proper blog post. Since it's chatty Sunday, it's a perfect time to jump into it!

First I have to disclose that I have a lot of patterned paper - and when I say a lot, I really mean a lot. Patterned paper is my favorite supply (even more than stamps!) and I've often put a stamp set back in favor of 2-3 patterned paper packs while doing my crafty shopping. All this has resulted in a very hefty patterned paper stash, with what I semi-jokingly refer to as my "towers of paper".

Now, I'm not saying that everyone needs a huge collection of paper like I do, but I very quickly learned that patterned paper really inspires me. The colors and the patterns make me want to get creative and get me thinking about new and unique ways to use it. I also notice patterned paper on other card-makers' cards and I'm especially drawn to cards that incorporate patterned paper. So, for me, patterned paper is an essential supply and I like having a lot of choices. I also happen to have room to store it, which is one thing that I know some crafters struggle with.

If you are short on space to store paper, I still encourage you to get a small selection of paper to use and play with. You may find yourself more careful about what paper to buy, but I firmly believe everyone needs at least 2-3 patterned paper packs in their stash.

A few months ago, I had a chance to re-organize my crafty supply stash and I paid a lot of attention to the paper. Being able to look at everything at once made a lot of things click for me and the result is that I've gotten a lot smarter at buying - and using! - my paper. So, I'm happy to share my experience with you and hopefully it will help out.

I first started buying paper when I got into card-making about 2 years ago. My early purchases included a couple of really large 'best of' 12x12" collection packs from K&Company - one was 365 paper collection, and the other was the Brenda Walton collection. At the time, they seemed like an incredible value - hundreds of papers at a fraction of the cost. But I quickly learned that they weren't great for card-making. The majority of the patterns were things I didn't really care for or see myself using. Of the patterns I did like, a lot were too large for the kind of cards I was creating. So, I put those packs into crafty storage and started buying 6x6 paper pads. In time, I found a few projects the big papers will be useful for (art journaling, altering projects, decoupage, etc). However, they taught me an important lesson: Quantity is not as important as quality. This is a lesson I learned pretty quickly - especially when it comes to crafty tools and essentials - but it's one I continue to remind myself of.

My foray into 6x6 papers started with shopping for bargains. I bought a lot of paper on sale in various stores and online shops. This seemed like a fantastic idea for someone on a budget, and I got quite a bit of fun papers this way. Since I was still trying to work out what kind of style I wanted for my cards, having a large variety of papers was amazing. However, I started to notice that I just did not use the paper. I did not want to use the paper I loved the most, and I saved it forever. But what started to happen was that, over time, I was less and less excited about the paper I really loved until it eventually stopped being inspiring altogether. Some of that had to do with my style evolving and changing over time. But at the core of it was the fact that I simply bought better and more exciting paper down the line. So, cue lesson #2: You will outgrow your supplies and there will always be more to inspire you. This is another lesson that I am still learning, and it has been radically changing the way I craft and shop for crafty supplies.

It was at this point that I started to really organize my crafty supply and start keeping track of what I was buying and using. I noticed that a lot of papers that inspired me the most came from specific lines and manufacturers (ex. Echo Park, Dear Lizzy, Fancy Pants, Pebbles, etc). So, I narrowed down to buying new paper pads from those manufacturers only, and this resulted in a ton of papers that I loved and found useable. However, the problem was that I was still buying a lot of paper and not using it as quickly as I was buying it. And while I liked the majority of the paper lines, there were still an odd paper pad or two that were a big challenge to use. My lesson #3 was: You don't need to buy everything your favorite manufacturer releases. This lesson in particular is something I'm working through right now and trying to apply to other crafty supplies.

So, after reorganizing my supplies (again), I've come up with a little check-list to use when buying patterned paper. I've been following this list for the past 6+ months and every single paper pad I've bought in that time frame has been filled with papers I've used and can continue to use. It works for me, and hopefully it will give you some ideas of how you can make it work for you.

Paper Checklist
  •  Does it have at least 2 papers I absolutely adore? -- If seeing the paper makes me happy or makes me feel like creating something, it's worth buying.
  •  Does it have at least 2-4 basics/classics? --  Polka dots, stripes and solids never go out of style. Make sure that your paper pad has a selection of these as it will make the pad easier to use by itself or in combination with other paper pads.
  •  Can I think of at least 3 cards (layouts, themes, etc) I can make with this? -- Inspiration is great, but I need to be practical. If I can't think of at least 3 projects or unique ideas when I look at the paper, then it's not something I just have to have. This is particularly important for paper pads with unique themes, such as a paper line about cooking or a line about Independence Day. Some of those specific themes could prove not to be versatile enough for the majority of your cards, and you'll want to really think before buying them.
  •  Does it go with any of my current paper pads? -- For this question, I mainly look at the colors and illustration style. I have a lot of bright and modern paper, so I know that paper with bright and contrasted colors will probably be easy to use. But I might take a little more care when looking at a vintage paper pad because it might not fit with the rest of my paper stash.
  •  Which 3 stamps could I use with this paper pad? -- This question is probably the most important one. Look closely at your stamp sets and note what style they're in. If you have a lot of cute critters, for example, you might want to stock up on bright paper pads with basic shapes and cute icons. For flower stamps, you might want more classic pads with polka dots and stripes. While your masculine stamps could require a textured industrial feel. There is no paper pad that will have absolutely everything you'll need, so try to pick things that will work with as many other supplies as possible.
The list is, of course, not full-proof. I buy a lot of my paper online and there are cases where the paper pad looks slightly different from the screenshots. There are a few paper pads I've purchased because they looked just perfect on my screen, but turned out to be a lot more muted in person. I've still made them work, but I now try to look for a few cards or YT videos that showcase the paper. A lot of the paper manufacturers have a blog or FB page where they showcase their paper, so make sure you check out their website and social media, too.

Lastly, if you're just not sure where to start or you have a limited storage space, I strongly suggest first stocking up on a few basics. Basic/Classic paper pads stand the test of time and can be used in a large variety of project styles. 

Here are a few of my go-to and favorites for basic packs:
- Lawn Fawn's paper pads - especially Let's Polka line, which features stripes, polka dots and hearts. These papers fit in perfectly with Lawn Fawn stamps and can help you chose bright colors that go with the cute images.
- Avery Elle's paper pads - while these paper pads have colors that match the Avery Elle inks, the main reason I love is because they have some fantastic basic patterns and tone-on-tone looks. If you're not confident in creating your own color combinations, Avery Elle's packs come in a 4-color palette that fits together. So, you end up with 4 colors that you can use as a launching point to picking your own card palette.
-  Simple Stories Color Vibe 2 - this pad has a very large variety of colors, which makes it a great staple paper pad for your stash. The patterns are very simple and easy to use, so if you can get only one paper pad, go with this one.
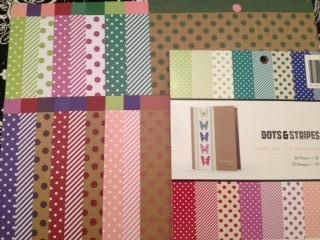
- Echo Parks Dots and Stripes - this particular line of Echo Park paper pads features the classic patterns in a variety of colors. The nice thing is that the pads are divided by color range, such as pinks and browns for baby girl cards or teals and greens for baby boy cards.

 And, of course, I just had to share a few of my current favorite pads:
- Echo Parks Pirate's Life 6x6 - this paper line has super cute illustrations and I love the nautical theme.
- Pebbles Inc. Fun In The Sun 6x6 -  this line has bright and cheerful colors, modern design and a variety of classic patterns such as stripes, waves and gingham.
- Pebbles Inc. Cottage Living 6x6 - this line features some of my favorite color tones: peach, pink, mint and black. It also has several classic geometric shapes that make for a great background. 
- Authentique Radiant 6x6 - this line is a bit brighter in person than it looks online, but it has lovely warm tones and a great combination of colors. 
- Simple Stories Homespun 6x6 - the colors in this line are a bit more muted and features some fun and unique patterns. It's a good choice when you want to have brighter colors, but a cream background or less contrast than stark white.

Thanks for hanging in there with me through this massive post! There was just so much info to share. Hopefully, it will be useful to some of you out there. Have a creative day!
~Elle~

Monday, July 28, 2014

Basic Card

As I approach my one-year anniversary in card-making, I wanted to write something for those of you who are just starting out - or thinking about getting into card-making. I've got a few posts now about the different tools and supplies, but I've never written a post about the process itself. True, my regular card posts outline the steps (and I hope dearly those are not boring and annoying to read!), but they all operate under the assumption you're familiar with the tools and basic techniques.

So, I thought I'd walk you through a process of making a card and maybe go over a few tips or tricks that could be helpful.

This is the card we're going to end up with. It's very simple and easy to reproduce, and - most importantly - it doesn't use a million supplies and techniques.

The first step with this card was choosing a focal image. Now, I normally stamp an image and then color it in with Copics or watercolor, but coloring is not always easy to get into. I'm lucky in that my current job has me creating art, so I was able to skip over a lot of the basics of coloring and just focus on techniques using the particular coloring tools. But if you've never done art before, it might be a bit more challenging and leave you with a result that you're not happy with.

So, the very first step in choosing that focal image is to get creative. Since I was trying to go simple with this card, I chose a beautiful sticker from Penny Black's Petals and Poetry sticker sheet. The reason I like this particular sticker is because it's fairly large, and it looks like it has texture and detail. This means I could keep the rest of the card simple and focus on the card layout - something that will set your card apart from a random card you find in the grocery aisle.

This is what the full sheet looks like. I chose the flower in the bottom right corner.

Once I had the focal image chosen, I picked out the rest of the supplies:
I chose a piece of Kraft cardstock because the color was close to the brown tones on the sticker. However, I also wanted to draw attention to certain parts of the card (such as the sticker, for example), so I chose a darker navy color, too.

I have two tips that will help you choose colors. The first is to have a selection of neutrals - brown, vanilla/cream, white, grey, black, kraft. Neutral colors go with any other color, so they're a safe combination. They also help with contrast, by either toning it down (example: a soft pink on white) or by increasing it (example: pink on black). The second tip is to grab your favorite paper pack and use it as a palette. Even the bold and bright prints will give you an idea of what tones you can put together. And it's a great bonus if you also happen to use that paper pack and have it match the rest of the card.

Speaking of patterned paper, I chose to go with Pebbles Front Porch 6x6 paper for this card. There's two main reasons why. The first is that the sticker had a soft brown border - which is the same tone I used for choosing the kraft base. The second is that quite a few of the stickers had writing in it, and there was one Front Porch paper that had a dictionary-like print on it, along with a creamy brown tone. It also had a bit of the distressing/texture that the sticker had. So, since many of the small details were the same, I knew it was a good choice for background paper.

The next few things I chose were:
- Foam squares -- because I knew I wanted to use layers, and having that slight bit of elevation would make the card more interesting
- Off-white ribbon and pearls -- because they had a soft antique quality that went with the sticker.

Then I got to work on the card.

I started by creating my base. I cut the sheet of cardstock in half on the long side, so my base measured 4 1/4 by 11". Then I used my Martha Stewart Mini Scoring board to score at 5 1/2" for a standard A2 card.

Since the navy is a strong color, I knew I wanted to use it as an accent - which is easy to do with frames. I cut it to measure 4 by 5 1/4. Then I cut a piece of Front Porch paper to measure 3 3/4 by 5". When I glued them on top of each other, this created a navy border around the paper.

I measured the sticker, then cut another panel that was slightly larger. After placing the sticker on this new panel, however, I realized that the sticker was a bit see-through. I ended up with a result that was darker than how the sticker looked on the sheet. But, I actually liked the deeper color quite a bit. So, it was a happy accident - and those can happen in card-making.

The rest of the card came together very easily. I tied the ribbon around the first panel, then adhered the flower panel with foam squares. Lastly, I added the pearls - just randomly, where it looked good.

At this point, I knew I wanted to add a more customized/personal touch to the card. But it was already done... So, I decided to make a matching tag.

I cut a rectangle out of the craft paper measuring 2" by 3". I rounded the corners at the top with a corner rounder and punched a hole with a hole punch. I layered bits of blue cardstock, patterned paper and a sticker. To match the card, I also added a ribbon and a pearl.

And voila! A simple card and tag.

Hopefully this was useful to someone out there. If so, please let me know in comments. :)

Supplies:
Penny Black Petals and Poetry Sticker
Neenah Desert Storm Environmental Cardstock in 100#lbs
Avery Elle Sapphire Heavyweight Cardstock
Martha Stewart Mini Scoring Board
Pebbles Front Porch 6x6 patterned paper
Melissa Frances Cream Pearls
Schiff satin 1/4" ribbon in Antique White
Scrapbook Adhesives 3D Thin Foam Squares
Tombow Dot Adhesive Runner
EK Success Mini Corner Rounder duo punch
Paper hole punch

Wednesday, January 22, 2014

Tools and Supplies for Beginners (part 3)

This is the last (and final) part of my tools for beginners series.

In the first part, I talked about cardstock, paper trimmers and adhesive. In the second part, I talked about stamps, ink and paper scissors.

7- Score Board
 Like the name implies, a score board makes it easier to score cardstock. You will find this very useful when you're making  and folding your own card bases. It's also useful when you want to create other kinds of paper objects such as decorative boxes that hold your cards or treat boxes.

I recommend Martha Stewart's Mini Score Board. You will generally only need the 6-inch score board for making cards - both because of the general card size, and because 6 inches is very easy to carry and store. The board comes with a bone folder, so you won't have to purchase an extra tool straight away.

I got the large score board as well just in case I wanted to make larger boxes. It happened to be on sale for 75% off, so it was a good deal. But I've yet to use it, so it's mainly just sitting in the back of my crafting closet.

8- Patterned Paper
 Patterned paper is a great way to add color and shape to your card, and it's also one supply that there are a HUGE variety of themes, sources and materials. Some patterned paper you can purchase is thin (like printer paper), while other kinds are thick like cardstock.

Patterned paper also comes in different sizes. You can use 12x12 scrapbooking paper, or buy the smaller 6x6 paper pads (which are cheaper and only require trimming a little). One great thing about 6x6 paper pads is that the patterns are scaled down, so you don't end up with large patterns (though there are times where you might want a larger pattern, too, so check out both 12x12 and 6x6 sizes when buying paper).

My first suggestion for patterned paper is to buy at least one solid "general" pack. This is your base pack that you can use for most occasions. I would recommend the following:
- Polka-dot and stripe paper pad, in various colors: Simple Stories Color Vibe pack
This is my second polka-dot and stripe pad. My favorite pad is the AC: Dots & Stripes 6x6 paper pad that I cannot seem to find online. I bought it at my local Target store, and I continue to buy it any time I see that they have it stocked. Its's a great basic pad with pleasant colors and a combination of white and craft base.
- Christmas-themed paper pad: BasicGrey 25th & Pine 6x6 paper pad
I originally got into card making because I wanted to make some Christmas cards for my family. I try to do something hand-made every year (besides the cookies, of course). I thought I was getting ready for the holidays early, but I quickly learned that Christmas is a HUGE cardmaking holiday, and that Christmas-themed supplies are quick to sell out as early as October. So, you want to have at least one holiday-themed paper pad that you can fall back on for those hand-made Christmas cards.
- One paper pad in your favorite color scheme, pattern or theme: Fancy Pants Memories Captured and Fancy Pants Down By The Shore
Sometimes it's fun to just have pretty paper that you just love and feel inspired by. If you're like me, you'll either buy it and never use it (Down by the Shore) or buy it and use it all the time (Memories Captured). Regardless, it's good to have a paper pad with your favorite things.
 - If you're on a budget, check out the Recollections Bold Basics at your local Michael's

 9- Embellishments
Embellishments are little bits and pieces you can add to a card as decoration. They come in many varieties: from stickers, to twine, to charms and more. And this is not counting some unusual crafty supplies that card makers can use!

The biggest challenge with embellishments is to find ones that match the rest of the card. A lot of companies have embellishments that match the colors and shapes of their paper packs, which is a huge help. But they can get a little pricey, so they're not always an option if you're on a budget.

My suggestion is to pick up a few of the following:
- Ribbon
I can pick up several yards of ribbon for 50 cents at my local craft store, and they have a HUGE variety of colors. A piece of ribbon can make a card pop or add a small feminine touch.
- Buttons
Like ribbon, you can find cheap buttons at the craft store or even at Walmart. I suggest getting a few neutral colors (white, black, brown, grey) at first, then moving onto colors and patterns. Look for button medleys that offer different sizes for the buttons, as this can make them very useful.
- Bakers' Twine
Thinner than ribbon, bakers' twine can add some visual interest to your card. You can also tie it around boxes for easy carrying or simple decoration.

10- Card Kit
I only recently signed up for Simon Says Stamp card kits (this is the current one), but it's been a really fun experience. Monthly card kits are a collection of papers, stamps and embellishments that coordinate together. SSS card kits also come with a few images of finished cards for inspiration. You do have to supply your own glue and ink, but that's usually something you have on hand anyway.

There's two big reasons why a card kit is useful. The first is that it has coordinating supplies. So you know that you will get a card base that matches the patterned paper, which in turn matches the sentiments and/or images from the stamp set.

The second is that it tends to have products you might not have otherwise picked up yourself. For example, January card kit came with these little paper tickets. I probably wouldn't have picked them out, myself, but they turned out to be just what I needed for this card.

There are several companies out there that make card and paper kits, and you might also find card kits in a store. I know Hero Arts has a few adorable card and tag kits, as does American Crafts. If you're just getting into card making and don't have many supplies, a card kit will give you the basic tools you'll need to make some awesome cards.

---
And that ends my supplies for beginners series! Thanks for reading, and hopefully it will help someone out there.

Thursday, December 12, 2013

Learning and Supplies

Although I have not been making cards for very long (I really only started doing it this year), I've discovered a few things that might be helpful to others - especially those of you who are just starting out and not sure what kind of products to get.

The first and the biggest thing I've learned is that you need to shop for quality rather than the price. I've got a huge boxful of things I bought because they were cheaper alternatives or were on sale. I've used some of them a couple of times, and ended up just disappointed. So, now I save up and buy products from brands I like. This is especially important with tools that you will be using again and again (such as stamps, ink, cardstock and glue).

The second thing I learned is that you don't need everything. This might sound like common sense, but bear with me. There's a HUGE variety of things you can get for card making. From materials, to tools, to embellishments. Before I pruned it a bit, my wishlist on Simon Says Stamp's site was over 700 items in size - and that's just the stuff I really really really wanted to get. If I started counting things I just found interesting, that number would be well into thousands. But, at the end of the day, I find myself always first reaching for a few favorites and letting my creativity turn them into things that are interesting and

And the last big thing I learned is that craft supplies are addictive. I'm still struggling with setting up a small budget figure for myself and keeping my purchases under it. But there's always a temptation that's impossible to resist -- a big sale, a brand new product, a better tool, and so on. So, always be prepared to spend just a little more than you intended to.


I was inspired by Jennifer McGuire's series where she talks about her favorite products and tools (you definitely want to check out her My Crafty Things videos, I learned a ton watching those), so I'm going to be starting a small series about my own favorite supplies. Stay tuned, I'm hoping it will be an interesting read.

Oh, and I need to take more pictures. I've been on a card-making spree, but the cards have been slowly sent off as gifts. I still have a few favorites that haven't been sent, so I will try to take photos before they're gone.