Another week has zoomed by, and I've spent almost 0 time in my crafting mode. With the summer here, I'm finding it more and more difficult to set aside time to make cards. Not for a lack of trying, mind you. But sitting down to complete a card is a challenge when I've only got 10 free minutes at the end of the day.
I generally make my cards in one sitting. The exception to this is coloring stamps - I will color a bunch of images at once and fussy-cut them for later use. But the actual card assembling does happen in one sitting. So, having a "work-in-progress" card feels a little strange. I keep wanting to head back into the craft room to finish up what I'm working on.
At the same time, I'm fully embracing the idea of slowing down and really enjoying the creative process as a whole. Most of my personal favorite cards were created with a lot of time and effort - by taking joy in finding the right paper, of getting the shading just right and picking out the perfect ephemera. When I slow down while tackling an idea or concept, things fall into place more naturally and instinctively.
Learning about my own creative process and how creative processes work for others is absolutely fascinating to me. I always waver between creating sporadically with unpredictably wild abandon and creating consistently through careful and practical planning. I should probably accept that my creative process is ever-changing, but I still spend time trying to figure it out and find strategies to improve my flow.
Thanks for reading!
~Elle~

Showing posts with label chat. Show all posts
Showing posts with label chat. Show all posts
Sunday, June 30, 2019

Sunday, July 17, 2016
Chatty Sunday: SCS
It's Sunday and it's time for another chatty post! This week, I want to share a big piece of exciting news, and also chat a little about being busy.
So, for my big news... I'm a part of the Dirty Dozen Design Team over on Splitcoast Stampers!!!
I had to keep it a secret, but now I can talk about it since it's been announced! I'm still not fully believing it, but it's sure true...
I got the invitation from Lydia a little while ago and my first thought was that she surely meant to ask someone else! While I've lurked at SCS for a while, I'd only become active very recently and I was absolutely sure that I was flying under the radar. But lo and behold, she did mean to ask me and I accepted! I'm really thrilled, amazed and honored -- all rolled into one ball of butterfly-inducing excitement. I hope I can do it justice and help inspire all the friendly folks at SCS...
And that leads me to the next topic - being busy!
I'm still a part of the Some Odd Girl design team, and with 2 DT responsibilities, I might find myself mega busy... Couple that with trying for extra work, and you've got one potentially overwhelmed me. So, I may switch to a slightly different format when posting.
Normally, I write my posts and publish them right away. Then I can also share them on FB or Flickr. But I'm going to switch to pre-writing my posts so that you can see cards on a regular basis and I'm not writing them at midnight while I'm dead tired and unable to utter a single coherent sentence.
And there you have it! A quick chat on a sunny Sunday. I'll leave you with a quick card share:

So, for my big news... I'm a part of the Dirty Dozen Design Team over on Splitcoast Stampers!!!
I had to keep it a secret, but now I can talk about it since it's been announced! I'm still not fully believing it, but it's sure true...
I got the invitation from Lydia a little while ago and my first thought was that she surely meant to ask someone else! While I've lurked at SCS for a while, I'd only become active very recently and I was absolutely sure that I was flying under the radar. But lo and behold, she did mean to ask me and I accepted! I'm really thrilled, amazed and honored -- all rolled into one ball of butterfly-inducing excitement. I hope I can do it justice and help inspire all the friendly folks at SCS...
And that leads me to the next topic - being busy!
I'm still a part of the Some Odd Girl design team, and with 2 DT responsibilities, I might find myself mega busy... Couple that with trying for extra work, and you've got one potentially overwhelmed me. So, I may switch to a slightly different format when posting.
Normally, I write my posts and publish them right away. Then I can also share them on FB or Flickr. But I'm going to switch to pre-writing my posts so that you can see cards on a regular basis and I'm not writing them at midnight while I'm dead tired and unable to utter a single coherent sentence.
And there you have it! A quick chat on a sunny Sunday. I'll leave you with a quick card share:

(featuring Sweet Stamp Shop's Dragon stamp)
Thanks for reading!
~Elle~
Monday, January 11, 2016
Lulu Thanks

The year has gotten a bit of a rocky start for me here on the blog, hasn't it? I've been meaning to make a blog post since January 1st, but things just kept getting in the way. Between feeling under the weather and lots of work, I've had very little free time. And what free time I've had has been spent organizing.
Yes, I got bit by the organizing bug again... Initially, I had just planned to make things a little easier on myself by pulling out some supplies and goodies to use up over the next few months. But that quickly spiraled into a need to catalog and organize virtually everything. On the bright side, it's made me rediscover a veritable trove of treasures to use with cards and paper crafts. On the not-so-bright side, it's made me realize I need clones or another 6 hours in a day where I can play with papers and ink.
Although I was incredibly tempted to pull everything out of my stash and organize it again (hey, I'm not buying things, so this is the perfect time to do so, right?), I decided to pull myself away and to jump into some card-making. After a rocky start, I'd managed to create a couple of "love" cards I was very happy with. I'll be sharing them very soon as part of my Valentine's series.
Today's card is a winter-themed thank you card featuring a Lulu stamp from Stamping Bella. I happen to have a rubber stamp (which I believe is discontinued now), but you can find a digital stamp right here.
I used bright and feminine colors to color the stamp, keeping the shading simple and minimal. After the coloring was done, I die-cut the image with a stitched circle die. I also die-cut a slightly larger circle out of some grayish brown paper and matted the two together with foam squares.
I grabbed a standard top-folding A2 card base (4¼x5½") and adhered a strip of patterned paper at the bottom. I grabbed a piece of white cardstock and trimmed it to 4¼x5½, then die-cut a decorative scalloped white edge. I adhered it to the top of the card base and added the matted image on top.
To finish off my card, I added 3 enamel dots echoing some of the colors in the card. I used some alphabet stickers to spell out my sentiment, and the card was done!
Thanks for reading!
~Elle~
Friday, January 1, 2016
Happy New Year!
And we've officially rung in the new year! I wish you all prosperity, happiness and good health in 2016, and may your New Years' resolutions come to fruition!
I had originally planned to make an awesome card to ring in the new year, but I've had a few busy days lately. I did get a chance to get crafty and created a couple of thank-you cards for some lovely and generous friends and family (who really spoiled us for Christmas!). They've already been mailed, so I can't snap a picture.
Instead, I figured I'd do a chatty/rambling little crafting update.
In my effort to prepare for the new year, I've been going through and organizing some of my crafty supplies. Organizing is kind of tricky. On one hand, it's a great way to go through all of my supplies to find hidden treasures and to get very inspired. On the other hand, it takes over my free time, so I'm not actually creating anything. It feels very productive, but there's nothing to show for it. However, it's still something I have to do a few times per year - such as during major holidays or when I need to pull out stamps I don't use all year round.
My big resolution/goals this year involve using what I have, and I thought it would be a good idea to go through some of my stash as a reminder of all the goodies I own. I also took the opportunity to put away the winter holiday crafting materials in a way that kept it neat and organized.
So, I thought I would share some of my organizing solutions that will help me stay on top of making cards this year.
- I have a mini-crate in my crafty cart with stamps I really want to use. This is more convenient and keeps me from constantly having to dig into my stash to find a stamp to use. In the crate, I have some of the newest stamps I got, a few favorites and a selection of never-before-used stamps I've been meaning to ink up. Having this crate is going to help me focus when I sit down without a specific idea on what I want to make. But the rest of m stamps are still close by in case I'm inspired to use a special stamp or two.
- I'm still using the mini-sticker dot system to mark which stamp sets I've used. I've also started putting check-marks on the dots with cards I've blogged about and a little dot on cards I sent out to family/friends for their birthday. I try to do something slightly different for each birthday card, so it helps me to know when I've used a stamp set already.
- I went through my paper pads and made myself mini paper bundles. This one took a bit of time, but I really think it was worth it. I started by pulling out all the papers that I liked or that I felt I needed out of a mountain of paper pads. Then, I chose several papers that fit a specific theme (ex. masculine cards) or palette (ex. pink, mint and gold) and bundled them together using a little piece of post-it tape to hold them. I really love this idea because I can quickly grab a bundle and know I'm set with all the papers I'm going to need for a card or 5.
- I chose some embellishments and put them in a plastic zipper pouch. I happened to have several of these pouches, so I was able to divvy up my embellishments into 4 categories: enamel dots, flowers, dimensional elements (woodchips, flair, etc) and stickers. I left my sequins in their containers, since they're really well organized there already. I will go through the pouches once per month and keep track of what's been used up.
- Lastly, I prepared a few card bases. Since I make my own card bases from cardstock, this involved cutting and scoring cardstock. It's a bit repetitive, but it's something I can easily do with music playing in the background. And it does save me a bit of time to not have to do it while making a card.
Thanks for reading!
~Elle~
I had originally planned to make an awesome card to ring in the new year, but I've had a few busy days lately. I did get a chance to get crafty and created a couple of thank-you cards for some lovely and generous friends and family (who really spoiled us for Christmas!). They've already been mailed, so I can't snap a picture.
Instead, I figured I'd do a chatty/rambling little crafting update.
In my effort to prepare for the new year, I've been going through and organizing some of my crafty supplies. Organizing is kind of tricky. On one hand, it's a great way to go through all of my supplies to find hidden treasures and to get very inspired. On the other hand, it takes over my free time, so I'm not actually creating anything. It feels very productive, but there's nothing to show for it. However, it's still something I have to do a few times per year - such as during major holidays or when I need to pull out stamps I don't use all year round.
My big resolution/goals this year involve using what I have, and I thought it would be a good idea to go through some of my stash as a reminder of all the goodies I own. I also took the opportunity to put away the winter holiday crafting materials in a way that kept it neat and organized.
So, I thought I would share some of my organizing solutions that will help me stay on top of making cards this year.
- I have a mini-crate in my crafty cart with stamps I really want to use. This is more convenient and keeps me from constantly having to dig into my stash to find a stamp to use. In the crate, I have some of the newest stamps I got, a few favorites and a selection of never-before-used stamps I've been meaning to ink up. Having this crate is going to help me focus when I sit down without a specific idea on what I want to make. But the rest of m stamps are still close by in case I'm inspired to use a special stamp or two.
- I'm still using the mini-sticker dot system to mark which stamp sets I've used. I've also started putting check-marks on the dots with cards I've blogged about and a little dot on cards I sent out to family/friends for their birthday. I try to do something slightly different for each birthday card, so it helps me to know when I've used a stamp set already.
- I went through my paper pads and made myself mini paper bundles. This one took a bit of time, but I really think it was worth it. I started by pulling out all the papers that I liked or that I felt I needed out of a mountain of paper pads. Then, I chose several papers that fit a specific theme (ex. masculine cards) or palette (ex. pink, mint and gold) and bundled them together using a little piece of post-it tape to hold them. I really love this idea because I can quickly grab a bundle and know I'm set with all the papers I'm going to need for a card or 5.
- I chose some embellishments and put them in a plastic zipper pouch. I happened to have several of these pouches, so I was able to divvy up my embellishments into 4 categories: enamel dots, flowers, dimensional elements (woodchips, flair, etc) and stickers. I left my sequins in their containers, since they're really well organized there already. I will go through the pouches once per month and keep track of what's been used up.
- Lastly, I prepared a few card bases. Since I make my own card bases from cardstock, this involved cutting and scoring cardstock. It's a bit repetitive, but it's something I can easily do with music playing in the background. And it does save me a bit of time to not have to do it while making a card.
Thanks for reading!
~Elle~
Sunday, December 13, 2015
Chatty Sunday: Plans for 2016
In my last post, I mentioned that I wanted to make a chatty post about my plans for the new year, and I figured today was the best time to do so. The rest of December is jam-packed with holiday prep and events, work and trying to make sure I haven't forgotten anything major. I'm also looking forward to spending some quiet moments with the family, once the holiday celebrations are out of the way.
You may recall my super excited post last year, where I talked about my One Hundred Cards challenge... Sadly, I did not complete that challenge (boo). After some thought, I'd come to the conclusion that it's because it was just too ambitious. 100 cards is a lot - even in a year. While I definitely want to take up this challenge again, I don't think I can make it into a yearly resolution. Instead, it will be an ongoing project - maybe one I can finish in 3 years or 10!
So... For the upcoming year, I decided to scale back quite a bit and make a more reasonable goal. It might sound like a bit of a boring goal, but I'm personally really excited and inspired by it.
In 2016, my goal is to spend the first half of the year just using up my existing supplies. I'm planning on keeping close track of how often I use up my consumables such as adhesives, patterned paper, cardstock and embellishments. At the same time, I plan to also make use of all the stamps and dies I own -- especially those that I've owned for a while. In doing so, I'd like to see if I have any stamp/die themes where I need more variety or areas that are getting too large to use effectively. I'm also thinking about posting my reviews of the products I used up. I know I love reading reviews, as they help me make a better decision about what to buy (or not to buy!), so hopefully all of you out there enjoy them too.
One of my recent big challenges has been finding room for all the supplies I own. A big part of that is my tendency to be prepared, so I stock up on things like extra adhesive, extra cardstock, extra embellishments, ink refills etc etc. However, without a clear idea of how many materials I use up on a regular basis, this can quickly (and easily!) lead to being overstocked. I think I probably have enough re-inkers for my hybrid inks to last me for years, for example. Since all of those things take up valuable stash space, I definitely want to make sure they're being used up. This is especially important because newer and better supplies continue to come out, and I don't want to end up throwing out hundreds of dollars worth of things years from now because they're just not useful.
The only thing I did not stock up for is Copic refills. I'm sure there are a few of them I could really use refills for, but I'm going to try to hold out and either use the palette that still works or switch around to other methods of coloring (pencils, watercolor, etc). I've been meaning to branch out and use all kinds of coloring techniques, so that works out very nicely for me.
For the second half of the year, I'm going to continue using up supplies while making a few small purchases to replenish my consumables and grab those can't-live-without supplies (spoiler: it will be a lot of new Lawn Fawn and Birdie Brown stamps). I'm hoping that those first 6 months will help me make much more informed purchases and help me focus on getting things I really truly need instead of things I'm afraid of running out.
In preparation for this, I've been working on some extra organization in between finishing up my holiday projects/prep. I've made some mini-kits for papers and embellishments, as well as pulled out a few stamps I feel especially inspired to use. As geeky as it might seem, I've really enjoyed planning this out and I'm looking forward to what the new year will bring!
Thanks for reading through my rambly chat.
~Elle~
You may recall my super excited post last year, where I talked about my One Hundred Cards challenge... Sadly, I did not complete that challenge (boo). After some thought, I'd come to the conclusion that it's because it was just too ambitious. 100 cards is a lot - even in a year. While I definitely want to take up this challenge again, I don't think I can make it into a yearly resolution. Instead, it will be an ongoing project - maybe one I can finish in 3 years or 10!
So... For the upcoming year, I decided to scale back quite a bit and make a more reasonable goal. It might sound like a bit of a boring goal, but I'm personally really excited and inspired by it.
In 2016, my goal is to spend the first half of the year just using up my existing supplies. I'm planning on keeping close track of how often I use up my consumables such as adhesives, patterned paper, cardstock and embellishments. At the same time, I plan to also make use of all the stamps and dies I own -- especially those that I've owned for a while. In doing so, I'd like to see if I have any stamp/die themes where I need more variety or areas that are getting too large to use effectively. I'm also thinking about posting my reviews of the products I used up. I know I love reading reviews, as they help me make a better decision about what to buy (or not to buy!), so hopefully all of you out there enjoy them too.
One of my recent big challenges has been finding room for all the supplies I own. A big part of that is my tendency to be prepared, so I stock up on things like extra adhesive, extra cardstock, extra embellishments, ink refills etc etc. However, without a clear idea of how many materials I use up on a regular basis, this can quickly (and easily!) lead to being overstocked. I think I probably have enough re-inkers for my hybrid inks to last me for years, for example. Since all of those things take up valuable stash space, I definitely want to make sure they're being used up. This is especially important because newer and better supplies continue to come out, and I don't want to end up throwing out hundreds of dollars worth of things years from now because they're just not useful.
The only thing I did not stock up for is Copic refills. I'm sure there are a few of them I could really use refills for, but I'm going to try to hold out and either use the palette that still works or switch around to other methods of coloring (pencils, watercolor, etc). I've been meaning to branch out and use all kinds of coloring techniques, so that works out very nicely for me.
For the second half of the year, I'm going to continue using up supplies while making a few small purchases to replenish my consumables and grab those can't-live-without supplies (spoiler: it will be a lot of new Lawn Fawn and Birdie Brown stamps). I'm hoping that those first 6 months will help me make much more informed purchases and help me focus on getting things I really truly need instead of things I'm afraid of running out.
In preparation for this, I've been working on some extra organization in between finishing up my holiday projects/prep. I've made some mini-kits for papers and embellishments, as well as pulled out a few stamps I feel especially inspired to use. As geeky as it might seem, I've really enjoyed planning this out and I'm looking forward to what the new year will bring!
Thanks for reading through my rambly chat.
~Elle~
Sunday, October 11, 2015
Chatty Sunday: Old/retired stamps
Last year, I really underestimated how long it takes to make Christmas cards for the whole family - which lead to a week of marathon card-making, lots of frazzled nerves and forgetting what my cards even looked like a week later. So, I decided to be better organized this year and start my card-making early -- as in this weekend early.
Going through my supplies, I noticed two things:
1) My collection of Christmas/Winter stamps is MASSIVE, second only to my "sentiments" section, which has a rather large variety of actual themes. I've got enough Christmas stamps to make a card for all of my friends/family for the next couple of years and not use the same stamp twice...
2) Several of the stamps in my collection are now retired. I expected a few of those, as they come from companies that retire their stamps very frequently. But a few were a surprise, and left me thinking.
If you've read my blog, you know that using old/retired supplies has been a challenge for me. On one hand, I really want to use my old supplies - I didn't get them so they can sit pretty in my crafty stash. On the other hand, I worried that seeing projects with unavailable materials will leave readers and fellow card-makers frustrated. Or (worse yet!) they will turn into uninspiring projects that everyone has seen and done a million times already.
But as I looked over my Christmas stamps/supplies, I found those worries faded and got quieter. Instead, I was excited by all the possibilities and couldn't wait to jump into creating. What changed? Well, some of it has to do with my new mentality of focusing on doing (read about it briefly here) and making use of things that inspire me. And the rest is the fact that I was making cards for friends and family - people who won't know which stamp set I used or whether it was retired. They'll just care that the card was made with them in mind.
I wondered if this feeling of excitement and inspiration would carry over to my other supplies and I found - much to my delight - that it did! I saw my old/retired stamps in a brand new light. Some of them I couldn't wait to use and I already have a million ideas for. Others would take a little extra thinking and planning.
So, I developed a little list of questions I ask myself about each retired stamp:
- Does it still inspire me?
If I can think of a card (or 3) just by looking at the stamp, it's a keeper. I took the time to jot down a few of the most promising ideas in my notebook, and grabbed a few stamps to highlight in the upcoming weeks.
- Is it a staple?
Some of my stamps aren't necessarily things I would use all the time, but they're very necessary. A good example are sympathy stamps or pattern stamps. I don't make a whole lot of sympathy cards, but it's useful to have a few sets dedicated to the occasion. Likewise, I tend to use patterned paper over making my own patterns, but I may use that long stripe stamp in the future.
- Can it challenge me?
I've got a few stamp sets that are not in the same style as the majority of my cards. Some are vintage, others are a more modern/graphic style - neither of which necessarily mesh with my cute/bright/cartoony card style. But I would like to challenge myself to use them in a card or art journal layout.
The majority of my old stamps fit into one of those 3 categories. And the few that don't are things purchased during massive sales or things I received as a random gift. I've set them aside for now. I will look at them again next year, and if they don't inspire me, I will give them away.
All in all, this left me with a very positive feeling about those old/retired stamps. I'm inspired to use them and looking forward to sharing bits and pieces in my blog.
Thanks for reading!
~Elle~
Going through my supplies, I noticed two things:
1) My collection of Christmas/Winter stamps is MASSIVE, second only to my "sentiments" section, which has a rather large variety of actual themes. I've got enough Christmas stamps to make a card for all of my friends/family for the next couple of years and not use the same stamp twice...
2) Several of the stamps in my collection are now retired. I expected a few of those, as they come from companies that retire their stamps very frequently. But a few were a surprise, and left me thinking.
If you've read my blog, you know that using old/retired supplies has been a challenge for me. On one hand, I really want to use my old supplies - I didn't get them so they can sit pretty in my crafty stash. On the other hand, I worried that seeing projects with unavailable materials will leave readers and fellow card-makers frustrated. Or (worse yet!) they will turn into uninspiring projects that everyone has seen and done a million times already.
But as I looked over my Christmas stamps/supplies, I found those worries faded and got quieter. Instead, I was excited by all the possibilities and couldn't wait to jump into creating. What changed? Well, some of it has to do with my new mentality of focusing on doing (read about it briefly here) and making use of things that inspire me. And the rest is the fact that I was making cards for friends and family - people who won't know which stamp set I used or whether it was retired. They'll just care that the card was made with them in mind.
I wondered if this feeling of excitement and inspiration would carry over to my other supplies and I found - much to my delight - that it did! I saw my old/retired stamps in a brand new light. Some of them I couldn't wait to use and I already have a million ideas for. Others would take a little extra thinking and planning.
So, I developed a little list of questions I ask myself about each retired stamp:
- Does it still inspire me?
If I can think of a card (or 3) just by looking at the stamp, it's a keeper. I took the time to jot down a few of the most promising ideas in my notebook, and grabbed a few stamps to highlight in the upcoming weeks.
- Is it a staple?
Some of my stamps aren't necessarily things I would use all the time, but they're very necessary. A good example are sympathy stamps or pattern stamps. I don't make a whole lot of sympathy cards, but it's useful to have a few sets dedicated to the occasion. Likewise, I tend to use patterned paper over making my own patterns, but I may use that long stripe stamp in the future.
- Can it challenge me?
I've got a few stamp sets that are not in the same style as the majority of my cards. Some are vintage, others are a more modern/graphic style - neither of which necessarily mesh with my cute/bright/cartoony card style. But I would like to challenge myself to use them in a card or art journal layout.
The majority of my old stamps fit into one of those 3 categories. And the few that don't are things purchased during massive sales or things I received as a random gift. I've set them aside for now. I will look at them again next year, and if they don't inspire me, I will give them away.
All in all, this left me with a very positive feeling about those old/retired stamps. I'm inspired to use them and looking forward to sharing bits and pieces in my blog.
Thanks for reading!
~Elle~
Wednesday, September 2, 2015
Make Your Own Card Kit -- Kit 1 review
Alright, so I finally found the slightest bit of time to create this post - even though it feels like the cards have been sitting on my desk for ages! To see how I made my kit, click here.
So, let me start with all the cards I created with this kit:


So, let me start with all the cards I created with this kit:


I ended up with 5 cards, which is pretty awesome. But I'm not a huge fan of all of them (which makes me feel a little underwhelmed). Some of the cards were very experimental and completely different from my usual style, so they're lacking my usual confidence. I did, however, learn quite a bit about both my own process and the way I should make my kits in the future.
So, let's get down to what I learned:
- I had too much patterned paper. At most, 5 cards should need 6 papers, so my 12 choices were just too much.
- I had too many embellishments. Not only did I use only a few of them, but I ended up mainly sticking with enamel dots because they fit most everything.
- I had too many stamp sets. I struggled to use as many of them as possible, and didn't feel like I did any single set justice.
- It was a good idea to have one focal piece. I made a real dent in the chipboard sticker set, though I did not use all of it yet. I'm going to try using it up in the future cards, too.
- Outside adhesive and a couple of inkpads, I didn't need to go outside the kit at all. It was very well-rounded in terms of giving me everything I needed. I definitely feel like I should continue to include all the different elements I included (but with less quantities).
- Having the card bases cut and scored in advance saved a bit of time, but I need to start adding extra cardstock I can use for layering and die-cutting. Especially white cardstock - it's a staple!
Overall, I had a positive experience with the kit, even if it was a bit challenging to use. I did like that a lot of the material from the kit got used up, but I'm going to assemble the next kit better - just so I can have less left-overs. I'd also like to add some dies to the kit, as I've got to make a dent in those, too. And I think I want to add some inkpads into the mix, as well. I've got some inky colors I just love, but haven't used to their potential yet.
Lastly, I plan on making another kit soon and sharing what I picked out.
Thanks for reading!
~Elle~
Thursday, August 13, 2015
Make your own Card Kit 1
Every now and then I get a cleaning/organizing bug. I find myself going through my crafty supplies in an effort to make them easier and more convenient to use. And it really helps! Seeing everything I already own is a great reminder that I might not need the 30 shiny new stamps that were just released.
The last thing I organized was my card kits. I only get one card kit per month (from Simon Says Stamp), but it still stacks up over time. Originally, I simply left the kits in the box they came in and stacked them in the corner of my crafty closet, with a label on the side. However, this wasn't ideal because I'd forget what was in each kit and that meant I used them less. So, I started switching them to big ziploc bags.
The clear bags were a better solution, as I could see the stamp set, embellishments and colors of the kit much easier. It still wasn't ideal, though, because I still often forgot to look through the kits when I was searching for the perfect card supplies.
So, my latest organizing idea was to leave the last 3 months of card kits in ziploc bags, and put the rest of it away with my other supplies. So, stickers went with stickers, washi tape with washi tape, stamps into their pockets and stored with the rest of my stamps, and so on. So far, I'm liking this system much better, as it's giving me a chance to break out of the kit-only box and use the supplies more.
While doing this organization project, I felt really inspired to try my hand at making my own card kit. I figured this would be a great way to fine-tune my planning and design skills, as well as inspire me to use up some of my ever-growing supply stash.
Here are the contents of my very first kit and how I went about putting it together.
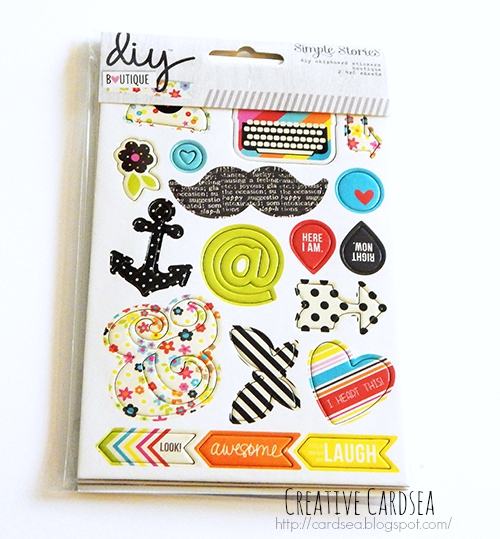 I think every kit needs to have a launching point of some sort -- whether that's a product, color scheme or topic/theme. I decided to start with this chipboard sticker set from Simple Stories DIY Boutique line. I've had this sticker set for a while and kept wanting to use it. But it never fit entirely in the card I was making, so it just sat there in my stash. I thought I might have a better chance of using it if I built a kit around it.
 I chose the paper quite randomly, going for colors and tones that matched the stickers. Some papers were from the same line as the sticker, but the majority were simply from my stash. I did not try to match the colors exactly, instead I went for choosing colors that had the right brightness and tones.


And that's a close-up of the different papers I chose. Since the sticker had a creamy off-white background, I chose to go with similar tones for the white.

Next, I prepared a few card bases that fit the tones of the patterned paper and sticker. These bases are already cut and folded into A2-sized cards (4¼x5½").
 The first part of embellishments was a set of enamel dots. I grabbed the bright enamel dots from Freckled Fawn, as well as a black/gray and gold sets of enamel dots from Studio Calico. The colors of the enamel dots are not the exact match to the other supplies, but they do stand out great against the patterned paper I chose.
 The second part of the embellishments was dipping into my wood veneer and button stash. I found some fun wood veneer and buttons in the same tones as the papers. I also grabbed a couple of flair, some black satin ribbon and a rainbow washi tape.
The last step was getting a few stamp sets that go along with the rest of the kit.
 Since I like coloring, I grabbed two stamp sets that I could color. On the left is Evie from The Greeting Farm secret stamp club. On the right is Some Odd Girl's Hipster Mae. Both of them seem to fit the modern hipster vibe I got from the chipboard stickers.
 Next, I grabbed a couple of stamp sets that are a little bit funny. On the left is Stuck on This from the Sweet Stamp Shop (now retired, sorry!) and Paper Smooches' Teen Routine is on the right.
 Since there was a mustache on the sticker pack, I thought it might be good to add in a masculine stamp, so I chose Terrific Ties from My Favorite Things.
 Lastly, I wanted to make sure that I had some good sentiments to work with, so I chose two stamp sets from Simon Says Stamp - Stripe Greetings on the left and Big Scripty Greetings on the right.
And that's all there is to this kit! I will be sharing the cards created with this kit as well as my thoughts about how well (or badly!) it worked for me soon.
Until next time... Thanks for reading!
~Elle~
The last thing I organized was my card kits. I only get one card kit per month (from Simon Says Stamp), but it still stacks up over time. Originally, I simply left the kits in the box they came in and stacked them in the corner of my crafty closet, with a label on the side. However, this wasn't ideal because I'd forget what was in each kit and that meant I used them less. So, I started switching them to big ziploc bags.
The clear bags were a better solution, as I could see the stamp set, embellishments and colors of the kit much easier. It still wasn't ideal, though, because I still often forgot to look through the kits when I was searching for the perfect card supplies.
So, my latest organizing idea was to leave the last 3 months of card kits in ziploc bags, and put the rest of it away with my other supplies. So, stickers went with stickers, washi tape with washi tape, stamps into their pockets and stored with the rest of my stamps, and so on. So far, I'm liking this system much better, as it's giving me a chance to break out of the kit-only box and use the supplies more.
While doing this organization project, I felt really inspired to try my hand at making my own card kit. I figured this would be a great way to fine-tune my planning and design skills, as well as inspire me to use up some of my ever-growing supply stash.
Here are the contents of my very first kit and how I went about putting it together.


And that's a close-up of the different papers I chose. Since the sticker had a creamy off-white background, I chose to go with similar tones for the white.

Next, I prepared a few card bases that fit the tones of the patterned paper and sticker. These bases are already cut and folded into A2-sized cards (4¼x5½").


The last step was getting a few stamp sets that go along with the rest of the kit.


And that's all there is to this kit! I will be sharing the cards created with this kit as well as my thoughts about how well (or badly!) it worked for me soon.
Until next time... Thanks for reading!
~Elle~
Sunday, July 19, 2015
Chatty Sunday: Choosing Patterned Paper
Warning! Rambling long post ahead! For the tl;dr version, head down to Paper Checklist.
My wonderful friend Ka (check out her blog here!) left a question on my last post about how I choose what patterned paper to buy. And at first, I started answering in a comment, but as the reply started getting longer, I thought I'd better turn it into a proper blog post. Since it's chatty Sunday, it's a perfect time to jump into it!
First I have to disclose that I have a lot of patterned paper - and when I say a lot, I really mean a lot. Patterned paper is my favorite supply (even more than stamps!) and I've often put a stamp set back in favor of 2-3 patterned paper packs while doing my crafty shopping. All this has resulted in a very hefty patterned paper stash, with what I semi-jokingly refer to as my "towers of paper".
Now, I'm not saying that everyone needs a huge collection of paper like I do, but I very quickly learned that patterned paper really inspires me. The colors and the patterns make me want to get creative and get me thinking about new and unique ways to use it. I also notice patterned paper on other card-makers' cards and I'm especially drawn to cards that incorporate patterned paper. So, for me, patterned paper is an essential supply and I like having a lot of choices. I also happen to have room to store it, which is one thing that I know some crafters struggle with.
If you are short on space to store paper, I still encourage you to get a small selection of paper to use and play with. You may find yourself more careful about what paper to buy, but I firmly believe everyone needs at least 2-3 patterned paper packs in their stash.
A few months ago, I had a chance to re-organize my crafty supply stash and I paid a lot of attention to the paper. Being able to look at everything at once made a lot of things click for me and the result is that I've gotten a lot smarter at buying - and using! - my paper. So, I'm happy to share my experience with you and hopefully it will help out.
I first started buying paper when I got into card-making about 2 years ago. My early purchases included a couple of really large 'best of' 12x12" collection packs from K&Company - one was 365 paper collection, and the other was the Brenda Walton collection. At the time, they seemed like an incredible value - hundreds of papers at a fraction of the cost. But I quickly learned that they weren't great for card-making. The majority of the patterns were things I didn't really care for or see myself using. Of the patterns I did like, a lot were too large for the kind of cards I was creating. So, I put those packs into crafty storage and started buying 6x6 paper pads. In time, I found a few projects the big papers will be useful for (art journaling, altering projects, decoupage, etc). However, they taught me an important lesson: Quantity is not as important as quality. This is a lesson I learned pretty quickly - especially when it comes to crafty tools and essentials - but it's one I continue to remind myself of.
My foray into 6x6 papers started with shopping for bargains. I bought a lot of paper on sale in various stores and online shops. This seemed like a fantastic idea for someone on a budget, and I got quite a bit of fun papers this way. Since I was still trying to work out what kind of style I wanted for my cards, having a large variety of papers was amazing. However, I started to notice that I just did not use the paper. I did not want to use the paper I loved the most, and I saved it forever. But what started to happen was that, over time, I was less and less excited about the paper I really loved until it eventually stopped being inspiring altogether. Some of that had to do with my style evolving and changing over time. But at the core of it was the fact that I simply bought better and more exciting paper down the line. So, cue lesson #2: You will outgrow your supplies and there will always be more to inspire you. This is another lesson that I am still learning, and it has been radically changing the way I craft and shop for crafty supplies.
It was at this point that I started to really organize my crafty supply and start keeping track of what I was buying and using. I noticed that a lot of papers that inspired me the most came from specific lines and manufacturers (ex. Echo Park, Dear Lizzy, Fancy Pants, Pebbles, etc). So, I narrowed down to buying new paper pads from those manufacturers only, and this resulted in a ton of papers that I loved and found useable. However, the problem was that I was still buying a lot of paper and not using it as quickly as I was buying it. And while I liked the majority of the paper lines, there were still an odd paper pad or two that were a big challenge to use. My lesson #3 was: You don't need to buy everything your favorite manufacturer releases. This lesson in particular is something I'm working through right now and trying to apply to other crafty supplies.
So, after reorganizing my supplies (again), I've come up with a little check-list to use when buying patterned paper. I've been following this list for the past 6+ months and every single paper pad I've bought in that time frame has been filled with papers I've used and can continue to use. It works for me, and hopefully it will give you some ideas of how you can make it work for you.
Paper Checklist
Lastly, if you're just not sure where to start or you have a limited storage space, I strongly suggest first stocking up on a few basics. Basic/Classic paper pads stand the test of time and can be used in a large variety of project styles.
Here are a few of my go-to and favorites for basic packs:
- Lawn Fawn's paper pads - especially Let's Polka line, which features stripes, polka dots and hearts. These papers fit in perfectly with Lawn Fawn stamps and can help you chose bright colors that go with the cute images.
- Avery Elle's paper pads - while these paper pads have colors that match the Avery Elle inks, the main reason I love is because they have some fantastic basic patterns and tone-on-tone looks. If you're not confident in creating your own color combinations, Avery Elle's packs come in a 4-color palette that fits together. So, you end up with 4 colors that you can use as a launching point to picking your own card palette.
- Simple Stories Color Vibe 2 - this pad has a very large variety of colors, which makes it a great staple paper pad for your stash. The patterns are very simple and easy to use, so if you can get only one paper pad, go with this one.
- Echo Parks Dots and Stripes - this particular line of Echo Park paper pads features the classic patterns in a variety of colors. The nice thing is that the pads are divided by color range, such as pinks and browns for baby girl cards or teals and greens for baby boy cards.
And, of course, I just had to share a few of my current favorite pads:
- Echo Parks Pirate's Life 6x6 - this paper line has super cute illustrations and I love the nautical theme.
- Pebbles Inc. Fun In The Sun 6x6 - this line has bright and cheerful colors, modern design and a variety of classic patterns such as stripes, waves and gingham.
- Pebbles Inc. Cottage Living 6x6 - this line features some of my favorite color tones: peach, pink, mint and black. It also has several classic geometric shapes that make for a great background.
- Authentique Radiant 6x6 - this line is a bit brighter in person than it looks online, but it has lovely warm tones and a great combination of colors.
- Simple Stories Homespun 6x6 - the colors in this line are a bit more muted and features some fun and unique patterns. It's a good choice when you want to have brighter colors, but a cream background or less contrast than stark white.
Thanks for hanging in there with me through this massive post! There was just so much info to share. Hopefully, it will be useful to some of you out there. Have a creative day!
~Elle~
My wonderful friend Ka (check out her blog here!) left a question on my last post about how I choose what patterned paper to buy. And at first, I started answering in a comment, but as the reply started getting longer, I thought I'd better turn it into a proper blog post. Since it's chatty Sunday, it's a perfect time to jump into it!
First I have to disclose that I have a lot of patterned paper - and when I say a lot, I really mean a lot. Patterned paper is my favorite supply (even more than stamps!) and I've often put a stamp set back in favor of 2-3 patterned paper packs while doing my crafty shopping. All this has resulted in a very hefty patterned paper stash, with what I semi-jokingly refer to as my "towers of paper".
Now, I'm not saying that everyone needs a huge collection of paper like I do, but I very quickly learned that patterned paper really inspires me. The colors and the patterns make me want to get creative and get me thinking about new and unique ways to use it. I also notice patterned paper on other card-makers' cards and I'm especially drawn to cards that incorporate patterned paper. So, for me, patterned paper is an essential supply and I like having a lot of choices. I also happen to have room to store it, which is one thing that I know some crafters struggle with.
If you are short on space to store paper, I still encourage you to get a small selection of paper to use and play with. You may find yourself more careful about what paper to buy, but I firmly believe everyone needs at least 2-3 patterned paper packs in their stash.
A few months ago, I had a chance to re-organize my crafty supply stash and I paid a lot of attention to the paper. Being able to look at everything at once made a lot of things click for me and the result is that I've gotten a lot smarter at buying - and using! - my paper. So, I'm happy to share my experience with you and hopefully it will help out.
I first started buying paper when I got into card-making about 2 years ago. My early purchases included a couple of really large 'best of' 12x12" collection packs from K&Company - one was 365 paper collection, and the other was the Brenda Walton collection. At the time, they seemed like an incredible value - hundreds of papers at a fraction of the cost. But I quickly learned that they weren't great for card-making. The majority of the patterns were things I didn't really care for or see myself using. Of the patterns I did like, a lot were too large for the kind of cards I was creating. So, I put those packs into crafty storage and started buying 6x6 paper pads. In time, I found a few projects the big papers will be useful for (art journaling, altering projects, decoupage, etc). However, they taught me an important lesson: Quantity is not as important as quality. This is a lesson I learned pretty quickly - especially when it comes to crafty tools and essentials - but it's one I continue to remind myself of.
My foray into 6x6 papers started with shopping for bargains. I bought a lot of paper on sale in various stores and online shops. This seemed like a fantastic idea for someone on a budget, and I got quite a bit of fun papers this way. Since I was still trying to work out what kind of style I wanted for my cards, having a large variety of papers was amazing. However, I started to notice that I just did not use the paper. I did not want to use the paper I loved the most, and I saved it forever. But what started to happen was that, over time, I was less and less excited about the paper I really loved until it eventually stopped being inspiring altogether. Some of that had to do with my style evolving and changing over time. But at the core of it was the fact that I simply bought better and more exciting paper down the line. So, cue lesson #2: You will outgrow your supplies and there will always be more to inspire you. This is another lesson that I am still learning, and it has been radically changing the way I craft and shop for crafty supplies.
It was at this point that I started to really organize my crafty supply and start keeping track of what I was buying and using. I noticed that a lot of papers that inspired me the most came from specific lines and manufacturers (ex. Echo Park, Dear Lizzy, Fancy Pants, Pebbles, etc). So, I narrowed down to buying new paper pads from those manufacturers only, and this resulted in a ton of papers that I loved and found useable. However, the problem was that I was still buying a lot of paper and not using it as quickly as I was buying it. And while I liked the majority of the paper lines, there were still an odd paper pad or two that were a big challenge to use. My lesson #3 was: You don't need to buy everything your favorite manufacturer releases. This lesson in particular is something I'm working through right now and trying to apply to other crafty supplies.
So, after reorganizing my supplies (again), I've come up with a little check-list to use when buying patterned paper. I've been following this list for the past 6+ months and every single paper pad I've bought in that time frame has been filled with papers I've used and can continue to use. It works for me, and hopefully it will give you some ideas of how you can make it work for you.
Paper Checklist
- Does it have at least 2 papers I absolutely adore? -- If seeing the paper makes me happy or makes me feel like creating something, it's worth buying.
- Does it have at least 2-4 basics/classics? -- Polka dots, stripes and solids never go out of style. Make sure that your paper pad has a selection of these as it will make the pad easier to use by itself or in combination with other paper pads.
- Can I think of at least 3 cards (layouts, themes, etc) I can make with this? -- Inspiration is great, but I need to be practical. If I can't think of at least 3 projects or unique ideas when I look at the paper, then it's not something I just have to have. This is particularly important for paper pads with unique themes, such as a paper line about cooking or a line about Independence Day. Some of those specific themes could prove not to be versatile enough for the majority of your cards, and you'll want to really think before buying them.
- Does it go with any of my current paper pads? -- For this question, I mainly look at the colors and illustration style. I have a lot of bright and modern paper, so I know that paper with bright and contrasted colors will probably be easy to use. But I might take a little more care when looking at a vintage paper pad because it might not fit with the rest of my paper stash.
- Which 3 stamps could I use with this paper pad? -- This question is probably the most important one. Look closely at your stamp sets and note what style they're in. If you have a lot of cute critters, for example, you might want to stock up on bright paper pads with basic shapes and cute icons. For flower stamps, you might want more classic pads with polka dots and stripes. While your masculine stamps could require a textured industrial feel. There is no paper pad that will have absolutely everything you'll need, so try to pick things that will work with as many other supplies as possible.
Lastly, if you're just not sure where to start or you have a limited storage space, I strongly suggest first stocking up on a few basics. Basic/Classic paper pads stand the test of time and can be used in a large variety of project styles.
Here are a few of my go-to and favorites for basic packs:
- Lawn Fawn's paper pads - especially Let's Polka line, which features stripes, polka dots and hearts. These papers fit in perfectly with Lawn Fawn stamps and can help you chose bright colors that go with the cute images.
- Avery Elle's paper pads - while these paper pads have colors that match the Avery Elle inks, the main reason I love is because they have some fantastic basic patterns and tone-on-tone looks. If you're not confident in creating your own color combinations, Avery Elle's packs come in a 4-color palette that fits together. So, you end up with 4 colors that you can use as a launching point to picking your own card palette.
- Simple Stories Color Vibe 2 - this pad has a very large variety of colors, which makes it a great staple paper pad for your stash. The patterns are very simple and easy to use, so if you can get only one paper pad, go with this one.
- Echo Parks Dots and Stripes - this particular line of Echo Park paper pads features the classic patterns in a variety of colors. The nice thing is that the pads are divided by color range, such as pinks and browns for baby girl cards or teals and greens for baby boy cards.
And, of course, I just had to share a few of my current favorite pads:
- Echo Parks Pirate's Life 6x6 - this paper line has super cute illustrations and I love the nautical theme.
- Pebbles Inc. Fun In The Sun 6x6 - this line has bright and cheerful colors, modern design and a variety of classic patterns such as stripes, waves and gingham.
- Pebbles Inc. Cottage Living 6x6 - this line features some of my favorite color tones: peach, pink, mint and black. It also has several classic geometric shapes that make for a great background.
- Authentique Radiant 6x6 - this line is a bit brighter in person than it looks online, but it has lovely warm tones and a great combination of colors.
- Simple Stories Homespun 6x6 - the colors in this line are a bit more muted and features some fun and unique patterns. It's a good choice when you want to have brighter colors, but a cream background or less contrast than stark white.
Thanks for hanging in there with me through this massive post! There was just so much info to share. Hopefully, it will be useful to some of you out there. Have a creative day!
~Elle~
Thursday, May 21, 2015
Crafty Chat and Goals (updated)
It's been just ages since I last put up a post, so I thought I'd have a quick chat about what I've been up to lately, and what some of my new crafty goals are for the upcoming months.
I've been quite busy with work, and it's unfortunately going to continue for some time. I'm hoping to still be able to squeeze in a few hours here and there to get crafty. But it might be another couple of weeks before I can resume any consistent anything. It's also not helping that summer is slowly creeping up on us - which means a ton more time spent outside. Hopefully I'll be able to balance out the work and the fun!
I've also been busy working on a few super secret projects that I cannot share just yet! They're wonderfully exciting, though, and I'm quite eager to reveal them when the time is right. But I can say they're wonderfully creative projects and I'm enjoying myself immensely.
One thing you might have noticed about my last few posts is some new titles and tags - like Color Monday or Retro Thursday. This is a new system I'm trying out to help me stay focused and sharing the way-too-many-ideas I have. And I'm mainly hoping it will make interesting posts easier to find.
Here is a breakdown of what I have planned:
- Color Monday: It's where I focus on coloring, interesting palettes, or colorful patterned paper.
- Challenge Tuesday: This is where I post a challenge card - whether it's a challenge I created or a challenge I'm participating in.
- Budget Wednesday: This is where I share cards using budget-friendly supplies, techniques or share other penny-saving tips. (haven't shared anything for this yet, but I am planning to!)
- Retro Thursday: It's where I share cards created in a retro/vintage/oldie style, or cards created with retired supplies.
- Friday Illustrations: This is where I share cards I illustrated myself. I'm hoping to grow more and more comfortable with illustration as time goes on.
- Saturday: My day off, as I spend it with family or catching up on work.
- Recap Sunday: This is where I just have a quick chat, go over some goals or just share interesting anecdotes.
I'm still slowly easing into this plan, so I'm not following it 100% to the letter and only sharing projects that fit that day's theme. But I am hoping to eventually implement it as a consistent schedule and get ahead on the projects I share. I'll be trying scheduled posts sometime soon, too, as I think they could help me quite a bit when life gets busy.
Other than that, there are a few long-term projects I'd like to do:
- Updated list of beginner essentials - I think this is definitely something that I should do on a yearly basis, rather than a one-time thing. This is both because my preferences change over time and because products I linked originally may have retired. I'd like to maybe update the list once per year, but we'll see what time will allow for.
- Art Journal - I've been slowly building up a collection of mixed-media and art supplies, as I think I would really enjoy journaling. It would also allow me to use all those awesome techniques that just don't translate into cards as well as I'd like them to.
- Tutorials - Especially on things that might seem a little scary to new crafters - like Copic coloring. I'm slowly getting over feeling like a total card-making newbie, so I think I'd like to jump into tutorials when I've got time for it.
Thank you for reading that wall of text!
~Elle~
I've been quite busy with work, and it's unfortunately going to continue for some time. I'm hoping to still be able to squeeze in a few hours here and there to get crafty. But it might be another couple of weeks before I can resume any consistent anything. It's also not helping that summer is slowly creeping up on us - which means a ton more time spent outside. Hopefully I'll be able to balance out the work and the fun!
I've also been busy working on a few super secret projects that I cannot share just yet! They're wonderfully exciting, though, and I'm quite eager to reveal them when the time is right. But I can say they're wonderfully creative projects and I'm enjoying myself immensely.
One thing you might have noticed about my last few posts is some new titles and tags - like Color Monday or Retro Thursday. This is a new system I'm trying out to help me stay focused and sharing the way-too-many-ideas I have. And I'm mainly hoping it will make interesting posts easier to find.
Here is a breakdown of what I have planned:
- Color Monday: It's where I focus on coloring, interesting palettes, or colorful patterned paper.
- Challenge Tuesday: This is where I post a challenge card - whether it's a challenge I created or a challenge I'm participating in.
- Budget Wednesday: This is where I share cards using budget-friendly supplies, techniques or share other penny-saving tips. (haven't shared anything for this yet, but I am planning to!)
- Retro Thursday: It's where I share cards created in a retro/vintage/oldie style, or cards created with retired supplies.
- Friday Illustrations: This is where I share cards I illustrated myself. I'm hoping to grow more and more comfortable with illustration as time goes on.
- Saturday: My day off, as I spend it with family or catching up on work.
- Recap Sunday: This is where I just have a quick chat, go over some goals or just share interesting anecdotes.
I'm still slowly easing into this plan, so I'm not following it 100% to the letter and only sharing projects that fit that day's theme. But I am hoping to eventually implement it as a consistent schedule and get ahead on the projects I share. I'll be trying scheduled posts sometime soon, too, as I think they could help me quite a bit when life gets busy.
Other than that, there are a few long-term projects I'd like to do:
- Updated list of beginner essentials - I think this is definitely something that I should do on a yearly basis, rather than a one-time thing. This is both because my preferences change over time and because products I linked originally may have retired. I'd like to maybe update the list once per year, but we'll see what time will allow for.
- Art Journal - I've been slowly building up a collection of mixed-media and art supplies, as I think I would really enjoy journaling. It would also allow me to use all those awesome techniques that just don't translate into cards as well as I'd like them to.
- Tutorials - Especially on things that might seem a little scary to new crafters - like Copic coloring. I'm slowly getting over feeling like a total card-making newbie, so I think I'd like to jump into tutorials when I've got time for it.
Thank you for reading that wall of text!
~Elle~
Tuesday, March 17, 2015
Update! (and a chat)
I mentioned a few entries back that I wanted to make some good changes, so I wanted to go a bit more in detail about what I'm planning to do and why. If you want to just read the changes themselves, scroll down to the Changes title.
A little while ago, I bought a small notebook & a pen, and I started a gratitude journal. At the end of every day, I take a few minutes to slow down and think about 3 little things I'm grateful for - a different something each day. One thing that became very obvious to me right away is that there are so many things in my life that I'm grateful for. The challenge is to narrow it down to just 3, and that's really amazing.
Even though I've only been doing a gratitude journal for a short time, I've already noticed some great benefits. I've found myself a lot more content, which led to feeling more relaxed overall. And that in turn made it even easier to find things I'm grateful for. But more importantly, it made me appreciate what I have. It brought my focus back to enjoying what I hold in front of me as opposed to just thinking about the next thing I need to get. All of it snowballed into making a lot of other positive changes in my life -- from eating healthier to exercising more, to having an easier time at work and more.
Then, a couple of weeks ago, we had our taxes done. This process is a bit more complicated because I'm an independent contractor (i.e. self-employed), so we had to carefully go through our expenses and make sure we've claimed everything properly. In the process of this, we added up the money spent on crafty and art supplies... And it's a staggeringly high amount. I only recalled making a couple of really big orders, but once all the little amounts got added, it just grew and grew. It wasn't so bad that we needed to take out a second mortgage and sell our cars or anything like that. But it's still was so much more than I ever spent on a hobby, and way above any budget I'd set for myself.
Altogether, it was a wake-up call that happened at just the right time. If I hadn't started my gratitude journal, I would have felt that massive feeling of guilt for overspending that would carry onto my card-making. I would have had creeping feelings of resentment about not being able to spend money on brand new shiny things. I might have even abandoned cards altogether. But armed with my feeling of contentment and plenty, I saw it as a another confirmation that I'm on the right path -- that I should continue to focus on what I already have instead of looking for what else I need to get.
This shift in focus means stepping away from buying new products. I'm not going to go on a formal spending freeze or anything like that. I tried really hard several times, and it was never really successful. I either got too tempted and ordered stuff anyway, or I didn't order for a while and then made a massive order with everything I would have bought before anyway. But I am going to spend less. I need to embrace what supplies I own and make use of them - regardless of whether they're retired, used a million times by others or out of trend. They're still new and exciting to me, so I'm looking forward to using them.
However, this exciting new direction also means a change for my current setup. I probably won't be able to make the same kinds of blog posts or join the same kind of challenges. Maybe it even means going completely unnoticed by companies and other crafters (though, thankfully, there are a lot of great companies that love and share their old material, and lots of new crafters who haven't grown tired of an old stamp. So there's still hope!). But I think the change is worth it and I hope you'll embark on this journey with me.
Changes
To make this a little easier, I'm going to make a few changes on my blog.
1) I'm going to be focusing on the process, thinking and inspiration instead of specific products. I will still link a few products here and there, as well as add in the right tags so you can find manufacturers easier. I just won't be spending as much time linking and naming everything I used.
This will make writing posts a lot easier for me, not to mention faster. So, hopefully it will mean more sharing.
2) I'm going to walk away from the step-by-step written instructions. After watching a ton of videos and reading just as many blog posts, I've come to the conclusion that step-by-step things work much better in a video. Just reading the text gets a bit boring and bland, not to mention that it really only makes perfect sense to me since I've already made the card.
3) I'm going to do a TON of new personal challenges, mini series and implement ideas I jotted down in my idea notebook. I'm giving a fair warning because they will be all over the place, but there's no reason to wait just because I worry it will be too much. They're things that inspire me, and I should use that inspiration.
4) I'm going to occasionally share mixed media or other art. Though I love cards, I'd also like to get into things like art journaling or watercolor practice. I've gone as far as buying several supplies specifically for art journaling, but haven't taken the plunge yet. I'd like to start in April, after I have a bit of extra time to devote to it. I'll try to share some of my future attempts here.
5) I'm going to change the blog look just a little -- which you should be seeing right now. I've switched the background to be a bit more neutral and simple, and added a blog banner. I hope you like it!
And that's all for now. Sorry for the wall of text, but I wanted to share all of this because I'm both excited and feeling like I'm on an absolutely right path.
A little while ago, I bought a small notebook & a pen, and I started a gratitude journal. At the end of every day, I take a few minutes to slow down and think about 3 little things I'm grateful for - a different something each day. One thing that became very obvious to me right away is that there are so many things in my life that I'm grateful for. The challenge is to narrow it down to just 3, and that's really amazing.
Even though I've only been doing a gratitude journal for a short time, I've already noticed some great benefits. I've found myself a lot more content, which led to feeling more relaxed overall. And that in turn made it even easier to find things I'm grateful for. But more importantly, it made me appreciate what I have. It brought my focus back to enjoying what I hold in front of me as opposed to just thinking about the next thing I need to get. All of it snowballed into making a lot of other positive changes in my life -- from eating healthier to exercising more, to having an easier time at work and more.
Then, a couple of weeks ago, we had our taxes done. This process is a bit more complicated because I'm an independent contractor (i.e. self-employed), so we had to carefully go through our expenses and make sure we've claimed everything properly. In the process of this, we added up the money spent on crafty and art supplies... And it's a staggeringly high amount. I only recalled making a couple of really big orders, but once all the little amounts got added, it just grew and grew. It wasn't so bad that we needed to take out a second mortgage and sell our cars or anything like that. But it's still was so much more than I ever spent on a hobby, and way above any budget I'd set for myself.
Altogether, it was a wake-up call that happened at just the right time. If I hadn't started my gratitude journal, I would have felt that massive feeling of guilt for overspending that would carry onto my card-making. I would have had creeping feelings of resentment about not being able to spend money on brand new shiny things. I might have even abandoned cards altogether. But armed with my feeling of contentment and plenty, I saw it as a another confirmation that I'm on the right path -- that I should continue to focus on what I already have instead of looking for what else I need to get.
This shift in focus means stepping away from buying new products. I'm not going to go on a formal spending freeze or anything like that. I tried really hard several times, and it was never really successful. I either got too tempted and ordered stuff anyway, or I didn't order for a while and then made a massive order with everything I would have bought before anyway. But I am going to spend less. I need to embrace what supplies I own and make use of them - regardless of whether they're retired, used a million times by others or out of trend. They're still new and exciting to me, so I'm looking forward to using them.
However, this exciting new direction also means a change for my current setup. I probably won't be able to make the same kinds of blog posts or join the same kind of challenges. Maybe it even means going completely unnoticed by companies and other crafters (though, thankfully, there are a lot of great companies that love and share their old material, and lots of new crafters who haven't grown tired of an old stamp. So there's still hope!). But I think the change is worth it and I hope you'll embark on this journey with me.
Changes
To make this a little easier, I'm going to make a few changes on my blog.
1) I'm going to be focusing on the process, thinking and inspiration instead of specific products. I will still link a few products here and there, as well as add in the right tags so you can find manufacturers easier. I just won't be spending as much time linking and naming everything I used.
This will make writing posts a lot easier for me, not to mention faster. So, hopefully it will mean more sharing.
2) I'm going to walk away from the step-by-step written instructions. After watching a ton of videos and reading just as many blog posts, I've come to the conclusion that step-by-step things work much better in a video. Just reading the text gets a bit boring and bland, not to mention that it really only makes perfect sense to me since I've already made the card.
3) I'm going to do a TON of new personal challenges, mini series and implement ideas I jotted down in my idea notebook. I'm giving a fair warning because they will be all over the place, but there's no reason to wait just because I worry it will be too much. They're things that inspire me, and I should use that inspiration.
4) I'm going to occasionally share mixed media or other art. Though I love cards, I'd also like to get into things like art journaling or watercolor practice. I've gone as far as buying several supplies specifically for art journaling, but haven't taken the plunge yet. I'd like to start in April, after I have a bit of extra time to devote to it. I'll try to share some of my future attempts here.
5) I'm going to change the blog look just a little -- which you should be seeing right now. I've switched the background to be a bit more neutral and simple, and added a blog banner. I hope you like it!
And that's all for now. Sorry for the wall of text, but I wanted to share all of this because I'm both excited and feeling like I'm on an absolutely right path.
Tuesday, March 10, 2015
Organization - Cardstock & Embellishments
My crafty area is nearly clean now, so I thought I would wrap up by sharing my storage solutions for the rest of my crafty stash.
Cardstock:
The first step in wrangling my cardstock was figuring out how I'm going to store it. I have a rather large collection of cardstock from several manufacturers, and I needed a good storage solution. Since paper is very heavy, I couldn't just throw all of my cardstock into one container - as it would then be impossible to move, as well as go through to pull out specific colors.
So, I went to my local office supply store and got some letter storage boxes (I don't have a link, though they are similar to these - only a lot less expensive). These boxes measure 10½" x 13½" x 3½", and there were several color choices. I was able to organize the cardstock by color, and I used a white box with a color label for any colors I was missing (ex. orange or purple). I stacked these boxes under my storage shelf, where they're perfectly out of the way, but still within reach if I need them.
Before I put all of the cardstock away, I grabbed 3 sheets of cardstock out of each package. I cut 2 of them in half and folded them to create A2 card bases (4¼ by 5½"), two top-folding and two side-folding. And the 3rd sheet was cut into four 4¼ by 5½" panels that I can use for layering or die-cutting. That was quite a bit of work, but it left me with a lot of ready-to-use card bases and gave me a very good idea of all the different colors I had in my stash.
There are a few packs of cardstock that I didn't put away:
-- My basics - white, cream, kraft, grays, navy and black -- I use them all the time, and I needed to have them within reach. I also needed to know just how many I had left, so I can re-order before running out of an essential color (like white).
-- Rainbow and sampler assortments. -- I kept these out just in case I run out of card bases or need extra of a particular color to die-cut.
I'm really pleased with this system, and glad I took the time to pre-cut those card bases. I'm already noticing that it makes card-making quicker and more convenient.
Embellishments:
The first step in organizing my embellishments was to put them in categories. I divided them by type, such as sequins, flowers, enamel dots, etc. After that, I went through each stack and took out any pieces I didn't think I would use immediately -- things like duplicate colors/back-ups, seldom used metal charms and ephemera, etc. I put them in a clear plastic box with a lid. I'm going to make an effort to pull something from that box at least once per month and find a way to use it.
The rest of the embellishments were stacked in photo boxes I got from Ikea. I used small plastic bags for embellishments that were open or had a lot of small non-adhesive pieces (ex. die-cuts, buttons, wood veneer).
I gave enamel dots their own separate box, both because they're my most frequently used embellishment and because I have such a large variety now. I organized them by color/color families. I still kept them in their packaging, just so they wouldn't get dusty.
My sequins are stored in the Craftmates Pop'nLock (and smaller version) containers I got from Amazon a few months ago. They're organized by color and by size if I have multiple sizes. I have a few fun mixes in there, too. Winnie and Walter always sends a little envelope with free sequins if you order them directly, so I've got a few of those packs to have fun with.
Lastly, my flowers are all in large basket. I kept them in their original packaging or in Ziploc bags to avoid getting them dusty. The flowers were the most challenging to organize because they're the biggest. I need to try using them on projects more often, I think.
And that's it! Everything is neatly organized and should be much easier to find (and use).
Tuesday, February 10, 2015
Organization - Inks & Ink Swatches
I'm currently in the process of organizing my inks and ink swatches, so I thought I'd share how I used my inks before and what I've changed.
My old system had the inks separated by manufacturer, then the majority of it stuck in a box because I had no way to display them. And that basically just lead to a bunch of wonderful inks that never got used. It was time to fix it.
My first big project was to make an ink swatch for all of the inks I have. I actually have a variety of inks - water-based dye inks, oil-based dye inks, hybrid inks, pigment inks and distress inks. So, I needed to have one central place where I could look at the different colors I have and easily figure out what techniques I can use them with.
I saw one of Jennifer McGuire's videos on ink swatches and I thought her system would work perfectly for me. So, I bought this set of coin-collecting pocket page protectors on Amazon. I cut out 2x2" pieces of card stock to insert into each pocket, then stamped a swatch rectangle and labelled it with ink name, company and type.
What I love about this system is that I can arrange and re-arrange the swatches as well as easily take them out to compare with paper or embellishments. Visually, it's helping me quickly identify what kind of colors I'm missing (yellow and green), and makes it less tempting to cave and buy more ink pads.
Another unexpected benefit of this system is seeing the different degrees of coverage I get out of my ink pads - especially after the ink was left to dry and really soak into the paper. I was using a completely solid stamp and it took practice with several of the inks to get it to stamp smoothly and evenly. I've discovered that I need to be a lot more careful with light inks - since they're hard to see on a photopolymer stamp. I seem to have a tendency to over-ink while making sure the stamp is covered evenly, and that results in a messy, splotchy image.
Also, I've now got a new-found love for Hero Arts Shadow inks and Simon Says Stamp inks. They have the same formula and stamp really splotchy at first. But over time, they even out and you end up with a rich and smooth result after drying.
On the other hand, I was a bit under-whelmed with my hybrid inks from My Favorite Things. They work just fabulously for Copic coloring. But their solid coverage wasn't as great -- and I've got a few ink colors that I wouldn't be using for Copics necessarily. So, some of those inkpads will be going into box storage.
I'm still working my way through the archival inks from Ranger (they're oil-based) and my collection of pigment inks. I've found that some of my Memento Luxe pigment inks have already dried out, so I've thrown them out. I was very careful about how I stored them -- had them upside down and with the lid secured, so I'm not sure exactly why they dried out. But they were some of the first inks I got, and I have no idea how long they sat in a warehouse before making their way to me. I'm going to try and figure out why they dried out or if there's any products I can get to refresh them. I know that there are ink refresher sprays for dye inks, but I don't know if anything exists for pigment inks.
I recently got a low white shelf that will be sitting in the closet and holding ink pads I plan on using fairly often. I have small canvas boxes I bought on sale at my local Target that will do a good job of keeping them contained. I thought about investing in a fancy stamp storage shelf, but I really don't have enough room for it at the moment. Maybe once all of my supplies are organized, I'll think about more permanent storage. But for now, I'm going for cheaper alternatives that will help me find and display my supplies.
I also bought a few small plastic baskets like these that will hold my most-used inks -- hybrid inks for Copic coloring, distress ink pads, black and brown pigment inks for sentiments and my Versamark ink for embossing. Having a designated basket I can easily grab for a technique will be very useful.
And that's all for my ink pads and ink swatches! Next time, I will be tackling the mountains of cardstock. :)
My old system had the inks separated by manufacturer, then the majority of it stuck in a box because I had no way to display them. And that basically just lead to a bunch of wonderful inks that never got used. It was time to fix it.
My first big project was to make an ink swatch for all of the inks I have. I actually have a variety of inks - water-based dye inks, oil-based dye inks, hybrid inks, pigment inks and distress inks. So, I needed to have one central place where I could look at the different colors I have and easily figure out what techniques I can use them with.
I saw one of Jennifer McGuire's videos on ink swatches and I thought her system would work perfectly for me. So, I bought this set of coin-collecting pocket page protectors on Amazon. I cut out 2x2" pieces of card stock to insert into each pocket, then stamped a swatch rectangle and labelled it with ink name, company and type.
What I love about this system is that I can arrange and re-arrange the swatches as well as easily take them out to compare with paper or embellishments. Visually, it's helping me quickly identify what kind of colors I'm missing (yellow and green), and makes it less tempting to cave and buy more ink pads.
Another unexpected benefit of this system is seeing the different degrees of coverage I get out of my ink pads - especially after the ink was left to dry and really soak into the paper. I was using a completely solid stamp and it took practice with several of the inks to get it to stamp smoothly and evenly. I've discovered that I need to be a lot more careful with light inks - since they're hard to see on a photopolymer stamp. I seem to have a tendency to over-ink while making sure the stamp is covered evenly, and that results in a messy, splotchy image.
Also, I've now got a new-found love for Hero Arts Shadow inks and Simon Says Stamp inks. They have the same formula and stamp really splotchy at first. But over time, they even out and you end up with a rich and smooth result after drying.
On the other hand, I was a bit under-whelmed with my hybrid inks from My Favorite Things. They work just fabulously for Copic coloring. But their solid coverage wasn't as great -- and I've got a few ink colors that I wouldn't be using for Copics necessarily. So, some of those inkpads will be going into box storage.
I'm still working my way through the archival inks from Ranger (they're oil-based) and my collection of pigment inks. I've found that some of my Memento Luxe pigment inks have already dried out, so I've thrown them out. I was very careful about how I stored them -- had them upside down and with the lid secured, so I'm not sure exactly why they dried out. But they were some of the first inks I got, and I have no idea how long they sat in a warehouse before making their way to me. I'm going to try and figure out why they dried out or if there's any products I can get to refresh them. I know that there are ink refresher sprays for dye inks, but I don't know if anything exists for pigment inks.
I recently got a low white shelf that will be sitting in the closet and holding ink pads I plan on using fairly often. I have small canvas boxes I bought on sale at my local Target that will do a good job of keeping them contained. I thought about investing in a fancy stamp storage shelf, but I really don't have enough room for it at the moment. Maybe once all of my supplies are organized, I'll think about more permanent storage. But for now, I'm going for cheaper alternatives that will help me find and display my supplies.
I also bought a few small plastic baskets like these that will hold my most-used inks -- hybrid inks for Copic coloring, distress ink pads, black and brown pigment inks for sentiments and my Versamark ink for embossing. Having a designated basket I can easily grab for a technique will be very useful.
And that's all for my ink pads and ink swatches! Next time, I will be tackling the mountains of cardstock. :)
Tuesday, January 27, 2015
Organizing - Patterned Paper
I've finally finished organizing my patterned paper, so I thought I'd share my process with you all a little. If you'd like to read a bit about how I store stamps, click here.
Before re-organizing my patterned paper was just stacked in 4 tall towers on a shelf. I'd gone through it a few times and tried to organize it so that the front towers had the patterned paper I was planning to use - ex. seasonal paper - as well as the most recent paper pads I'd purchased. I periodically went through the towers and tried to pull out some of the more fun sets to use. My old system worked alright, but there were a few major problems:
1) It was really difficult to keep track of all the different paper I owned.
- While I was doing pretty good at not buying duplicate paper pads, I still found myself not knowing how many paper pads I had for a specific theme. So, I had a dozen Christmas-themed paper pads -- some of them with colors/style that wouldn't work with my stamp collection.
2) I was overwhelmed with the possibilities.
- This lead to either using the same patterned paper again and again, or not using patterned paper at all. And with my collection being as big as it is, this meant I had a lot of supplies just using up space and being wasted.
3) I was saving my "favorite" papers.
- There's always that one favorite paper that I just adore and want to keep forever. And then there were two, and three, and eventually towers. But as I was sorting my crafty supplies, I came to realize that some of those favorite papers weren't such a favorite now. And quite a few of them don't match my current stamp collection either.
4) I had a pretty large collection of 12x12 paper.
- There are several papers and collections that only came in 12x12 format, and I made sure to grab them while they were still available. Originally, I planned to keep them in the 12x12 format, so I could use them for boxes. But the boxes I make are always smaller than 6" in height/width/depth, so I didn't really need to keep them in the 12x12 size.
My first step was to cut the 12x12 sheets into a 6x6 size. I did this for the majority of my 12x12 sheets. The remainder of the 12x12 papers were duplicates of collections that are no longer readily available (ex. Lawn Fawn's Into the Woods collection). Since they were all unopened, I tied them with a long piece of ribbon and put them in a flat box that rolls under the bed.
Then I grabbed all of the Christmas and winter-themed papers and put them in a plastic Sterilite bin -- one of the bins I'd been using for my stamps previously. I make a lot of Holiday cards, so I wanted to make sure the Christmas papers were somewhere I can easily find and grab when I need them.
I chose 6 paper pads I really wanted to use for the next few cards and put them in a small wicker basket I got from my local Target - it was in the baby section and only cost 1.99$. My plan is to use the 6 paper pads exclusively until they're gone (or close to gone) and then move onto the next set.
The rest of the paper was organized by theme - seasonal, holiday, baby, girl/boy, travel, masculine, feminine, geometric and basic shapes. The collections that didn't seem to fit in any other theme were grouped together by color. I chose this particular system because thematic content seems to work really well with the stamps. I'm eager to see how it will work with paper.
Since I'd made a few MFT orders throughout last year, I had several of their package boxes still sitting in the closet. I put my 6x6 papers in those boxes, and stacked them up neatly in the corner of my crafty closet. I like the MFT boxes in particular because the lid folds in and stays shut, and the white color made it very easy to write down the contents with a sharpie.
I'm going to limit my buying of patterned paper over the next few months. However, there are a few collections that I'm really looking forward to (Lawn Fawn and Avery Elle, specifically), so I've made sure to save a little extra storage space for those.
Next, I will be tackling my cardstock, inks and embellishments. I'll keep you posted once I've made progress on those.
Before re-organizing my patterned paper was just stacked in 4 tall towers on a shelf. I'd gone through it a few times and tried to organize it so that the front towers had the patterned paper I was planning to use - ex. seasonal paper - as well as the most recent paper pads I'd purchased. I periodically went through the towers and tried to pull out some of the more fun sets to use. My old system worked alright, but there were a few major problems:
1) It was really difficult to keep track of all the different paper I owned.
- While I was doing pretty good at not buying duplicate paper pads, I still found myself not knowing how many paper pads I had for a specific theme. So, I had a dozen Christmas-themed paper pads -- some of them with colors/style that wouldn't work with my stamp collection.
2) I was overwhelmed with the possibilities.
- This lead to either using the same patterned paper again and again, or not using patterned paper at all. And with my collection being as big as it is, this meant I had a lot of supplies just using up space and being wasted.
3) I was saving my "favorite" papers.
- There's always that one favorite paper that I just adore and want to keep forever. And then there were two, and three, and eventually towers. But as I was sorting my crafty supplies, I came to realize that some of those favorite papers weren't such a favorite now. And quite a few of them don't match my current stamp collection either.
4) I had a pretty large collection of 12x12 paper.
- There are several papers and collections that only came in 12x12 format, and I made sure to grab them while they were still available. Originally, I planned to keep them in the 12x12 format, so I could use them for boxes. But the boxes I make are always smaller than 6" in height/width/depth, so I didn't really need to keep them in the 12x12 size.
My first step was to cut the 12x12 sheets into a 6x6 size. I did this for the majority of my 12x12 sheets. The remainder of the 12x12 papers were duplicates of collections that are no longer readily available (ex. Lawn Fawn's Into the Woods collection). Since they were all unopened, I tied them with a long piece of ribbon and put them in a flat box that rolls under the bed.
Then I grabbed all of the Christmas and winter-themed papers and put them in a plastic Sterilite bin -- one of the bins I'd been using for my stamps previously. I make a lot of Holiday cards, so I wanted to make sure the Christmas papers were somewhere I can easily find and grab when I need them.
I chose 6 paper pads I really wanted to use for the next few cards and put them in a small wicker basket I got from my local Target - it was in the baby section and only cost 1.99$. My plan is to use the 6 paper pads exclusively until they're gone (or close to gone) and then move onto the next set.
The rest of the paper was organized by theme - seasonal, holiday, baby, girl/boy, travel, masculine, feminine, geometric and basic shapes. The collections that didn't seem to fit in any other theme were grouped together by color. I chose this particular system because thematic content seems to work really well with the stamps. I'm eager to see how it will work with paper.
Since I'd made a few MFT orders throughout last year, I had several of their package boxes still sitting in the closet. I put my 6x6 papers in those boxes, and stacked them up neatly in the corner of my crafty closet. I like the MFT boxes in particular because the lid folds in and stays shut, and the white color made it very easy to write down the contents with a sharpie.
I'm going to limit my buying of patterned paper over the next few months. However, there are a few collections that I'm really looking forward to (Lawn Fawn and Avery Elle, specifically), so I've made sure to save a little extra storage space for those.
Next, I will be tackling my cardstock, inks and embellishments. I'll keep you posted once I've made progress on those.
Saturday, January 10, 2015
Organization - Stamps
This past week, I've slowly started to get my crafting supplies organized. After all the massive deals, clearance and retirement sales, my crafty closet storage is just about bursting at the seams. Not to mention that I cannot find a few products I know I own... I'm also on a personal quest to use all of the supplies I own, and that's rather hard to do so if they're buried under a mountain of things.
So, I decided to do some major re-organizing and get all of my supplies in order. And I thought I'd share this process with you a bit.
Before I get to the new organization systems, here's a quick overview of how my stamps were organized before:
- I'd purchased a few sets of Avery Elle storage pockets. I found them for quite a bit cheaper on Amazon, and bought a few sets.
- For the stamp pocket insets, I used a large pack of 100#lbs cardstock from Recollections that I got from my local Michaels. This was an extremely cheap pack - 10$ for 100 sheets, and I bought it during a sale with a coupon that brought the price down to 2$ at checkout. At the time I'd bought it, I thought I could use it for crafts. But the cardstock was of such terrible quality that it made any card using it look cheap and awful. Still, they were perfectly sturdy and great to use in storage pockets.
- I bought a few cheap Sterilite plastic bins at my local Walmart - note, I bought them at the store individually, so the price was around 3.50$ per bin.
- Stamps were organized by manufacturer, then alphabetically.
There were a few problems with my old system, the biggest being that it was hard to find stamps. I knew where the stamps I used often were, but that led to me using the same stamp again and again because it was the easiest one to find/reach. And that led to completely forgetting I had an awesome stamp for a card and going online to buy an extra stamp I may not have needed.
The other problem was that my stamp collection was growing - exponentially! So what started as 1 little bin turned into 3 bins + a huge box that I still needed bins and storage pockets. And I'd run out of room to place them all. It was time to re-think and get some new systems in place.
My first big solution was to find a place that would house all the stamps. I needed something big, sturdy but still easy to move and use. So, I drew inspiration from Jennifer McGuire's organizing video, and purchased a couple of fridge binz from Amazon. I happened to grab them at a small discount, and use up a gift card I got for Christmas. I really love how easy it is to display the stamps, and how I can grab and move the bins around if I need to. They are also very large and house quite a few sets of stamps. This was perfect for my collection.
The second step was the storage pockets. Although I like the Avery Elle pockets, I bought a set of My Favorite Things Large storage pockets with my last order. If you're looking to save a bit of money, you definitely want to go with the MFT pockets. They are almost identical yo the Avery Elle pockets, being just a slightest bit wider - which means they can fit in a 5.5" insert and that makes making inserts from regular cardstock much easier. But they're a lot cheaper - cost of $8.99 for 50 pockets -- which means 4.50$ compared to the 9$ Avery Elle set.
The final step was figuring out how to organize them. I knew by manufacturer wasn't working for me, so I took a look through my blog, card collection and idea book and figured out how to separate the stamps by theme. I've got the following themes: baby, flowers & butterflies, holiday (non-Christmas), Christmas, seasonal, sentiments, animal/critter, birthday, food, school, people, patterns/backgrounds, love/marriage/anniversary, sympathy and other. Each of the sections is then stacked by manufacturer and alphabetically.
In separating the stamps by theme, I've already found what stamps I need to get more of (sympathy, baby) and what stamps I have more than enough material for (Christmas, sentiment). And it's been much easier to find stamps for a specific occasion.
Lastly, I found a set of color-coding labels I'd originally bought at Walmart to use on kraft wrapping paper. It's a great way to add cute polkadots to the gift wrap or to use for a card technique (masking dots, for example). But they're also going to be useful for keeping track of which stamps I'm using. So, every time I use a stamp, I will put a little round circle on the stamp pocket. This will encourage me to use stamps without the circle and help me track what I'm using more often.
And that's all for the stamps! Next time, I'll write about tackling paper and cardstock.
So, I decided to do some major re-organizing and get all of my supplies in order. And I thought I'd share this process with you a bit.
Before I get to the new organization systems, here's a quick overview of how my stamps were organized before:
- I'd purchased a few sets of Avery Elle storage pockets. I found them for quite a bit cheaper on Amazon, and bought a few sets.
- For the stamp pocket insets, I used a large pack of 100#lbs cardstock from Recollections that I got from my local Michaels. This was an extremely cheap pack - 10$ for 100 sheets, and I bought it during a sale with a coupon that brought the price down to 2$ at checkout. At the time I'd bought it, I thought I could use it for crafts. But the cardstock was of such terrible quality that it made any card using it look cheap and awful. Still, they were perfectly sturdy and great to use in storage pockets.
- I bought a few cheap Sterilite plastic bins at my local Walmart - note, I bought them at the store individually, so the price was around 3.50$ per bin.
- Stamps were organized by manufacturer, then alphabetically.
There were a few problems with my old system, the biggest being that it was hard to find stamps. I knew where the stamps I used often were, but that led to me using the same stamp again and again because it was the easiest one to find/reach. And that led to completely forgetting I had an awesome stamp for a card and going online to buy an extra stamp I may not have needed.
The other problem was that my stamp collection was growing - exponentially! So what started as 1 little bin turned into 3 bins + a huge box that I still needed bins and storage pockets. And I'd run out of room to place them all. It was time to re-think and get some new systems in place.
My first big solution was to find a place that would house all the stamps. I needed something big, sturdy but still easy to move and use. So, I drew inspiration from Jennifer McGuire's organizing video, and purchased a couple of fridge binz from Amazon. I happened to grab them at a small discount, and use up a gift card I got for Christmas. I really love how easy it is to display the stamps, and how I can grab and move the bins around if I need to. They are also very large and house quite a few sets of stamps. This was perfect for my collection.
The second step was the storage pockets. Although I like the Avery Elle pockets, I bought a set of My Favorite Things Large storage pockets with my last order. If you're looking to save a bit of money, you definitely want to go with the MFT pockets. They are almost identical yo the Avery Elle pockets, being just a slightest bit wider - which means they can fit in a 5.5" insert and that makes making inserts from regular cardstock much easier. But they're a lot cheaper - cost of $8.99 for 50 pockets -- which means 4.50$ compared to the 9$ Avery Elle set.
The final step was figuring out how to organize them. I knew by manufacturer wasn't working for me, so I took a look through my blog, card collection and idea book and figured out how to separate the stamps by theme. I've got the following themes: baby, flowers & butterflies, holiday (non-Christmas), Christmas, seasonal, sentiments, animal/critter, birthday, food, school, people, patterns/backgrounds, love/marriage/anniversary, sympathy and other. Each of the sections is then stacked by manufacturer and alphabetically.
In separating the stamps by theme, I've already found what stamps I need to get more of (sympathy, baby) and what stamps I have more than enough material for (Christmas, sentiment). And it's been much easier to find stamps for a specific occasion.
Lastly, I found a set of color-coding labels I'd originally bought at Walmart to use on kraft wrapping paper. It's a great way to add cute polkadots to the gift wrap or to use for a card technique (masking dots, for example). But they're also going to be useful for keeping track of which stamps I'm using. So, every time I use a stamp, I will put a little round circle on the stamp pocket. This will encourage me to use stamps without the circle and help me track what I'm using more often.
And that's all for the stamps! Next time, I'll write about tackling paper and cardstock.
Saturday, December 13, 2014
Update and crafty chat
You may have noticed that there haven't been very many cards lately. And I'm very sorry about that! I've been very busy at work, and it's left me with virtually no time for anything else. I have one more week to go, and then I get a week off to spend time with my family. I'm hoping to go back to a semblance of a regular posting schedule after that.
Even though I haven't done anything particularly crafty lately, I've still been in a bit of a "craft" mindset/mode. So, I did some more planning out on what I'd like to do after the holidays. I actually got this big elaborate plan in my notebook about what to do on a week per week basis, and a ton of fun and exciting new series. I don't know whether I'll be able to keep up with it all, but it was fun to plan.
I've also bought a few supplies to try out new techniques. I got some stencils and some texture paste, and I'm curious to see the kind of thing I can make with them. During the Black Friday/Cyber Monday weekend, I also got some Tombow markers and some Peerless Watercolor sheets. So, I'm very excited to play more with watercolor.
I've started organizing my patterned paper towers. I just love patterned paper, and I have collected a huge variety of it now - something for every occasion. However, I often find myself "saving" the favorites and not using them. But, as I remind myself, they were bought to be used not to collect dust in a closet. So, I'm going to make an effort to create extra things with patterned paper. And maybe get away from only using it as a 4 x 5 1/4" mat.
Lastly, I'm going to be starting a personal challenge for the next year. It will be a 100-card challenge based on a list of words (some of the words are concepts or ideas, others are objects and colors). I'll post the list of words and the details of the challenge very soon. I hope you'll join me. :)
Even though I haven't done anything particularly crafty lately, I've still been in a bit of a "craft" mindset/mode. So, I did some more planning out on what I'd like to do after the holidays. I actually got this big elaborate plan in my notebook about what to do on a week per week basis, and a ton of fun and exciting new series. I don't know whether I'll be able to keep up with it all, but it was fun to plan.
I've also bought a few supplies to try out new techniques. I got some stencils and some texture paste, and I'm curious to see the kind of thing I can make with them. During the Black Friday/Cyber Monday weekend, I also got some Tombow markers and some Peerless Watercolor sheets. So, I'm very excited to play more with watercolor.
I've started organizing my patterned paper towers. I just love patterned paper, and I have collected a huge variety of it now - something for every occasion. However, I often find myself "saving" the favorites and not using them. But, as I remind myself, they were bought to be used not to collect dust in a closet. So, I'm going to make an effort to create extra things with patterned paper. And maybe get away from only using it as a 4 x 5 1/4" mat.
Lastly, I'm going to be starting a personal challenge for the next year. It will be a 100-card challenge based on a list of words (some of the words are concepts or ideas, others are objects and colors). I'll post the list of words and the details of the challenge very soon. I hope you'll join me. :)
Subscribe to:
Posts (Atom)