Now that we're half-way through 2019 and things have settled to a more natural pace, I wanted to make a chatty post and share a few of my plans for the rest of the year (and hopefully onward). I'm hoping that these changes will make both sharing and creating a little easier. As I like the idea of regular sharing, this kind of schedule should help me stay on track a little better.
The first is a posting schedule:
- Cards/projects shared daily Monday through Friday, with minimal text.
- Saturday and Sunday are my days off, with occasional chatty posts shared on Sundays.
- Once per month, I will be doing a recap post of the previous month.
- Once per season, I will be taking a whole week off to catch up or take a creative break.
I'm hoping that this new schedule will help me stay active on my blog and on Instagram without feeling overwhelmed. As it takes significant time to create, photograph, edit and schedule all the posts, I've found it really difficult to do this daily and still produce quality content. If I have a bad week where I'm sick or where there's a ton of events happening, it becomes extremely stressful to try and keep up the pace.
The second thing I wanted to share is that I will try to do a destash giveaway or two in the near future.
While I don't want this to be a giveaway blog, I do have a few stamps and supplies that could use a new loving home, and I would love to pass them on to someone who will truly enjoy them. I thought about selling them at a discount, but I don't have enough free time to be a seller and it seemed like an extra layer of stressful little tasks to ensure the exchange goes smoothly. So, I'd rather just do a giveaway when I can afford to ship off some goodies.
Lastly, I will be working on some personal mini-challenges again to keep things interesting.
I have a notebook full of ideas, themes, sketches and palettes and I want to turn it into cards. I would like to work my way through it - and have it help me work through a few other secret projects I've got going on.
Thanks for reading!
~Elle~

Showing posts with label Organization. Show all posts
Showing posts with label Organization. Show all posts
Sunday, June 9, 2019

Wednesday, August 1, 2018
Brief Hiatus (Cleaning)
As you may have noticed, there haven't been any card posts for the past few days. I am currently deep in the trenches of organizing and cleaning out my crafty space and storage. And, of course, cleaning and organizing means no time to make cards.
I'm excited because I've been working hard on decluttering my space and I have a hefty bundle of supplies I'm ready to pass onto someone else. I haven't decided yet if I'll be selling or donating my destash goodies, but I am looking forward to having a more manageable supplies section.
I found a whole bunch of things I am itching to use, so expect some fun new projects in the near future.
Posts will resume this weekend!
~Elle~
I'm excited because I've been working hard on decluttering my space and I have a hefty bundle of supplies I'm ready to pass onto someone else. I haven't decided yet if I'll be selling or donating my destash goodies, but I am looking forward to having a more manageable supplies section.
I found a whole bunch of things I am itching to use, so expect some fun new projects in the near future.
Posts will resume this weekend!
~Elle~
Sunday, January 29, 2017
Chatty Sunday: January Stash Kit review
Here we are at the end of January, and you're probably wondering what happened to the January stash kit. Tthe answer is... well, nothing fun.
For some reason, the kit for January just didn't work for me. Don't get me wrong, I actually loved all the components of the kit - I had a ton of random ideas for the stamps, the paper and the embellishments. I stamped out a whole bunch of cute images that I colored. I even put together a couple of extra cards! But the process, as a whole, left me very underwhelmed. I don't feel like I gave the supplies a good workout, and I really didn't feel that I should be setting the supplies down in the "used" pile.
And I'm kind of glad, actually. Not all supplies will inspire me in the same ways, and I think that's the whole point of doing this project - to figure out how my supplies are best used and to make something productive with them. The fact that a month was underwhelming is good. I went from very structured sets last year (thematic sets) to something completely random in January, and it was a bit like a swinging pendulum - neither extreme worked for me. I don't want completely structured, but I also don't want completely random, either.
With this in mind, I figured out a couple of changes I need to make to the kit process:
The first change is to make the kits a bit smaller. January's kit had 7 stamps - and that's just too much for a single kit. I've decided to go back to a 4-stamp model, with it being broken down to: one smaller set (ex. 3x3 or 4x4 set), one standard set (4x6), one larger set (4x7.5 or larger) and one sentiment set (any size). This gives me a great variety of stamps to use, but without feeling like the amount of material I need to use is overwhelming.
The second change will be to take out any rubber stamps. Although I do plan to use my rubber stamps, I think they're better-suited to single cards. Almost all of my rubber stamps are character stamps, and the majority are a bit complicated - so they take a lot longer to color. I think it will work better to use them as I'm inspired to, instead of forcing them into a kit.
And the last change will be to get rid of the monthly time element. Instead of a monthly kit, they'll just be kits - and I'll continue working on them for as long as it takes me to make 12 cards. I'm still hoping to hit that 1-kit-per-month mark, but I am also looking forward to feeling less pressure to try and cram making 8 cards in one evening. Deadlines can be a great motivator, but too rigid of a schedule starts making the process feel like a job or a chore, and I don't want that.
In the next week, I'll be sharing my next kit. The focus will be on birthday and masculine/boy cards, as I'm going to be working on some gift sets for Christmas.
Thanks for reading!
~Elle~
For some reason, the kit for January just didn't work for me. Don't get me wrong, I actually loved all the components of the kit - I had a ton of random ideas for the stamps, the paper and the embellishments. I stamped out a whole bunch of cute images that I colored. I even put together a couple of extra cards! But the process, as a whole, left me very underwhelmed. I don't feel like I gave the supplies a good workout, and I really didn't feel that I should be setting the supplies down in the "used" pile.
And I'm kind of glad, actually. Not all supplies will inspire me in the same ways, and I think that's the whole point of doing this project - to figure out how my supplies are best used and to make something productive with them. The fact that a month was underwhelming is good. I went from very structured sets last year (thematic sets) to something completely random in January, and it was a bit like a swinging pendulum - neither extreme worked for me. I don't want completely structured, but I also don't want completely random, either.
With this in mind, I figured out a couple of changes I need to make to the kit process:
The first change is to make the kits a bit smaller. January's kit had 7 stamps - and that's just too much for a single kit. I've decided to go back to a 4-stamp model, with it being broken down to: one smaller set (ex. 3x3 or 4x4 set), one standard set (4x6), one larger set (4x7.5 or larger) and one sentiment set (any size). This gives me a great variety of stamps to use, but without feeling like the amount of material I need to use is overwhelming.
The second change will be to take out any rubber stamps. Although I do plan to use my rubber stamps, I think they're better-suited to single cards. Almost all of my rubber stamps are character stamps, and the majority are a bit complicated - so they take a lot longer to color. I think it will work better to use them as I'm inspired to, instead of forcing them into a kit.
And the last change will be to get rid of the monthly time element. Instead of a monthly kit, they'll just be kits - and I'll continue working on them for as long as it takes me to make 12 cards. I'm still hoping to hit that 1-kit-per-month mark, but I am also looking forward to feeling less pressure to try and cram making 8 cards in one evening. Deadlines can be a great motivator, but too rigid of a schedule starts making the process feel like a job or a chore, and I don't want that.
In the next week, I'll be sharing my next kit. The focus will be on birthday and masculine/boy cards, as I'm going to be working on some gift sets for Christmas.
Thanks for reading!
~Elle~
Sunday, January 1, 2017
Crafty Chat - New Year, New Goals

Happy New Year, everyone! I hope 2017 treats you all well and brings many moments of joy and laughter.
I don't make New Years' resolutions. However, I do set some sensible goals for myself each year. In 2016, my goal was to make and share 100 non-DT cards on my blog, and I have reached - and surpassed! - this goal.
For 2017, I decided to focus on my current crafty stash and see how long I can go without making a single crafty order. I have a few projects and ideas to help me make good use of my supplies - things like monthly stash kits, blog features and reviews - along with an occasional challenge or two.
In preparation, I've made a few final crafty orders with my favorite companies - I took advantage of Black Friday and Christmas sales, so I really got a lot of bang for my buck. My orders were for a few staples like cardstock, envelopes and adhesive, as well as a bunch of stamps, inks and dies that were on my wish-list. With this goal, I hope to whittle down some of my existing consumables (like paper, embellishments, etc) as well as make a plan for what I want to do with my stamps. As much as I'd love to, I can't keep an overwhelming and infinite stash of stamps and dies. So, that will be an interesting task for the last half of 2017...
My secondary goal for 2017 is to try and interact with crafters more, so I'll try to be less of a lurker and make time to chat with others. I do spend a bit of time browsing blogs, FB pages and YouTube videos from crafters I admire, so I'm going to try and comment (on top of a quick "like" of content).
Lastly, I plan to continue blogging regularly. I'd like to have it be a daily thing, but I know work and life will keep me a bit busy sometimes. So, I'll just work on posting on a regular schedule instead and work ahead for some of the entries.
Thanks for reading!
~Elle~
Sunday, October 23, 2016
Stash Kit: November
One of the challenges with October's kit was that cards started to all look the same. So, I decided to add a touch of randomness and variation.
So, the kit for November does not have one unifying theme. Instead, I've just pulled a few random stamps from the stash and added a couple sets I could use for Thanksgiving projects. Since the selection is random, I've also added more paper pads.
Let's jump straight into it!
The Greeting Farm - Wednesday

Art Impressions - 29 Again


Simon Says Stamp - Apple of My Pie

Neat & Tangled - Better Together
 Paper Smooches - Metropolis

I've chosen 3 different paper pads.
Lawn Fawn - Perfectly Plaid Fall 6x6
 Lawn Fawn - Sweater Weather 6x6
 Avery Elle - The Happy Collection 6x6

Lastly, I've added a few embellishments:
Your Next Stamp - Give Thanks for Sparkle Gumdrops

Your Next Stamp - Love Earth Gumdrops
 Doodlebug - Rainbow Assortment Sequins

Thanks for reading!
~Elle~
So, the kit for November does not have one unifying theme. Instead, I've just pulled a few random stamps from the stash and added a couple sets I could use for Thanksgiving projects. Since the selection is random, I've also added more paper pads.
Let's jump straight into it!
The Greeting Farm - Wednesday

Art Impressions - 29 Again


Simon Says Stamp - Apple of My Pie

Neat & Tangled - Better Together


I've chosen 3 different paper pads.
Lawn Fawn - Perfectly Plaid Fall 6x6


Lastly, I've added a few embellishments:
Your Next Stamp - Give Thanks for Sparkle Gumdrops

Your Next Stamp - Love Earth Gumdrops

Thanks for reading!
~Elle~
Sunday, October 2, 2016
Chatty Sunday: September Stash Kit Review

Now that all the cards I've created with September's Stash Kit have been shared, I wanted to take a minute to review how the process went and what I learned from it.
Total cards made: 13
Materials used:
- 8 patterned papers with minimal scraps, scraps will be used to create some die-cut shapes.
- One enamel dot package that was already used a little prior to the challene
- 13 card bases + cardstock for matting some panels
- 1 adhesive refill and 2 sheets of foam dimensionals
Notable materials pulled from stash:
- Embellishments like flowers, vellum tags and Nuvo crystal drops
- Neutral cardstock and sparkly silver cardstock
- Dies and die-cuts
Overall, I think it was a great success! With the amount of material in the kit, I didn't feel too constrained - something that was an issue with single stamp kits for me. I found that photopolymer stamps were easiest to use on multiple cards, whereas single rubber stamps were a bit more complicated. In the future, I may stamp out a rubber stamp only for one card - especially with more complex designs.
Working with one paper pad went well, but I may pull a larger selection of paper in future kits. I was worried that I used the same tones throughout the kit and that it would make the cards seem too similar. So, I might focus on a larger variety after October's kit.
Though September's kit was great, it still wasn't entirely portable because I used so many dies/die-cuts and embellishments out of my stash. If I need to make a kit more inclusive in the future, I will include an embellishment bag and some die-cuts that are cut in advance. Since I will have the paper chosen at the same time, I will be able to cut out a nice set of panels and shapes in appropriate cardstock or paper colors.
Lastly, I want to note that I did not feel too pressured or too overwhelmed by the card creation. The step that took up the most time was blogging about each card. So, I may have to tweak the blogging portion a little in the future. I did, however, appreciate having a daily card to share for September. I'd like to continue that trend in the future, too.
Thanks for reading!
~Elle~
Saturday, September 24, 2016
Stash Kit: October
We're inching toward the end of September, so I thought I would share my stash kit for October. The kit is themed for Halloween, as I'd like to create a gift set of Halloween cards for a friend who throws a pretty major spooky bash party every year.
Rubber Stamps:
Kraftin' Kimmie - My Best Friends Are Witches
 Kraftin' Kimmie - Batty and Catty
 C.C. Designs - Broom Ride (Roberto's Rascals)

Patterned Paper:
Doodlebug - Ghouls & Goodies 6x6

Photopolymer Stamps:
Mama Elephant - Meowlloween Extras
 My Favorite Things - (Birdie Brown) Witch Way is the Candy?
 Lawn Fawn - Spooktacular

Embellishments:
Nuvo Crystal Drops in Crushed Grape

Simon Says Stamp - Witches' Brew Sequins
 Doodlebug - Ghouls & Goodies Enamel Shapes

As with last time, I've added a combination of older and newer stamps. Some things are retired, others are available for purchase (I've added a link to those that are still available).
I will also be supplementing these with cardstock and dies from my stash.
Thanks for reading!
~Elle~
Rubber Stamps:
Kraftin' Kimmie - My Best Friends Are Witches

Patterned Paper:
Doodlebug - Ghouls & Goodies 6x6
Photopolymer Stamps:
Mama Elephant - Meowlloween Extras


Embellishments:
Nuvo Crystal Drops in Crushed Grape

Simon Says Stamp - Witches' Brew Sequins


As with last time, I've added a combination of older and newer stamps. Some things are retired, others are available for purchase (I've added a link to those that are still available).
I will also be supplementing these with cardstock and dies from my stash.
Thanks for reading!
~Elle~
Sunday, September 18, 2016
Chatty Sunday: Planner
I think I've mentioned this before, but I am a planner at heart. I don't mean that I'm obsessed about planners (though I own a couple now), but that I seem to be at my most productive when things are planned out. To do lists and a clear plans of action keep me very motivated - which could explain why the Stash Kit project is going so swimmingly.
Regardless, I have come to embrace my planning ways and I got myself a new planner. Or I should say, a cute little Mead agenda. I bought it at Target during back-to-school shopping. Originally, I was going to use it for work, but it wasn't quite right for that. What it was perfect for was planning other life activities, such as my design team responsibilities. So, I jumped in head first and planned out not only my DT responsibilities, but also my blog posts for the next few weeks.
Since I have Stash Kit projects to share, I took the time to organize how I'm going to go about it - and I really like it! The plan gives me a chance to write some posts in advance, while still giving me the freedom to be impulsive and post on the go. My hope is that this new system will mean more regular updates and a balance between crafting and blogging.
Now we just need to see how it will do in action...
Thanks for reading!
~Elle~
Sunday, September 11, 2016
Chatty Sunday: September chit-chat and plans
I may have mentioned this before, but autumn is my favorite season. I love the cooler weather - with no bugs, no pollen and with rainy days. I love the way the leaves change color, and how they become brilliant yellow, red and earthy brown. And I love all the activities - from visiting the apple orchards and pumpkin patches to jumping into leaf piles and taking walks in the crisp air. I always feel like it's a celebration of nature, as if there's a royal ball coming up.
Plus, the cooler weather makes it perfect to go back to baking delicious goodies - like cakes, cookies and yummy loafs of bread. I'm going to be trying to bake once or twice per week from September on. Not only do I love to bake, but I've got quite a few ingredients sitting in the pantry, waiting to be used up. I'm especially looking forward to making a bacon and cheese quiche, and trying bierocks.
So, what's on the docket for the rest of September?
Well, next week is Some Odd Girl digi release- which means you will be treated to an entire week of fun and exciting projects. There's a lot of fabulous new stamps in the release, and I helped pitch a few of the ideas - so, I'm even more excited to share the inspiration with you. And having caught a little peek at how amazing the rest of the creations from my fellow designers are... Let me just say, it will be a truly fun event.
I'm still working on my stash kit cards. I've actually got quite a few of them completed, using up supplies and really letting the stamps shine. I've still got a few images to color, but I'm confident that I will be hitting my 12-card goal before the end of the month. I'm already more than half-way there, and I will continue to work on things as I get some free time.
Speaking of free time... It feels like it's a rare commodity nowadays. I find myself in that zone where I suddenly have a free moment, but there's so much I want to do that I can't decide and I just end up watching random Youtube videos. And while it's entertaining and I've learned some awesome new card-making techniques, it's not exactly productive. So, I'm going to try putting myself on a schedule of some sort. Maybe having an evening dedicated to crafting or an evening dedicated to art will help me stay focused better.
Thanks for reading!
~Elle~
Plus, the cooler weather makes it perfect to go back to baking delicious goodies - like cakes, cookies and yummy loafs of bread. I'm going to be trying to bake once or twice per week from September on. Not only do I love to bake, but I've got quite a few ingredients sitting in the pantry, waiting to be used up. I'm especially looking forward to making a bacon and cheese quiche, and trying bierocks.
So, what's on the docket for the rest of September?
Well, next week is Some Odd Girl digi release- which means you will be treated to an entire week of fun and exciting projects. There's a lot of fabulous new stamps in the release, and I helped pitch a few of the ideas - so, I'm even more excited to share the inspiration with you. And having caught a little peek at how amazing the rest of the creations from my fellow designers are... Let me just say, it will be a truly fun event.
I'm still working on my stash kit cards. I've actually got quite a few of them completed, using up supplies and really letting the stamps shine. I've still got a few images to color, but I'm confident that I will be hitting my 12-card goal before the end of the month. I'm already more than half-way there, and I will continue to work on things as I get some free time.
Speaking of free time... It feels like it's a rare commodity nowadays. I find myself in that zone where I suddenly have a free moment, but there's so much I want to do that I can't decide and I just end up watching random Youtube videos. And while it's entertaining and I've learned some awesome new card-making techniques, it's not exactly productive. So, I'm going to try putting myself on a schedule of some sort. Maybe having an evening dedicated to crafting or an evening dedicated to art will help me stay focused better.
Thanks for reading!
~Elle~
Monday, August 22, 2016
Stash Kit Project

Stash Kit Project is a personal challenge created to help me focus on my existing stash and to make use of supplies I've purchased but did not use (or did not use enough). The idea behind this challenge is very simple: create a kit of coordinating stamps, paper and embellishments and make several cards throughout a month with it.
My kits will be similar to card kits you can get from Simon Says Stamp, but I will be adding several stamp sets instead of just one. I'm keeping the first kit pretty simple, just to give myself some time to get used to the process and to go over some other things I may need in future kits. I'm also going to keep track of everything I use with the kits, so I can make them portable for traveling or crafting on the go.
Want to play along with me?
Here's the basic rules:
1) As the goal of this project is to make use of supplies, you should only use what exists in your stash - no shopping for new products allowed!
2) Give yourself some choices, pick products that you've used before and loved, then mix them with products you've never used.
3) Retired products are good! I encourage you to pick retired goodies as long as they inspire you to create something awesome. Tip: You can google the name of the product and find the product sheet to link to so your readers can see what it looks like before you've played with it.
4) Think small - fewer kit elements mean you have a better chance of completing your goal. You can always add extra items if you run out of everything, but you don't want to be stuck with half a kit to use up as the month winds down.
5) Pick a goal. How many cards will you make? This will both give you something to work toward and help you decide how big your kit needs to be.
6) Have fun! Simplest rule, but the most important one. If you're not enjoying the process and you're forcing yourself to make things, don't be afraid to take a step back. Treat it as a learning experience that will help you construct a better kit next month.
I also thought I'd share how my kits will be stored.
I purchased a set of A4 zipper bags from Amazon, and they're the perfect storage bags. I can add several stamps, a paper pad, some cardstock and embellishments. And since the set comes with 12 bags, I can set up the kits a month or two in advance if I need to.
If you decide to take part in the Stash Kit project, do let me know! I'd love to check out your blog/site and send some extra support your way. :)
Find a follow-up and more information in Part 2.
Thanks for reading!
~Elle~
Edit: I've added a picture for easy post pinning!
Sunday, March 20, 2016
Chatty Sunday: Card Sets and Stash Cards
It's time for another chatty Sunday! This week I want to talk about card sets and stash cards.
When I sit down to make cards, I generally make one-of-a-kind cards. This makes cards great to share and write about on my blog, as each card is different and unique. I also often send batches of these unique cards to friends and family for everyday use (and from what I can tell, it's appreciated!).
But sometimes I'd like to gift someone a small set of cards - maybe a set using their favorite colors, or a special theme that's meaningful to them. And that's where "one-of-a-kind" type of card that takes too long to create -- and multiples are just not feasible.
I think a key to card sets is to have a lot of unifying elements -- things like same color palette, similar stamps and similar card design/layout. In addition, I think it's important to plan everything out in advance. That way, the process can be broken into steps that are easier to manage.
One of my biggest inspirations for card sets is Kristie Marcotte's 6x6 paper pad tutorials. If you're not familiar with Kristie, she has several tutorials for making cards out of a complete 6x6 paper pad. I love her concept! Not only does it use up supplies, but she provides readers with measured sketches and a video of the whole process.
Another thing I've noticed is that my "card" stash is dwindling and in serious need of replenishment. I've got no sympathy and no birthday cards left - which is a bit alarming! And my "thank you" card batch is down to 3 cards...
Since I've been bit by the organizing bug, I'm going to spend a little time coming up with a "card stash basics" plan - things like "birthday boy" cards or "elegant thanks" cards will be very useful and I can tailor them to fit with my circle of family and friends. For example, there's a lot of boys in my husband's side of the family, so having a good stash of masculine cards will be great.
I'm super excited about both of these projects, as it should get me to really make use of my stamps. I'm going to aim to create several cards with each stamp set - something I tried with Mama Elephant's Charmed set recently.
Thanks for reading!
~Elle~
When I sit down to make cards, I generally make one-of-a-kind cards. This makes cards great to share and write about on my blog, as each card is different and unique. I also often send batches of these unique cards to friends and family for everyday use (and from what I can tell, it's appreciated!).
But sometimes I'd like to gift someone a small set of cards - maybe a set using their favorite colors, or a special theme that's meaningful to them. And that's where "one-of-a-kind" type of card that takes too long to create -- and multiples are just not feasible.
I think a key to card sets is to have a lot of unifying elements -- things like same color palette, similar stamps and similar card design/layout. In addition, I think it's important to plan everything out in advance. That way, the process can be broken into steps that are easier to manage.
One of my biggest inspirations for card sets is Kristie Marcotte's 6x6 paper pad tutorials. If you're not familiar with Kristie, she has several tutorials for making cards out of a complete 6x6 paper pad. I love her concept! Not only does it use up supplies, but she provides readers with measured sketches and a video of the whole process.
Another thing I've noticed is that my "card" stash is dwindling and in serious need of replenishment. I've got no sympathy and no birthday cards left - which is a bit alarming! And my "thank you" card batch is down to 3 cards...
Since I've been bit by the organizing bug, I'm going to spend a little time coming up with a "card stash basics" plan - things like "birthday boy" cards or "elegant thanks" cards will be very useful and I can tailor them to fit with my circle of family and friends. For example, there's a lot of boys in my husband's side of the family, so having a good stash of masculine cards will be great.
I'm super excited about both of these projects, as it should get me to really make use of my stamps. I'm going to aim to create several cards with each stamp set - something I tried with Mama Elephant's Charmed set recently.
Thanks for reading!
~Elle~
Monday, January 11, 2016
Lulu Thanks

The year has gotten a bit of a rocky start for me here on the blog, hasn't it? I've been meaning to make a blog post since January 1st, but things just kept getting in the way. Between feeling under the weather and lots of work, I've had very little free time. And what free time I've had has been spent organizing.
Yes, I got bit by the organizing bug again... Initially, I had just planned to make things a little easier on myself by pulling out some supplies and goodies to use up over the next few months. But that quickly spiraled into a need to catalog and organize virtually everything. On the bright side, it's made me rediscover a veritable trove of treasures to use with cards and paper crafts. On the not-so-bright side, it's made me realize I need clones or another 6 hours in a day where I can play with papers and ink.
Although I was incredibly tempted to pull everything out of my stash and organize it again (hey, I'm not buying things, so this is the perfect time to do so, right?), I decided to pull myself away and to jump into some card-making. After a rocky start, I'd managed to create a couple of "love" cards I was very happy with. I'll be sharing them very soon as part of my Valentine's series.
Today's card is a winter-themed thank you card featuring a Lulu stamp from Stamping Bella. I happen to have a rubber stamp (which I believe is discontinued now), but you can find a digital stamp right here.
I used bright and feminine colors to color the stamp, keeping the shading simple and minimal. After the coloring was done, I die-cut the image with a stitched circle die. I also die-cut a slightly larger circle out of some grayish brown paper and matted the two together with foam squares.
I grabbed a standard top-folding A2 card base (4¼x5½") and adhered a strip of patterned paper at the bottom. I grabbed a piece of white cardstock and trimmed it to 4¼x5½, then die-cut a decorative scalloped white edge. I adhered it to the top of the card base and added the matted image on top.
To finish off my card, I added 3 enamel dots echoing some of the colors in the card. I used some alphabet stickers to spell out my sentiment, and the card was done!
Thanks for reading!
~Elle~
Friday, January 1, 2016
Happy New Year!
And we've officially rung in the new year! I wish you all prosperity, happiness and good health in 2016, and may your New Years' resolutions come to fruition!
I had originally planned to make an awesome card to ring in the new year, but I've had a few busy days lately. I did get a chance to get crafty and created a couple of thank-you cards for some lovely and generous friends and family (who really spoiled us for Christmas!). They've already been mailed, so I can't snap a picture.
Instead, I figured I'd do a chatty/rambling little crafting update.
In my effort to prepare for the new year, I've been going through and organizing some of my crafty supplies. Organizing is kind of tricky. On one hand, it's a great way to go through all of my supplies to find hidden treasures and to get very inspired. On the other hand, it takes over my free time, so I'm not actually creating anything. It feels very productive, but there's nothing to show for it. However, it's still something I have to do a few times per year - such as during major holidays or when I need to pull out stamps I don't use all year round.
My big resolution/goals this year involve using what I have, and I thought it would be a good idea to go through some of my stash as a reminder of all the goodies I own. I also took the opportunity to put away the winter holiday crafting materials in a way that kept it neat and organized.
So, I thought I would share some of my organizing solutions that will help me stay on top of making cards this year.
- I have a mini-crate in my crafty cart with stamps I really want to use. This is more convenient and keeps me from constantly having to dig into my stash to find a stamp to use. In the crate, I have some of the newest stamps I got, a few favorites and a selection of never-before-used stamps I've been meaning to ink up. Having this crate is going to help me focus when I sit down without a specific idea on what I want to make. But the rest of m stamps are still close by in case I'm inspired to use a special stamp or two.
- I'm still using the mini-sticker dot system to mark which stamp sets I've used. I've also started putting check-marks on the dots with cards I've blogged about and a little dot on cards I sent out to family/friends for their birthday. I try to do something slightly different for each birthday card, so it helps me to know when I've used a stamp set already.
- I went through my paper pads and made myself mini paper bundles. This one took a bit of time, but I really think it was worth it. I started by pulling out all the papers that I liked or that I felt I needed out of a mountain of paper pads. Then, I chose several papers that fit a specific theme (ex. masculine cards) or palette (ex. pink, mint and gold) and bundled them together using a little piece of post-it tape to hold them. I really love this idea because I can quickly grab a bundle and know I'm set with all the papers I'm going to need for a card or 5.
- I chose some embellishments and put them in a plastic zipper pouch. I happened to have several of these pouches, so I was able to divvy up my embellishments into 4 categories: enamel dots, flowers, dimensional elements (woodchips, flair, etc) and stickers. I left my sequins in their containers, since they're really well organized there already. I will go through the pouches once per month and keep track of what's been used up.
- Lastly, I prepared a few card bases. Since I make my own card bases from cardstock, this involved cutting and scoring cardstock. It's a bit repetitive, but it's something I can easily do with music playing in the background. And it does save me a bit of time to not have to do it while making a card.
Thanks for reading!
~Elle~
I had originally planned to make an awesome card to ring in the new year, but I've had a few busy days lately. I did get a chance to get crafty and created a couple of thank-you cards for some lovely and generous friends and family (who really spoiled us for Christmas!). They've already been mailed, so I can't snap a picture.
Instead, I figured I'd do a chatty/rambling little crafting update.
In my effort to prepare for the new year, I've been going through and organizing some of my crafty supplies. Organizing is kind of tricky. On one hand, it's a great way to go through all of my supplies to find hidden treasures and to get very inspired. On the other hand, it takes over my free time, so I'm not actually creating anything. It feels very productive, but there's nothing to show for it. However, it's still something I have to do a few times per year - such as during major holidays or when I need to pull out stamps I don't use all year round.
My big resolution/goals this year involve using what I have, and I thought it would be a good idea to go through some of my stash as a reminder of all the goodies I own. I also took the opportunity to put away the winter holiday crafting materials in a way that kept it neat and organized.
So, I thought I would share some of my organizing solutions that will help me stay on top of making cards this year.
- I have a mini-crate in my crafty cart with stamps I really want to use. This is more convenient and keeps me from constantly having to dig into my stash to find a stamp to use. In the crate, I have some of the newest stamps I got, a few favorites and a selection of never-before-used stamps I've been meaning to ink up. Having this crate is going to help me focus when I sit down without a specific idea on what I want to make. But the rest of m stamps are still close by in case I'm inspired to use a special stamp or two.
- I'm still using the mini-sticker dot system to mark which stamp sets I've used. I've also started putting check-marks on the dots with cards I've blogged about and a little dot on cards I sent out to family/friends for their birthday. I try to do something slightly different for each birthday card, so it helps me to know when I've used a stamp set already.
- I went through my paper pads and made myself mini paper bundles. This one took a bit of time, but I really think it was worth it. I started by pulling out all the papers that I liked or that I felt I needed out of a mountain of paper pads. Then, I chose several papers that fit a specific theme (ex. masculine cards) or palette (ex. pink, mint and gold) and bundled them together using a little piece of post-it tape to hold them. I really love this idea because I can quickly grab a bundle and know I'm set with all the papers I'm going to need for a card or 5.
- I chose some embellishments and put them in a plastic zipper pouch. I happened to have several of these pouches, so I was able to divvy up my embellishments into 4 categories: enamel dots, flowers, dimensional elements (woodchips, flair, etc) and stickers. I left my sequins in their containers, since they're really well organized there already. I will go through the pouches once per month and keep track of what's been used up.
- Lastly, I prepared a few card bases. Since I make my own card bases from cardstock, this involved cutting and scoring cardstock. It's a bit repetitive, but it's something I can easily do with music playing in the background. And it does save me a bit of time to not have to do it while making a card.
Thanks for reading!
~Elle~
Thursday, August 13, 2015
Make your own Card Kit 1
Every now and then I get a cleaning/organizing bug. I find myself going through my crafty supplies in an effort to make them easier and more convenient to use. And it really helps! Seeing everything I already own is a great reminder that I might not need the 30 shiny new stamps that were just released.
The last thing I organized was my card kits. I only get one card kit per month (from Simon Says Stamp), but it still stacks up over time. Originally, I simply left the kits in the box they came in and stacked them in the corner of my crafty closet, with a label on the side. However, this wasn't ideal because I'd forget what was in each kit and that meant I used them less. So, I started switching them to big ziploc bags.
The clear bags were a better solution, as I could see the stamp set, embellishments and colors of the kit much easier. It still wasn't ideal, though, because I still often forgot to look through the kits when I was searching for the perfect card supplies.
So, my latest organizing idea was to leave the last 3 months of card kits in ziploc bags, and put the rest of it away with my other supplies. So, stickers went with stickers, washi tape with washi tape, stamps into their pockets and stored with the rest of my stamps, and so on. So far, I'm liking this system much better, as it's giving me a chance to break out of the kit-only box and use the supplies more.
While doing this organization project, I felt really inspired to try my hand at making my own card kit. I figured this would be a great way to fine-tune my planning and design skills, as well as inspire me to use up some of my ever-growing supply stash.
Here are the contents of my very first kit and how I went about putting it together.
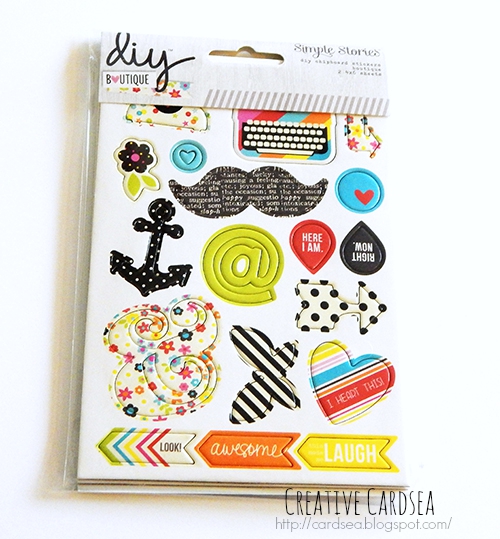 I think every kit needs to have a launching point of some sort -- whether that's a product, color scheme or topic/theme. I decided to start with this chipboard sticker set from Simple Stories DIY Boutique line. I've had this sticker set for a while and kept wanting to use it. But it never fit entirely in the card I was making, so it just sat there in my stash. I thought I might have a better chance of using it if I built a kit around it.
 I chose the paper quite randomly, going for colors and tones that matched the stickers. Some papers were from the same line as the sticker, but the majority were simply from my stash. I did not try to match the colors exactly, instead I went for choosing colors that had the right brightness and tones.


And that's a close-up of the different papers I chose. Since the sticker had a creamy off-white background, I chose to go with similar tones for the white.

Next, I prepared a few card bases that fit the tones of the patterned paper and sticker. These bases are already cut and folded into A2-sized cards (4¼x5½").
 The first part of embellishments was a set of enamel dots. I grabbed the bright enamel dots from Freckled Fawn, as well as a black/gray and gold sets of enamel dots from Studio Calico. The colors of the enamel dots are not the exact match to the other supplies, but they do stand out great against the patterned paper I chose.
 The second part of the embellishments was dipping into my wood veneer and button stash. I found some fun wood veneer and buttons in the same tones as the papers. I also grabbed a couple of flair, some black satin ribbon and a rainbow washi tape.
The last step was getting a few stamp sets that go along with the rest of the kit.
 Since I like coloring, I grabbed two stamp sets that I could color. On the left is Evie from The Greeting Farm secret stamp club. On the right is Some Odd Girl's Hipster Mae. Both of them seem to fit the modern hipster vibe I got from the chipboard stickers.
 Next, I grabbed a couple of stamp sets that are a little bit funny. On the left is Stuck on This from the Sweet Stamp Shop (now retired, sorry!) and Paper Smooches' Teen Routine is on the right.
 Since there was a mustache on the sticker pack, I thought it might be good to add in a masculine stamp, so I chose Terrific Ties from My Favorite Things.
 Lastly, I wanted to make sure that I had some good sentiments to work with, so I chose two stamp sets from Simon Says Stamp - Stripe Greetings on the left and Big Scripty Greetings on the right.
And that's all there is to this kit! I will be sharing the cards created with this kit as well as my thoughts about how well (or badly!) it worked for me soon.
Until next time... Thanks for reading!
~Elle~
The last thing I organized was my card kits. I only get one card kit per month (from Simon Says Stamp), but it still stacks up over time. Originally, I simply left the kits in the box they came in and stacked them in the corner of my crafty closet, with a label on the side. However, this wasn't ideal because I'd forget what was in each kit and that meant I used them less. So, I started switching them to big ziploc bags.
The clear bags were a better solution, as I could see the stamp set, embellishments and colors of the kit much easier. It still wasn't ideal, though, because I still often forgot to look through the kits when I was searching for the perfect card supplies.
So, my latest organizing idea was to leave the last 3 months of card kits in ziploc bags, and put the rest of it away with my other supplies. So, stickers went with stickers, washi tape with washi tape, stamps into their pockets and stored with the rest of my stamps, and so on. So far, I'm liking this system much better, as it's giving me a chance to break out of the kit-only box and use the supplies more.
While doing this organization project, I felt really inspired to try my hand at making my own card kit. I figured this would be a great way to fine-tune my planning and design skills, as well as inspire me to use up some of my ever-growing supply stash.
Here are the contents of my very first kit and how I went about putting it together.


And that's a close-up of the different papers I chose. Since the sticker had a creamy off-white background, I chose to go with similar tones for the white.

Next, I prepared a few card bases that fit the tones of the patterned paper and sticker. These bases are already cut and folded into A2-sized cards (4¼x5½").


The last step was getting a few stamp sets that go along with the rest of the kit.


And that's all there is to this kit! I will be sharing the cards created with this kit as well as my thoughts about how well (or badly!) it worked for me soon.
Until next time... Thanks for reading!
~Elle~
Tuesday, March 10, 2015
Organization - Cardstock & Embellishments
My crafty area is nearly clean now, so I thought I would wrap up by sharing my storage solutions for the rest of my crafty stash.
Cardstock:
The first step in wrangling my cardstock was figuring out how I'm going to store it. I have a rather large collection of cardstock from several manufacturers, and I needed a good storage solution. Since paper is very heavy, I couldn't just throw all of my cardstock into one container - as it would then be impossible to move, as well as go through to pull out specific colors.
So, I went to my local office supply store and got some letter storage boxes (I don't have a link, though they are similar to these - only a lot less expensive). These boxes measure 10½" x 13½" x 3½", and there were several color choices. I was able to organize the cardstock by color, and I used a white box with a color label for any colors I was missing (ex. orange or purple). I stacked these boxes under my storage shelf, where they're perfectly out of the way, but still within reach if I need them.
Before I put all of the cardstock away, I grabbed 3 sheets of cardstock out of each package. I cut 2 of them in half and folded them to create A2 card bases (4¼ by 5½"), two top-folding and two side-folding. And the 3rd sheet was cut into four 4¼ by 5½" panels that I can use for layering or die-cutting. That was quite a bit of work, but it left me with a lot of ready-to-use card bases and gave me a very good idea of all the different colors I had in my stash.
There are a few packs of cardstock that I didn't put away:
-- My basics - white, cream, kraft, grays, navy and black -- I use them all the time, and I needed to have them within reach. I also needed to know just how many I had left, so I can re-order before running out of an essential color (like white).
-- Rainbow and sampler assortments. -- I kept these out just in case I run out of card bases or need extra of a particular color to die-cut.
I'm really pleased with this system, and glad I took the time to pre-cut those card bases. I'm already noticing that it makes card-making quicker and more convenient.
Embellishments:
The first step in organizing my embellishments was to put them in categories. I divided them by type, such as sequins, flowers, enamel dots, etc. After that, I went through each stack and took out any pieces I didn't think I would use immediately -- things like duplicate colors/back-ups, seldom used metal charms and ephemera, etc. I put them in a clear plastic box with a lid. I'm going to make an effort to pull something from that box at least once per month and find a way to use it.
The rest of the embellishments were stacked in photo boxes I got from Ikea. I used small plastic bags for embellishments that were open or had a lot of small non-adhesive pieces (ex. die-cuts, buttons, wood veneer).
I gave enamel dots their own separate box, both because they're my most frequently used embellishment and because I have such a large variety now. I organized them by color/color families. I still kept them in their packaging, just so they wouldn't get dusty.
My sequins are stored in the Craftmates Pop'nLock (and smaller version) containers I got from Amazon a few months ago. They're organized by color and by size if I have multiple sizes. I have a few fun mixes in there, too. Winnie and Walter always sends a little envelope with free sequins if you order them directly, so I've got a few of those packs to have fun with.
Lastly, my flowers are all in large basket. I kept them in their original packaging or in Ziploc bags to avoid getting them dusty. The flowers were the most challenging to organize because they're the biggest. I need to try using them on projects more often, I think.
And that's it! Everything is neatly organized and should be much easier to find (and use).
Tuesday, February 10, 2015
Organization - Inks & Ink Swatches
I'm currently in the process of organizing my inks and ink swatches, so I thought I'd share how I used my inks before and what I've changed.
My old system had the inks separated by manufacturer, then the majority of it stuck in a box because I had no way to display them. And that basically just lead to a bunch of wonderful inks that never got used. It was time to fix it.
My first big project was to make an ink swatch for all of the inks I have. I actually have a variety of inks - water-based dye inks, oil-based dye inks, hybrid inks, pigment inks and distress inks. So, I needed to have one central place where I could look at the different colors I have and easily figure out what techniques I can use them with.
I saw one of Jennifer McGuire's videos on ink swatches and I thought her system would work perfectly for me. So, I bought this set of coin-collecting pocket page protectors on Amazon. I cut out 2x2" pieces of card stock to insert into each pocket, then stamped a swatch rectangle and labelled it with ink name, company and type.
What I love about this system is that I can arrange and re-arrange the swatches as well as easily take them out to compare with paper or embellishments. Visually, it's helping me quickly identify what kind of colors I'm missing (yellow and green), and makes it less tempting to cave and buy more ink pads.
Another unexpected benefit of this system is seeing the different degrees of coverage I get out of my ink pads - especially after the ink was left to dry and really soak into the paper. I was using a completely solid stamp and it took practice with several of the inks to get it to stamp smoothly and evenly. I've discovered that I need to be a lot more careful with light inks - since they're hard to see on a photopolymer stamp. I seem to have a tendency to over-ink while making sure the stamp is covered evenly, and that results in a messy, splotchy image.
Also, I've now got a new-found love for Hero Arts Shadow inks and Simon Says Stamp inks. They have the same formula and stamp really splotchy at first. But over time, they even out and you end up with a rich and smooth result after drying.
On the other hand, I was a bit under-whelmed with my hybrid inks from My Favorite Things. They work just fabulously for Copic coloring. But their solid coverage wasn't as great -- and I've got a few ink colors that I wouldn't be using for Copics necessarily. So, some of those inkpads will be going into box storage.
I'm still working my way through the archival inks from Ranger (they're oil-based) and my collection of pigment inks. I've found that some of my Memento Luxe pigment inks have already dried out, so I've thrown them out. I was very careful about how I stored them -- had them upside down and with the lid secured, so I'm not sure exactly why they dried out. But they were some of the first inks I got, and I have no idea how long they sat in a warehouse before making their way to me. I'm going to try and figure out why they dried out or if there's any products I can get to refresh them. I know that there are ink refresher sprays for dye inks, but I don't know if anything exists for pigment inks.
I recently got a low white shelf that will be sitting in the closet and holding ink pads I plan on using fairly often. I have small canvas boxes I bought on sale at my local Target that will do a good job of keeping them contained. I thought about investing in a fancy stamp storage shelf, but I really don't have enough room for it at the moment. Maybe once all of my supplies are organized, I'll think about more permanent storage. But for now, I'm going for cheaper alternatives that will help me find and display my supplies.
I also bought a few small plastic baskets like these that will hold my most-used inks -- hybrid inks for Copic coloring, distress ink pads, black and brown pigment inks for sentiments and my Versamark ink for embossing. Having a designated basket I can easily grab for a technique will be very useful.
And that's all for my ink pads and ink swatches! Next time, I will be tackling the mountains of cardstock. :)
My old system had the inks separated by manufacturer, then the majority of it stuck in a box because I had no way to display them. And that basically just lead to a bunch of wonderful inks that never got used. It was time to fix it.
My first big project was to make an ink swatch for all of the inks I have. I actually have a variety of inks - water-based dye inks, oil-based dye inks, hybrid inks, pigment inks and distress inks. So, I needed to have one central place where I could look at the different colors I have and easily figure out what techniques I can use them with.
I saw one of Jennifer McGuire's videos on ink swatches and I thought her system would work perfectly for me. So, I bought this set of coin-collecting pocket page protectors on Amazon. I cut out 2x2" pieces of card stock to insert into each pocket, then stamped a swatch rectangle and labelled it with ink name, company and type.
What I love about this system is that I can arrange and re-arrange the swatches as well as easily take them out to compare with paper or embellishments. Visually, it's helping me quickly identify what kind of colors I'm missing (yellow and green), and makes it less tempting to cave and buy more ink pads.
Another unexpected benefit of this system is seeing the different degrees of coverage I get out of my ink pads - especially after the ink was left to dry and really soak into the paper. I was using a completely solid stamp and it took practice with several of the inks to get it to stamp smoothly and evenly. I've discovered that I need to be a lot more careful with light inks - since they're hard to see on a photopolymer stamp. I seem to have a tendency to over-ink while making sure the stamp is covered evenly, and that results in a messy, splotchy image.
Also, I've now got a new-found love for Hero Arts Shadow inks and Simon Says Stamp inks. They have the same formula and stamp really splotchy at first. But over time, they even out and you end up with a rich and smooth result after drying.
On the other hand, I was a bit under-whelmed with my hybrid inks from My Favorite Things. They work just fabulously for Copic coloring. But their solid coverage wasn't as great -- and I've got a few ink colors that I wouldn't be using for Copics necessarily. So, some of those inkpads will be going into box storage.
I'm still working my way through the archival inks from Ranger (they're oil-based) and my collection of pigment inks. I've found that some of my Memento Luxe pigment inks have already dried out, so I've thrown them out. I was very careful about how I stored them -- had them upside down and with the lid secured, so I'm not sure exactly why they dried out. But they were some of the first inks I got, and I have no idea how long they sat in a warehouse before making their way to me. I'm going to try and figure out why they dried out or if there's any products I can get to refresh them. I know that there are ink refresher sprays for dye inks, but I don't know if anything exists for pigment inks.
I recently got a low white shelf that will be sitting in the closet and holding ink pads I plan on using fairly often. I have small canvas boxes I bought on sale at my local Target that will do a good job of keeping them contained. I thought about investing in a fancy stamp storage shelf, but I really don't have enough room for it at the moment. Maybe once all of my supplies are organized, I'll think about more permanent storage. But for now, I'm going for cheaper alternatives that will help me find and display my supplies.
I also bought a few small plastic baskets like these that will hold my most-used inks -- hybrid inks for Copic coloring, distress ink pads, black and brown pigment inks for sentiments and my Versamark ink for embossing. Having a designated basket I can easily grab for a technique will be very useful.
And that's all for my ink pads and ink swatches! Next time, I will be tackling the mountains of cardstock. :)
Tuesday, January 27, 2015
Organizing - Patterned Paper
I've finally finished organizing my patterned paper, so I thought I'd share my process with you all a little. If you'd like to read a bit about how I store stamps, click here.
Before re-organizing my patterned paper was just stacked in 4 tall towers on a shelf. I'd gone through it a few times and tried to organize it so that the front towers had the patterned paper I was planning to use - ex. seasonal paper - as well as the most recent paper pads I'd purchased. I periodically went through the towers and tried to pull out some of the more fun sets to use. My old system worked alright, but there were a few major problems:
1) It was really difficult to keep track of all the different paper I owned.
- While I was doing pretty good at not buying duplicate paper pads, I still found myself not knowing how many paper pads I had for a specific theme. So, I had a dozen Christmas-themed paper pads -- some of them with colors/style that wouldn't work with my stamp collection.
2) I was overwhelmed with the possibilities.
- This lead to either using the same patterned paper again and again, or not using patterned paper at all. And with my collection being as big as it is, this meant I had a lot of supplies just using up space and being wasted.
3) I was saving my "favorite" papers.
- There's always that one favorite paper that I just adore and want to keep forever. And then there were two, and three, and eventually towers. But as I was sorting my crafty supplies, I came to realize that some of those favorite papers weren't such a favorite now. And quite a few of them don't match my current stamp collection either.
4) I had a pretty large collection of 12x12 paper.
- There are several papers and collections that only came in 12x12 format, and I made sure to grab them while they were still available. Originally, I planned to keep them in the 12x12 format, so I could use them for boxes. But the boxes I make are always smaller than 6" in height/width/depth, so I didn't really need to keep them in the 12x12 size.
My first step was to cut the 12x12 sheets into a 6x6 size. I did this for the majority of my 12x12 sheets. The remainder of the 12x12 papers were duplicates of collections that are no longer readily available (ex. Lawn Fawn's Into the Woods collection). Since they were all unopened, I tied them with a long piece of ribbon and put them in a flat box that rolls under the bed.
Then I grabbed all of the Christmas and winter-themed papers and put them in a plastic Sterilite bin -- one of the bins I'd been using for my stamps previously. I make a lot of Holiday cards, so I wanted to make sure the Christmas papers were somewhere I can easily find and grab when I need them.
I chose 6 paper pads I really wanted to use for the next few cards and put them in a small wicker basket I got from my local Target - it was in the baby section and only cost 1.99$. My plan is to use the 6 paper pads exclusively until they're gone (or close to gone) and then move onto the next set.
The rest of the paper was organized by theme - seasonal, holiday, baby, girl/boy, travel, masculine, feminine, geometric and basic shapes. The collections that didn't seem to fit in any other theme were grouped together by color. I chose this particular system because thematic content seems to work really well with the stamps. I'm eager to see how it will work with paper.
Since I'd made a few MFT orders throughout last year, I had several of their package boxes still sitting in the closet. I put my 6x6 papers in those boxes, and stacked them up neatly in the corner of my crafty closet. I like the MFT boxes in particular because the lid folds in and stays shut, and the white color made it very easy to write down the contents with a sharpie.
I'm going to limit my buying of patterned paper over the next few months. However, there are a few collections that I'm really looking forward to (Lawn Fawn and Avery Elle, specifically), so I've made sure to save a little extra storage space for those.
Next, I will be tackling my cardstock, inks and embellishments. I'll keep you posted once I've made progress on those.
Before re-organizing my patterned paper was just stacked in 4 tall towers on a shelf. I'd gone through it a few times and tried to organize it so that the front towers had the patterned paper I was planning to use - ex. seasonal paper - as well as the most recent paper pads I'd purchased. I periodically went through the towers and tried to pull out some of the more fun sets to use. My old system worked alright, but there were a few major problems:
1) It was really difficult to keep track of all the different paper I owned.
- While I was doing pretty good at not buying duplicate paper pads, I still found myself not knowing how many paper pads I had for a specific theme. So, I had a dozen Christmas-themed paper pads -- some of them with colors/style that wouldn't work with my stamp collection.
2) I was overwhelmed with the possibilities.
- This lead to either using the same patterned paper again and again, or not using patterned paper at all. And with my collection being as big as it is, this meant I had a lot of supplies just using up space and being wasted.
3) I was saving my "favorite" papers.
- There's always that one favorite paper that I just adore and want to keep forever. And then there were two, and three, and eventually towers. But as I was sorting my crafty supplies, I came to realize that some of those favorite papers weren't such a favorite now. And quite a few of them don't match my current stamp collection either.
4) I had a pretty large collection of 12x12 paper.
- There are several papers and collections that only came in 12x12 format, and I made sure to grab them while they were still available. Originally, I planned to keep them in the 12x12 format, so I could use them for boxes. But the boxes I make are always smaller than 6" in height/width/depth, so I didn't really need to keep them in the 12x12 size.
My first step was to cut the 12x12 sheets into a 6x6 size. I did this for the majority of my 12x12 sheets. The remainder of the 12x12 papers were duplicates of collections that are no longer readily available (ex. Lawn Fawn's Into the Woods collection). Since they were all unopened, I tied them with a long piece of ribbon and put them in a flat box that rolls under the bed.
Then I grabbed all of the Christmas and winter-themed papers and put them in a plastic Sterilite bin -- one of the bins I'd been using for my stamps previously. I make a lot of Holiday cards, so I wanted to make sure the Christmas papers were somewhere I can easily find and grab when I need them.
I chose 6 paper pads I really wanted to use for the next few cards and put them in a small wicker basket I got from my local Target - it was in the baby section and only cost 1.99$. My plan is to use the 6 paper pads exclusively until they're gone (or close to gone) and then move onto the next set.
The rest of the paper was organized by theme - seasonal, holiday, baby, girl/boy, travel, masculine, feminine, geometric and basic shapes. The collections that didn't seem to fit in any other theme were grouped together by color. I chose this particular system because thematic content seems to work really well with the stamps. I'm eager to see how it will work with paper.
Since I'd made a few MFT orders throughout last year, I had several of their package boxes still sitting in the closet. I put my 6x6 papers in those boxes, and stacked them up neatly in the corner of my crafty closet. I like the MFT boxes in particular because the lid folds in and stays shut, and the white color made it very easy to write down the contents with a sharpie.
I'm going to limit my buying of patterned paper over the next few months. However, there are a few collections that I'm really looking forward to (Lawn Fawn and Avery Elle, specifically), so I've made sure to save a little extra storage space for those.
Next, I will be tackling my cardstock, inks and embellishments. I'll keep you posted once I've made progress on those.
Saturday, January 10, 2015
Organization - Stamps
This past week, I've slowly started to get my crafting supplies organized. After all the massive deals, clearance and retirement sales, my crafty closet storage is just about bursting at the seams. Not to mention that I cannot find a few products I know I own... I'm also on a personal quest to use all of the supplies I own, and that's rather hard to do so if they're buried under a mountain of things.
So, I decided to do some major re-organizing and get all of my supplies in order. And I thought I'd share this process with you a bit.
Before I get to the new organization systems, here's a quick overview of how my stamps were organized before:
- I'd purchased a few sets of Avery Elle storage pockets. I found them for quite a bit cheaper on Amazon, and bought a few sets.
- For the stamp pocket insets, I used a large pack of 100#lbs cardstock from Recollections that I got from my local Michaels. This was an extremely cheap pack - 10$ for 100 sheets, and I bought it during a sale with a coupon that brought the price down to 2$ at checkout. At the time I'd bought it, I thought I could use it for crafts. But the cardstock was of such terrible quality that it made any card using it look cheap and awful. Still, they were perfectly sturdy and great to use in storage pockets.
- I bought a few cheap Sterilite plastic bins at my local Walmart - note, I bought them at the store individually, so the price was around 3.50$ per bin.
- Stamps were organized by manufacturer, then alphabetically.
There were a few problems with my old system, the biggest being that it was hard to find stamps. I knew where the stamps I used often were, but that led to me using the same stamp again and again because it was the easiest one to find/reach. And that led to completely forgetting I had an awesome stamp for a card and going online to buy an extra stamp I may not have needed.
The other problem was that my stamp collection was growing - exponentially! So what started as 1 little bin turned into 3 bins + a huge box that I still needed bins and storage pockets. And I'd run out of room to place them all. It was time to re-think and get some new systems in place.
My first big solution was to find a place that would house all the stamps. I needed something big, sturdy but still easy to move and use. So, I drew inspiration from Jennifer McGuire's organizing video, and purchased a couple of fridge binz from Amazon. I happened to grab them at a small discount, and use up a gift card I got for Christmas. I really love how easy it is to display the stamps, and how I can grab and move the bins around if I need to. They are also very large and house quite a few sets of stamps. This was perfect for my collection.
The second step was the storage pockets. Although I like the Avery Elle pockets, I bought a set of My Favorite Things Large storage pockets with my last order. If you're looking to save a bit of money, you definitely want to go with the MFT pockets. They are almost identical yo the Avery Elle pockets, being just a slightest bit wider - which means they can fit in a 5.5" insert and that makes making inserts from regular cardstock much easier. But they're a lot cheaper - cost of $8.99 for 50 pockets -- which means 4.50$ compared to the 9$ Avery Elle set.
The final step was figuring out how to organize them. I knew by manufacturer wasn't working for me, so I took a look through my blog, card collection and idea book and figured out how to separate the stamps by theme. I've got the following themes: baby, flowers & butterflies, holiday (non-Christmas), Christmas, seasonal, sentiments, animal/critter, birthday, food, school, people, patterns/backgrounds, love/marriage/anniversary, sympathy and other. Each of the sections is then stacked by manufacturer and alphabetically.
In separating the stamps by theme, I've already found what stamps I need to get more of (sympathy, baby) and what stamps I have more than enough material for (Christmas, sentiment). And it's been much easier to find stamps for a specific occasion.
Lastly, I found a set of color-coding labels I'd originally bought at Walmart to use on kraft wrapping paper. It's a great way to add cute polkadots to the gift wrap or to use for a card technique (masking dots, for example). But they're also going to be useful for keeping track of which stamps I'm using. So, every time I use a stamp, I will put a little round circle on the stamp pocket. This will encourage me to use stamps without the circle and help me track what I'm using more often.
And that's all for the stamps! Next time, I'll write about tackling paper and cardstock.
So, I decided to do some major re-organizing and get all of my supplies in order. And I thought I'd share this process with you a bit.
Before I get to the new organization systems, here's a quick overview of how my stamps were organized before:
- I'd purchased a few sets of Avery Elle storage pockets. I found them for quite a bit cheaper on Amazon, and bought a few sets.
- For the stamp pocket insets, I used a large pack of 100#lbs cardstock from Recollections that I got from my local Michaels. This was an extremely cheap pack - 10$ for 100 sheets, and I bought it during a sale with a coupon that brought the price down to 2$ at checkout. At the time I'd bought it, I thought I could use it for crafts. But the cardstock was of such terrible quality that it made any card using it look cheap and awful. Still, they were perfectly sturdy and great to use in storage pockets.
- I bought a few cheap Sterilite plastic bins at my local Walmart - note, I bought them at the store individually, so the price was around 3.50$ per bin.
- Stamps were organized by manufacturer, then alphabetically.
There were a few problems with my old system, the biggest being that it was hard to find stamps. I knew where the stamps I used often were, but that led to me using the same stamp again and again because it was the easiest one to find/reach. And that led to completely forgetting I had an awesome stamp for a card and going online to buy an extra stamp I may not have needed.
The other problem was that my stamp collection was growing - exponentially! So what started as 1 little bin turned into 3 bins + a huge box that I still needed bins and storage pockets. And I'd run out of room to place them all. It was time to re-think and get some new systems in place.
My first big solution was to find a place that would house all the stamps. I needed something big, sturdy but still easy to move and use. So, I drew inspiration from Jennifer McGuire's organizing video, and purchased a couple of fridge binz from Amazon. I happened to grab them at a small discount, and use up a gift card I got for Christmas. I really love how easy it is to display the stamps, and how I can grab and move the bins around if I need to. They are also very large and house quite a few sets of stamps. This was perfect for my collection.
The second step was the storage pockets. Although I like the Avery Elle pockets, I bought a set of My Favorite Things Large storage pockets with my last order. If you're looking to save a bit of money, you definitely want to go with the MFT pockets. They are almost identical yo the Avery Elle pockets, being just a slightest bit wider - which means they can fit in a 5.5" insert and that makes making inserts from regular cardstock much easier. But they're a lot cheaper - cost of $8.99 for 50 pockets -- which means 4.50$ compared to the 9$ Avery Elle set.
The final step was figuring out how to organize them. I knew by manufacturer wasn't working for me, so I took a look through my blog, card collection and idea book and figured out how to separate the stamps by theme. I've got the following themes: baby, flowers & butterflies, holiday (non-Christmas), Christmas, seasonal, sentiments, animal/critter, birthday, food, school, people, patterns/backgrounds, love/marriage/anniversary, sympathy and other. Each of the sections is then stacked by manufacturer and alphabetically.
In separating the stamps by theme, I've already found what stamps I need to get more of (sympathy, baby) and what stamps I have more than enough material for (Christmas, sentiment). And it's been much easier to find stamps for a specific occasion.
Lastly, I found a set of color-coding labels I'd originally bought at Walmart to use on kraft wrapping paper. It's a great way to add cute polkadots to the gift wrap or to use for a card technique (masking dots, for example). But they're also going to be useful for keeping track of which stamps I'm using. So, every time I use a stamp, I will put a little round circle on the stamp pocket. This will encourage me to use stamps without the circle and help me track what I'm using more often.
And that's all for the stamps! Next time, I'll write about tackling paper and cardstock.
Subscribe to:
Posts (Atom)