Showing posts with label Design Team. Show all posts

Wednesday, October 31, 2018

LDRS Creative Halloween Party Blog Hop


Hello everyone!

Welcome to the first edition of the HALLOWEEN PARTY BLOG HOP by LDRS Creative!

The design team has prepared some WICKED inspiration using the latest seasonal products in store, including them in super-duper fun tutorials at each stop. 

We are so EXCITED to celebrate this special day with you all, that we have decided to offer a 31% DISCOUNT on all Halloween and Fall products in store (*excluding bundles, using code Wicked31, valid until October 31st, MIDNIGHT EST).
 

And because there is no party without PRIZES....Who would like to win surprise grab bag of LDRS Creative products worth at least $30? We will draw 3 winners throughout the day (Oct. 31st, EST) on our Facebook group, so make sure to join it HERE.

I started my project by grabbing some of the wonderful goodies from the Halloween section - Winnie Dracula stamp and Build-a-card Spooky Hat die. I knew I wanted to color sweet Winnie in all her vampire glory, and Spooky Hat happens to have a "spooky" word die that would make the perfect sentiment for my card.

But then, I also added a bit of a surprise die - Tree Line Border Die from the new winter release. This die is a great coordinating die that goes with a tree line stamp set. With a little bit of stretching and creativity, the tree line border die made a perfectly SPOOKY and ghoulish dripping blood panel.


Isn't this card so much fun?! I accented the dripping panel with some enamel dots and added a batty patterned paper from Wicked 6x6 paper pad. Don't you just love when things fit together so perfectly?


Make sure to hop around, leave a comment at each stop, and answer the mysterious questions (haha!) on the first stop. 

Here's the list and keep hoping:

And remember to use that discount code before it turns into a pumpkin at MIDNIGHT! ;-)

Friday, August 31, 2018

Tutorial: Autumn Stencil Background

Thank you for joining us on our LDRS Creative inspiration week blog hop! We are showcasing lots of gorgeous projects using products from our new release. You can even see them in action with step-by-step projects by our amazing designers on their blogs and our own LDRS Creative Youtube channel (make sure you subscribe)!
We have TWO new designer paperpads bursting of colours, with awesome patterns all ready for your projects called Happy Fall and Wicked, with a perfectly coordinated Wicked cardstock pack! There are EIGHT stamp sets that are simply fabulous: Winds are BlowingHappy Fall stamps, Happy Fall sentiments, Winnie Broomstick, Winnie Dracula, Winnie Magic, Fall Full O Leaves and The Magic of Fall sentiments! But wait, there is something brand NEW in the store, stencils! We have leaves and plaid patterns just in time to use with the NEW mini ink cube sets (Cobblestone and Jewelry Beads)! We also have new die sets that can be used as accessories or full backgrounds:  Spooky Hat, Punkin, Wicked Boot, Apple A Day and Autumn Breeze Peek-A-Boo. And for the first time at LDRS Creative, you can grab them in bundles, because you KNOW you need them all!

Simply use the list at the end of the post to keep hopping!
Each day we are giving away a $50 LDRS Creative gift card to one lucky hopper! To enter leave a comment on each blog in the hop, plus follow us on Facebook and Instagram. Winners will be announced on the LDRS Creative inspiration blog on September 4th.
AND for the release event we are excited to offer some great savings!
Save 15% on the new release* and use code HAPPYFALL
(*Coupon valid until midnight EST 9/3/18)

For today's project, I have something special -- a full tutorial on how to create a fun and unique plaid background! Grab a cup of coffee (or tea) and settle in for some fun!

The first step in this tutorial is to grab a piece of masking paper. I used the LDRS Creative Stamping Mask Paper - which is very thick and sturdy. I wanted a sturdy paper, in particular, because I could reuse it on a couple of cards and not have to worry about my ink bleeding through.

The next step was to die-cut some shapes with your dies. I wanted to use circles, so I grabbed a variety of circle die sizes from my die stash. You can just as easily use other shapes you have available - or even stick to cutting one die out several times. To get just the right placement, I die cut the circle shapes out of scrap cardstock first and played around with the placement. When I had the layout I was happy with, I ran the masking paper through my die-cutting machine.
 

Next, I peeled off the masking paper backing and added it to a white A2-sized panel. Then, I added the gorgeous Plaid stencil on top and secured it with some painters' tape.

Now it's time for that craft room workout session: ink blending! I used the rich mini inks in the Jewelry Beads set - but you can use any ink you might have in your stash. What drew me to the palette in Jewelry Beads was how rich and bright the colors were, and I thought they looked just perfect for an autumn card.
 
And here's the fun part -- removing the stencil and the mask! I love this step as it always feels a little bit like magic. Once the stencil and the mask are removed, you're left with a CAS background that's visually interesting and draws the eye in.

I finished off my card by adding a stunning image from the Winds are Blowing stamp set that I colored with my alcohol markers. I added a sentiment in Raven Hybrid ink and scattered a few enamel dots for embellishment

Hop along and leave a comment so you could win!
Day 3:
And make sure to be back tomorrow for more inspiration!

Wednesday, August 29, 2018

Spooky Cute Winnie


Thank you for joining us on our LDRS Creative inspiration week blog hop! We are showcasing lots of gorgeous projects using products from our new release. You can even see them in action with step-by-step projects by our amazing designers on their blogs and our own LDRS Creative Youtube channel (make sure you subscribe)! 
We have TWO new designer paperpads bursting of colours, with awesome patterns all ready for your projects called Happy Fall and Wicked, with a perfectly coordinated Wicked cardstock pack! There are EIGHT stamp sets that are simply fabulous: Winds are BlowingHappy Fall stamps, Happy Fall sentiments, Winnie Broomstick, Winnie Dracula, Winnie Magic, Fall Full O Leaves and The Magic of Fall sentiments! But wait, there is something brand NEW in the store, stencils! We have leaves and plaid patterns just in time to use with the NEW mini ink cube sets (Cobblestone and Jewelry Beads)! We also have new die sets that can be used as accessories or full backgrounds:  Spooky Hat, Punkin, Wicked Boot, Apple A Day and Autumn Breeze Peek-A-Boo. And for the first time at LDRS Creative, you can grab them in bundles, because you KNOW you need them all!

Simply use the list at the end of the post to keep hopping!
Each day we are giving away a $50 LDRS Creative gift card to one lucky hopper! To enter leave a comment on each blog in the hop, plus follow us on Facebook and Instagram. Winners will be announced on the LDRS Creative inspiration blog on September 4th.
AND for the release event we are excited to offer some great savings!
Save 15% on the new release* and use code HAPPYFALL
(*Coupon valid until midnight EST 9/3/18)

My project for today features the adorable Winnie the witch, along with a fun witch's hat die.

I started by stamping Winnie from the Winnie Broomstick stamp set in Coffee Bean hybrid ink from the new Cobblestone mini inkpad collection. Stamping in brown gives the image a softer, more subtle look that always feels ideal for the fall. The mini cubes in the Cobblestone set are fantastic neutrals and definitely must-haves for your ink collection! They are super juicy and they work perfectly with alcohol markers, colored pencils and watercolor. I love having one inkpad for all the coloring mediums I own, and Cobblestone set really fits the bill there.

After I finished coloring Winnie, I got to work on my background. I chose a really fun spider pattern from the Wicked paper pack, along with a striped purple paper for my witch's hat. Wicked features a slightly distressed style that looks like it has a lot of texture, so it's perfect for both modern and vintage looks.

I used the Spooky Hat die for the hat, using the patterned paper, black cardstock and a piece of shiny mirror cardstock to make my centerpiece panel and sentiment. I added it to the card base with some foam tape and adhered Winnie over the top.

With so much fun texture already on the card, I didn't add any other embellishments.


Hop along and leave a comment so you could win!
Day 1:

And make sure to be back tomorrow for more inspiration!

Saturday, October 21, 2017

Halloween Boxes

What else goes bump in the night? Trick-or-treaters!

Every year, I dress up the candy we give out for Halloween. We don't get too many kids, really - only about 30 or so - which means I can make all kinds of cute treat boxes, bags and decorations.

Last year, I made 2x2x2 boxes that fit a mini candy bar or a little bag of M&Ms. They feature fun Halloween paper (that I buy, but never use the rest of the year), some twine and charms made with a retired Halloween die and cardstock.

I got the instructions for the box from Sam (Pootles): https://www.youtube.com/watch?v=eBwm81fgok8
She is a SU demonstrator and does absolutely lovely boxes, treat bags and more. I do enjoy watching her videos and always feel inspired to make a special box or two.

Thanks for reading!
~Elle~

Friday, October 20, 2017

Monster-ific

This card uses a free digital stamp from Useless Trinkets: https://uselesstrinkets.wordpress.com/freebies/

I colored the adorable toothy monster with grays and added some green dots. It reminded me of a mossy rock monster, though I didn't add enough texture to make his skin seem like a rock. I colored his belly yellow and gave him a bright purple patch of hair. I used the palette as my inspiration with the patterned paper and layering die colors.

Thanks for reading!
~Elle~

Wednesday, October 18, 2017

Don't Blink

Of course, I had to create another card featuring my favorite Doctor Who monster - Weeping Angels. If you're not familiar with weeping angels, they are predatory creatures that pose as still statues when they're looked at. But if you turn away, close your eyes or even just blink, they turn into terrifying monsters that send you back in time and steal your life force with a single touch. They are considered the most terrifying and the most popular creature in the Doctor Who universe.

I didn't have any classic angel stamps, so I sketched my own angel. I water-colored the image, playing around with the texture a little. I wrote my own sentiment onto a die-cut banner and adhered it to the card.

Thanks for reading.
~Elle~

Tuesday, October 17, 2017

Are You My Mummy?

The first thing that popped into my head when I thought about things that bump in the night is Doctor Who. Not because Doctor Who is synonymous with terror, but because some of the strangest, scariest and most unique creatures come from it. Doctor Who is an incredible blend of fantasy, action, drama, emotion and all the unique things that make it an eternally great show to watch.

So, of course, I had to do my homage to two of my MANY favorite episodes - The Empty Child and The Doctor Dances. If you haven't had the pleasure to see these episodes, I thoroughly recommend them -- especially if you'd like a bit of creepiness.

This was a card I created during my stint as the SCS design team member last October. It's still a big favorite for me, and I thought I'd share it with all of you.

Thanks for reading.
~Elle~

Tuesday, July 18, 2017

SCS: Arthurian Legends

And here is the last of the SCS September 2016 theme I'll be sharing.

I love the myths and legends centered around King Arthur. I love the stories so much that I took 2 classes in college about King Arthur (and aced both of them). So, it's only natural that I would want to feature something Arthurian for the literally challenge.

Sir Galahad was just the perfect stamp to use, and I paired him with a sticker from Tim Holtz. I think I can use this card as a great masculine congratulations or birthday card. :)

Thanks for reading!
~Elle~


Saturday, July 8, 2017

SCS: Art of Writing

Another fun card from the SCS September DT - Literally.

A few years ago, I had the opportunity to see a museum exhibition that centered around books and writing. It featured early printing presses, ink making tools and displayed several old manuscripts. One of my favorite parts was an old practice book where the owner was practicing calligraphy that had ink splotches and sketches in the margins. It looked so playful and was in such contrast with the rest of the manuscripts.

I have to confess that the main reason why I bought the Music Hall stamp was the inky sketch of a Victorian lady. Ink being associated with writing and books made me think it was a perfect stamp to use for this month's theme.

I challenged myself to add a touch of mixed media flair, so I blended some distress ink across the panel. A sticker sentiment finished the card off perfectly. :)

Thanks for reading!
~Elle~

Thursday, July 6, 2017

SCS: Get Lost in a Book

Today, I'm sharing another card from my stint in the Splitcoast Stampers design team.

I am a HUGE bookworm - a voracious reader that on average goes through at least 2 books every week. I read a variety of genres and book types (depending on my mood). I was super excited to see a literary theme for September 2016, and just knew I had to do something special.

My first thought was to make a card based on my favorite book. But I can't possibly pick a favorite book! Too many choices... So, I made a card based on my favorite book series -- Terry Pratchett's Discworld.

If you haven't experienced Discworld, I can't recommend it enough! It's equal parts hilarious as it is thought-provoking. It features an unforgettable cast and a universe that seems truly alive. And you need it in your life. Go out, buy any book in the series and prepare yourself to fall in love. You'll thank me later. ;)

My card features Discworld itself, a flat world that sits on top of 4 elephants that are standing on a giant turtle that's swimming through the starry universe.

Thanks for reading!
~Elle~

Tuesday, April 11, 2017

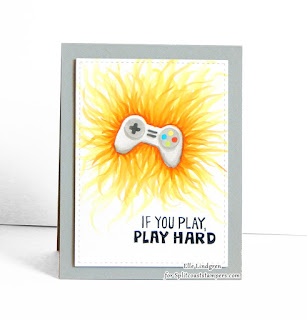
(SCS) Play Hard

This is the final and my personal favorite card for the Fun & Games theme from August 2016. When I think of fun and games, the first thing that pops into my head is video games. As a child (and later a teen), I spent *many* hours glued to the TV, trying to finish one more level or beat just one more boss. I still love playing video games - and I'm still just as passionate about it as I was as a child.

I wanted to illustrate this passion and joy, so I grabbed my Copics to create a unique background. I layered several shades together to create a fiery backdrop that lets the controller shine.

Thanks for reading!
~Elle~

Sunday, April 9, 2017

(SCS) Pika-choose you!

One of the things that my DT term over at Splitcoast Stampers did was to push me outside of my comfort zone. So, here's a card featuring a Pikachu that I drew and watercolored myself, and a punny sentiment spelled out from Elle's Alpha's (from Avery Elle).

It's not perfect, of course, but I'm still pretty proud of how it turned out.

Thanks for reading!
~Elle~

Monday, April 3, 2017

(SCS) You're a Winner

Continuing on with the Fun & Games theme, I used Simon Says Stamp's All Boy (retired) for another masculine card -- this time for congratulations. I paired the stamp with a fun Kaisercraft patterned paper and tried to repeat the elements (circles, stars) for an interesting layout.

Thanks for reading!
~Elle~

Saturday, April 1, 2017

(SCS) Boy Defined

In August 2016, the Splitcoast DT theme was Fun & Games - and my mind immediately went to kids having fun.

With kids, fun often equals messy, and the sentiment from Simon Says Stamp's All Boy (retired) just sums it up perfectly. I used the sneakers from the stamp set and I colored them to look very muddy, like they've been well-loved and well-used - as is the case with all boy shoes.

A few fun enamel dots finish the design for this fun masculine card. I think it would be a great funny baby card for a new mom expecting a baby boy.

Thanks for reading!
Elle

Wednesday, March 1, 2017

Some Odd Girl: March Challenge

It's monthly challenge time over at Some Odd Girl, and this month we're playing with things that POP! The theme for March is anything goes, with the added challenge to pop it up. Head on over to the Some Odd Girl Blog to check out some amazing creations from the design team - and don't forget to participate with your own creation!

For my entry, I used the new Gangsta Bunny digi. Have you guys seen this digi? I cracked up the first time I saw it. Just the idea of a gangsta bunny makes me giggle, and Kristy did an amazing job drawing him up. I just knew I had to use him on a card - especially with Easter coming.

I colored him in softer/pastel tones and added him to my card on an action wobbler (as my little helper, here, is demonstrating). This makes the card even more hilarious, as I imagine The Bunz break-dancing as he raps...

I hope you'll join us for this month's challenge!
~Elle~

Friday, February 10, 2017

Some Odd Girl: Valentine's Blog Hop!


Welcome to my stop on the Some Odd Girl Valentine’s Day Blog Hop! You should have arrived from Ria’s blog but if you just stopped by then head back to the beginning to get started so you don’t miss any stops.
Whenever I think of love, my mind always goes back to old vintage photographs of happy couples. I like the warmth of the tones and how it seems to capture a moment in time. So, I decided to make a vintage photograph featuring the Grands couple. I used my Warm Greys Copic marker - and it was an interesting challenge to make sure there was enough contrast to make all the details stand out. I also brushed the images lightly with a blending tool using Gathered Twigs distress ink. I used Gathered Twigs along with Pumice Stone on the background, too. A bit of gold glam on the "Love" die cut and a couple hearts tie everything together.

Be sure to check in and comment on each blog, including this one, to be the most eligible. Since we’re spreading the love so hardcore, everyone gets 14% off at the Some Odd Girl shop using code SOGLove! But, we'll also be choosing 2 lucky winners from those of you who comment on every blog, each receiving a $14 spending spree in our shop. 
Here’s our hop list...
Elle * You are here
Alexis

Thanks for reading!
~Elle~

Wednesday, February 1, 2017

SOG Monthly Challenge - February

Some Odd Girl is starting a new monthly challenge, and I just had to jump in and make a card! I used the lovely Cupid Mae digi, and some Valentine supplies I had sitting around. I chose a darker skin tone and color for this Cupid, and tied the colors together with red and white doilies.

Click here to check out what the other Oddies made, I guarantee you'll be impressed! :)

Thanks for reading,
Elle

Monday, December 12, 2016

Merry HolODDays!

Good morning, Oddies! It’s that time of year again for our Hol-Odd-Day Hop and the Odd Girls have some ah-mazing projects for you this season! This is our last week of posts before the we take our holiday break, so what better time to hop than now! You can hop with us all week as well as joining us for special holiday posts here on our blog.
Christmas doesn't usually bring fairies to mind, but I just adore all the adorable fairy images over at Some Odd Girl store - and I couldn't resist using Pixie for my hol-ODD-ay card. I used my favorite Christmas color combo - reds, cream, olive green and a touch of gold for eyes and wings.

Now, let’s get a hoppin! If you get lost, just come back here to the main list:
Some Odd Girl blog
Melissa
Anna
Ellen
Tabbatha
Elle ** You are here!
Lynda
Kristy


Be sure to leave a comment at each blog for a chance to win a special prize, $25 gift certificate with some extra winners of $5 that we'll announce on Saturday Dec 17, but everyone can get 25% off in the shop with the code HOLODDDAY! We’re so happy to have spent another year with all of you and we can’t wait to bring you some more ODD fun in 2017!


Friday, October 28, 2016

SOG - Spooky Scary Blog Hop!

It's time to trick or treat with the Odd Crew!


Our hop this week is full of spooktacular Halloween Tricks and Treats. Don’t worry, our tricks won’t be too scary! AND, just like trick or treating for candy, you don’t want to skip any houses…or blogs in this case! Every stop along the way will have (crafty) goodies for you but you won't get the treats you must be a good trick or treater and stop at every house and leave your comment. You can Trick or Treat with us thru midnight EDT on October 31, winners will be announced back here on Nov 2.


My trick is inspired by one of my favorite Oddie cards Ghostly Violin. I wanted to give this concept another try, but take it up a notch. So, I've combined Violin Gwen digi with the Wraith Mae digi to create a new undead bride. I set her against an aged paper script from Romeo and Juliet, and made a spooky sentiment with stickers.
So, my trick for you is to look beyond your digis and combine them in new and unexpected ways! You can add a touch of spooky or a touch of fun.

For this card, I printed a copy of each stamp, then printed another Wraith Mae onto a piece of very thin copy paper. I put the thin paper over Violin digi and traced where I needed to trim the image so it would layer over the stamp correctly. Then I used that as a guide to fussy-cut the shape I needed. Then I colored everything and adhered the two stamps together. Voila!

Here is our hop order for you after you leave the comfort of my porch...
Anna
Melissa
Elle * You Are Here
Lynda
Ellen
Janine
Ria
Tabbatha
Alexis

Wondering what our treats are?
Well, of course we'll be doing a coupon code for 31% off at the shop throughout the hop, TRICKORTREAT.
Then from those of you who comment on every stop we'll be giving away 3, $20 GCs to the shop. Awesome, right? Make sure to stop in our community, Kristy  may have another surprise up her sleeve as well.
And there you have it!  Happy Haunting – I mean HOPPING!

Friday, September 16, 2016

SOG - Foxy & Wizard

Today is the last day of Some Odd Girl digi release, and I've got 2 more cards to share!
Cat Wizard is just plain adorable. He reminds me of the adorable Bandit Wizard digi - which was one of the stamps I worked with when I first guest-designed with the Oddies. So, of course, it's with both excitement and nostalgia that I created this card.

I colored the cat orange, a nod to the little orange friend we had visiting at our front door just the other morning. A bit of purple for contrast and the image was ready!

I had a whole piece of dotty orange vellum left from the ghost card, so I decided to use it. I placed it over a subtle striped paper and it created a really fun and different texture.

For my last card, I went completely non-Halloween. This is both because I wanted to show that you could do something different with each stamp, and because I really wanted to use soft and subtle colors.

I was inspired by a white fennec fox, and decided to keep the fur very pale. I used the same tones for the outfit, going with a pale pink and a darker gray. I set everything against a stripy background and added a couple hearts.

My sentiment came from another word sticker sheet, and I though it went rather perfectly with an unusual fox lady image.

Thanks for reading!
~Elle~