Thursday, July 31, 2014

Birdie Brown - Sweet Birthday

I may have mentioned this before, but I really love Birdie Brown's stamp line from My Favorite Things. They are designed by Torico, who also posts some absolutely beautiful cards on her blog. One of the things that impresses me the most about Torico's designs is that a lot of them have this wonderfully soft and warm quality (not to mention great photography).

I've been meaning to create something in a similar style for a while now, but I always felt like I fell just short of it. Until I saw another MFT design team member achieve a similar effect simply by using a brown ink. Yes, that's right. Just brown ink instead of black for the stamp outline. I felt a bit silly for not realizing that sooner, and for - apparently- not paying enough attention on Torico's blog to notice that she used an espresso (ie brown!) ink instead of black.

So, armed with this new knowledge, I set to create a card with the newest Birdie Brown set: Sweet Birthday Wishes. There are a lot of great parts to this stamp, but I chose to go with the girl and a small present. After stamping them in chocolate brown (see, I'm learning!) ink onto Copic marker paper, I colored them in with Copics. Although this set comes with a matching die, I don't own the die, so I fussy-cut the girl and the present out with scissors.

I got to work on the background by grabbing the newly released Confetti Background stamp. I inked it 3 times with different colors, making sure I turned the stamp so the dots wouldn't all overlap. Originally, I was going to just use the dot background and call it a day, but I found it to be a bit too busy.

So, I cut some strips of Bubblegum and Spearmint cardstock with the smallest of the Horizontal Stitched Strips die. I used the second smallest die to cut a rectangle of the dotted background. I adhered the strips to a piece of white cardstock that measured 4 by 5 1/4". I made sure to leave some blank space between the strips, so it would create an evenly-striped border.

The card base was created by cutting a sheet of Sweet Tooth cardstock in half, and scoring it into a standard A2 card (41/4 by 5 1/2"). I adhered the striped panel to the card with foam squares, then added the girl and the present using thin foam squares.

Lastly, I cut a 1" strip of white cardstock and stamped a sentiment from the set in light brown. I cut the end into a fishtail and adhered it to the card.

Overall, I'm pretty happy with how it turned out. I think I will have to play around with Copic colors some more, though, before I can have that truly warm and cozy quality.

Supplies:
MFT Birdie Brown Sweet Birthday Wishes stamp
MFT Confetti Background stamp
MFT Horizontal Stitched Strips die
MFT Heavyweight cardstock in Bubblegum, Spearmint and Sweet Tooth
MFT Hybrid Ink in Chocolate Brown
Stampin' Up Inkpad in Baked Brown Sugar, Coastal Cabana and Crisp Cantaloupe
Scrapbook Adhesives Foam Squares in Thin and Regular
Copics (E00, E11, E13, R20, YR23, E35, E37, E47, E23, E79, R81, R85, RV66, BG11, BG32, BG47, B00, B24, B37, YG41, YG45, C2, C4, C6, 0)
Sakura Gellyroll White gel pen

Wednesday, July 30, 2014

Lawn Fawn - Mini Summer

If you've been following Lawn Fawn, then you probably know about their upcoming mega fall/winter release (August 28th!!!). I'm super excited, and I'm wishing it was end of August already! While I wait, I decided to make use of some of the other Lawn Fawn supplies that have been sitting in my crafting closet.

For this card, I decided to go small and simple. I started with the Lawn Fawn notecard, in the hippo color. I rounded the corners on one side with the 1/4" We-R-Memory Keepers corner chomper.

I took a sweet garland paper from Lawn Fawn's Hello Sunshine petite paper pad and cut it into a 3x4" rectangle. I rounded all 4 corners with 1/4" corner chomper. I adhered it to the notecard, positioned a little more toward the right.

I stamped 3 cool and refreshing treats from Lawn Fawn's Here's the Scoop stamp set onto some Copic marker paper with MFT's Hybrid Ink in black licorice. I colored them in with Copic markers and added a few details in white gel pen. I carefully cut them out with scissors and adhered them to the card with foam squares.

I wanted to add a bit more color, so I used Lawn Fawn's Stitched Journaling cards to cut out two small flags from Lawn Fawn's Let's Polka petite 6x6 paper pad. I also grabbed one of the Let's Polka flair badges - which had just the perfect sentiment!

Lastly, I added three yellow Studio Calico enamel dots to the top right part of the card to balance everything out.

Supplies:
Lawn Fawn Notecard in Hippo
Lawn Fawn Here's The Scoop stamp
My Favorite Things Hybrid Ink in black licorice
Lawn Fawn Hello Sunshine petite 6x6 paper pad
Lawn Fawn Let's Polka petite 6x6 paper pad
Lawn Fawn Stitched Journaling Card die
Lawn Fawn Let's Polka Flair badges
Studio Calico Yellow & Orange enamel dots
Copic Mini Marker pad 70lbs
Copics (E33, E37, E47, RV11, R43, R05, R46, B00, E50, E35, BG01, BG07, 0)
Sakura Gellyroll White Gel Pen
Scrapbook Adhesive 3D Foam Squares

Tuesday, July 29, 2014

SOG-Mousey

I know, I know... We are nowhere near Christmas! But I was looking for a critter image to practice some texture Copic coloring with and I came across Some Odd Gir's Chris Mouse stamp. This was the very first Some Odd Girl stamp I bought, and I used it like mad for last year's Christmas cards. I colored him in brown, grey, and white, and he was always absolutely adorable. So, when I came across him again, I just had to make a super early Christmas card.

I started by stamping Chris onto some Copic marker paper using MFT's Hybrid ink in black licorice. I colored him in with Copics. (If you're interested in the furry texture, it was done using the very edge of the chisel tip of a Sketch marker to make light, short strokes). I cut him out, leaving a small white border.

For the rest of the card, I wanted to go with a simple and somewhat classic design. Using my Bigshot, I cut the intricate Eliza snowflake die from Simon Says Stamp in white cardstock. I also grabbed some white pearls.

I created a base out of Simon Says Stamp's White Woodgrain cardstock. I went for a standard A2 card base (measuring 4 1/4 by 5 1/2"). I grabbed a couple of wintery papers from my paper scraps box (sorry, I have no clue which pads they're from!) and cut them to 4 by 5 1/4" (brown) and 2 1/2 by 5 1/4" (blue).

I adhered the blue strip in the center of the brown, then added it to the card front. I used Tombow Mono Multi liquid glue to adhere the snowflake to the card, and added the pearls on top. I adhered Chris with foam squares. I decided to forgo the sentiment, so it would work as a more general holiday card.

I liked the design of the card itself. One could easily replace the mouse with a merry Christmas sentiment, or layer a few smaller snowflake dies and pearls for a more complicated design.

Supplies:
Some Odd Girl Chris Mouse stamp
Copic Mini Marker Paper Pad 70lbs
MFT Hybrid Ink in black licorice
Simon Says Stamp Eliza snowflake die
Simon Says Stamp White Woodgrain cardstock
Neenah Solar White 80lbs cardstock
Christmas paper
Pearls
Copics (W2, W4, W6, R05, R46, R89, E33, E37, E49, RV11, R43)
Sakura Gellyroll white gel pen

Monday, July 28, 2014

Basic Card

As I approach my one-year anniversary in card-making, I wanted to write something for those of you who are just starting out - or thinking about getting into card-making. I've got a few posts now about the different tools and supplies, but I've never written a post about the process itself. True, my regular card posts outline the steps (and I hope dearly those are not boring and annoying to read!), but they all operate under the assumption you're familiar with the tools and basic techniques.

So, I thought I'd walk you through a process of making a card and maybe go over a few tips or tricks that could be helpful.

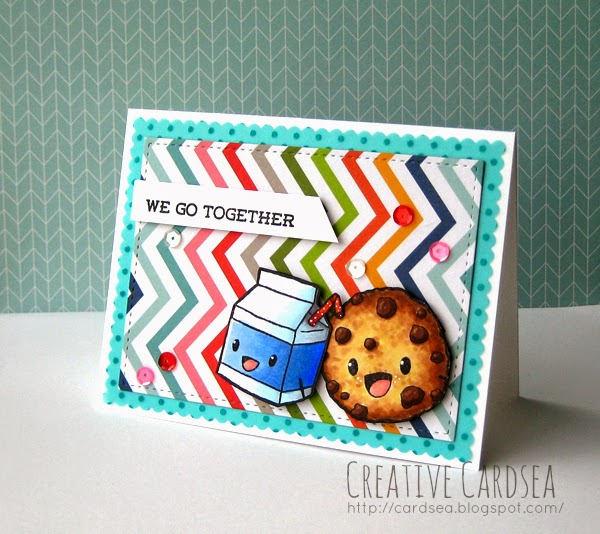
This is the card we're going to end up with. It's very simple and easy to reproduce, and - most importantly - it doesn't use a million supplies and techniques.

The first step with this card was choosing a focal image. Now, I normally stamp an image and then color it in with Copics or watercolor, but coloring is not always easy to get into. I'm lucky in that my current job has me creating art, so I was able to skip over a lot of the basics of coloring and just focus on techniques using the particular coloring tools. But if you've never done art before, it might be a bit more challenging and leave you with a result that you're not happy with.

So, the very first step in choosing that focal image is to get creative. Since I was trying to go simple with this card, I chose a beautiful sticker from Penny Black's Petals and Poetry sticker sheet. The reason I like this particular sticker is because it's fairly large, and it looks like it has texture and detail. This means I could keep the rest of the card simple and focus on the card layout - something that will set your card apart from a random card you find in the grocery aisle.

This is what the full sheet looks like. I chose the flower in the bottom right corner.

Once I had the focal image chosen, I picked out the rest of the supplies:
I chose a piece of Kraft cardstock because the color was close to the brown tones on the sticker. However, I also wanted to draw attention to certain parts of the card (such as the sticker, for example), so I chose a darker navy color, too.

I have two tips that will help you choose colors. The first is to have a selection of neutrals - brown, vanilla/cream, white, grey, black, kraft. Neutral colors go with any other color, so they're a safe combination. They also help with contrast, by either toning it down (example: a soft pink on white) or by increasing it (example: pink on black). The second tip is to grab your favorite paper pack and use it as a palette. Even the bold and bright prints will give you an idea of what tones you can put together. And it's a great bonus if you also happen to use that paper pack and have it match the rest of the card.

Speaking of patterned paper, I chose to go with Pebbles Front Porch 6x6 paper for this card. There's two main reasons why. The first is that the sticker had a soft brown border - which is the same tone I used for choosing the kraft base. The second is that quite a few of the stickers had writing in it, and there was one Front Porch paper that had a dictionary-like print on it, along with a creamy brown tone. It also had a bit of the distressing/texture that the sticker had. So, since many of the small details were the same, I knew it was a good choice for background paper.

The next few things I chose were:
- Foam squares -- because I knew I wanted to use layers, and having that slight bit of elevation would make the card more interesting
- Off-white ribbon and pearls -- because they had a soft antique quality that went with the sticker.

Then I got to work on the card.

I started by creating my base. I cut the sheet of cardstock in half on the long side, so my base measured 4 1/4 by 11". Then I used my Martha Stewart Mini Scoring board to score at 5 1/2" for a standard A2 card.

Since the navy is a strong color, I knew I wanted to use it as an accent - which is easy to do with frames. I cut it to measure 4 by 5 1/4. Then I cut a piece of Front Porch paper to measure 3 3/4 by 5". When I glued them on top of each other, this created a navy border around the paper.

I measured the sticker, then cut another panel that was slightly larger. After placing the sticker on this new panel, however, I realized that the sticker was a bit see-through. I ended up with a result that was darker than how the sticker looked on the sheet. But, I actually liked the deeper color quite a bit. So, it was a happy accident - and those can happen in card-making.

The rest of the card came together very easily. I tied the ribbon around the first panel, then adhered the flower panel with foam squares. Lastly, I added the pearls - just randomly, where it looked good.

At this point, I knew I wanted to add a more customized/personal touch to the card. But it was already done... So, I decided to make a matching tag.

I cut a rectangle out of the craft paper measuring 2" by 3". I rounded the corners at the top with a corner rounder and punched a hole with a hole punch. I layered bits of blue cardstock, patterned paper and a sticker. To match the card, I also added a ribbon and a pearl.

And voila! A simple card and tag.

Hopefully this was useful to someone out there. If so, please let me know in comments. :)

Supplies:
Penny Black Petals and Poetry Sticker
Neenah Desert Storm Environmental Cardstock in 100#lbs
Avery Elle Sapphire Heavyweight Cardstock
Martha Stewart Mini Scoring Board
Pebbles Front Porch 6x6 patterned paper
Melissa Frances Cream Pearls
Schiff satin 1/4" ribbon in Antique White
Scrapbook Adhesives 3D Thin Foam Squares
Tombow Dot Adhesive Runner
EK Success Mini Corner Rounder duo punch
Paper hole punch

Saturday, July 26, 2014

SSS-August 2014 You're So Cool

Yesterday, I received my August card kit from Simon Says Stamp, and I just had to play with it straight away! We've got a fun summer treat theme, with ice cream and bright colors. The kit isn't sold out yet, so you can still grab it and enjoy the goodies! This month, the kit included Bo Bunny patterned paper, 2 distress markers, a piece of Tim Holtz distress watercolor paper and a few cute die-cuts.


Now onto my card... I created a standard top-folding A2 card base by cutting and scoring a piece of yellow cardstock from the kit in half.

I started by stamping the ice-cream onto the distress watercolor paper with MFT Hybrid Ink in black licorice. I colored a part of it in Peacock Feathers (which came in the kit), and used Gathered Twigs distress marker for the brown. I also stamped a little heart from the kit stamp and colored it in with Festive Berries. After it was dry, I carefully cut it out with scissors.

I wanted to play with some fun dies, so I pulled out Mama Elephant Femme frames to create a scalloped background panel out of the Bo Bunny paper from the kit. I adhered it to the card front.

I cut a tag out of white cardstock in the kit using Lawn Fawn's Tag You're It die. To tie in the rest of the card, I die-cut a small circle from the sunshine cardstock, and glued it to the top of the tag. I also added a bit of Lawn Fawn lime twine at the top.

I used the new Simon Says Stamp Frames die to cut a panel out of the yellow cardstock. The really cool thing about this new frames die is that it cut 2 pieces - a really thin frame and a matching decorative label. I decided to leave the label for the sentiment and use the frame on the tag to bring more attention to the ice-cream.

I stamped the sentiment from the kit stamp in plain black. It looked a bit too simple, so I used the Peacock Feathers distress marker to stamp the circle heart. I filled in the heart with festive berries marker. Once it was dry, I cut it out with a 1/2"round punch and adhered it under the sentiment with foam squares.

Using a glue pen, I adhered the thin frame to the tag, then popped up the ice-cream with some foam squares. I adhered it to the top of the label, then adhered the whole panel to the front of the card.

Supplies:
Simon Says Stamp August 2014 card kit
Simon Says Stamp Frames die
My Favorite Things Hybrid Ink in black licorice
Distress markers in Gathered Twigs and Festive Berries
Mama Elephant Femme Frames die
Lawn Fawn Tag You're It die
Lawn Fawn Lime Single Cord twine
1/2" circle paper punch
Scrapbook Adhesives 3D foam squares
Tombow Mono Liquid glue pen

Friday, July 25, 2014

Avery Elle - Pastel Thanks

Confession time! I have ridiculous amounts of patterned paper. Staggering towers of 6x6 papers, a bundle of 12x12 collections and let's not even get into the cardstock stacks... I am a paper girl at heart, and nothing makes me happier than having the perfect paper for every occasion. So, when I saw that Avery Elle was introducing 6x6 patterned papers to match their inks and cardstock, I just had to get them right away. And then they sat on my craft table for a while, until I figured out just how I wanted to use them.

This card started with the Avery Elle Sorbet 6x6 paper pack. The papers in this collection are in softer pastel colors, and would be perfect for a baby card or a spring card. I also grabbed Avery Elle Mint to Be and Pixie cardstock - which matched the patterned paper.

First, I created the card base by cutting a sheet of Avery Elle Ultra smooth pure white cardstock in half. I scored it into an A2 top-folding card (4 1/4 by 5 1/2").

Using my Bigshot, I cut two circles from the pink and mint cardstock, using MFT's Stitched Circle dies.  I adhered them at the top of the card. I thought about adding a third circle, but I liked the simple look of just having 2 colors and 2 shapes.

Then I grabbed a piece of mint and pink heart paper from the patterned pack and cut them into 1/2-inch strips. I adhered them to the right corner of the card base at an angle, alternating the colors. I cut off the extra pieces on the side.

For the sentiment, I went with Avery Elle's Many Thanks stamp set. I stamped the thank you in Mint To Be pigment ink.

As a last touch, I scattered some sequins over the two circles.

I think this would make a really sweet baby thank-you card. The pink could be replaced with blue for a boy version. Sorbet pack features a sea-glass color in it as well, which is a light blue color. And there's also a brighter green, which would work great for something gender-neutral.

Supplies:
Avery Elle Many Thanks stamp
Avery Elle Mint to Be pigment ink
Avery Elle Sorbet 6x6 paper pad
Avery Elle heavyweight cardstock in Mint to be, Pixie and Ultra smooth pure white
MFT Stitched Circle die-namics
Ranger Studio Multi-Medium Matte glue
Avery Elle sequins in Sugar blend and Lucky blend

Wednesday, July 23, 2014

Water Fairy

This card actually started as a simple coloring practice. I've been wanting to try out coloring a different skin tone for a while now, so I stamped out a fairy and got to coloring. I ended up liking the result so much that I decided to create a card with it.

I started by stamping Some Odd Girl's Fairy Magic stamp on a piece of Copic marker paper.  After the fairy was colored in, I added a few dots of white with my gel pen and carefully cut her out with scissors. She looked like a water fairy, so I decided to go with a water-like theme with the rest of the card.

I created a standard A2 card base (4 1/4 by 5 1/2") from a piece of light blue cardstock. Then, I got my Bigshot out and cut a couple of panels with Mama Elephant Femme frames and Type It dies. I used Bo Bunny's Enchanted Garden paper, which had fantastic purple and green hues.

After adhering the panels and the water fairy to the base, I went a little crazy and added sequins, pearls, an intricate die-cut and a paper flower. Hopefully it's not too much clutter!

Supplies:
Some Odd Girl Fairy Magic
MFT Hybrid Ink in black Licorice
Copic Marker paper 70lbs
Bo Bunny Enchanted Garden 6x6 paper
Mama Elephant Femme Frames and Type It dies
My Favorite Things Fancy Flourish die
Some Odd Girl Baby Mix sequins
Pearls
Copics: Skin: E13, E15, E18, R43, 0, R46, Eyes: B01, B07, Leaves/flowers: B00, YG13, YG17, Hair: C2, C4, C6, C8, Dress: B41, B24, B37, B99, Wings: BG11, BG32, BG34, BG49
Sakura Gellyroll White Gel pen
Prima Flowers Calypso tin of blue hydrangea

Monday, July 21, 2014

Lawn Fawn - You Color My World


I had major issues with my internet this past week - which is worrisome as I need an internet connection for work. It was also rather frustrating because I was also feeling rather creative and had created several cards that I couldn't share (but really wanted to!).

While I was alternating between shaking my fist at the modem and pleading for it to start working, I got a great idea for a technology card using the Lawn Fawn Beep Boop Birthday stamp set and its matching dies.

I started by cutting a sheet of MFT Steel Blue cardstock in half and scoring it to create a standard A2 card (4 1/4 by 5 1/2"). I also cut a piece of Copic marker paper to measure 4 by 5 1/4", which created a center panel for me.

I lightly drew a straight line with a pencil toward the bottom half of the panel. I stamped four of the same robot onto this straight line with MFT's Steel Blue hybrid ink. This made the robots look a bit more faded - which was perfect for the monochromatic look I was going for. I quickly colored them in with my Copics, then erased that pencil line.

I stamped the other robot from the set in MFT's Black Licorice hybrid ink, and also colored him in with Copics. I used brighter colors on the robot, but I still kept the coloring pretty simple. After I was finished, I cut him out with the matching Beep Boop dies. While I had my Bigshot out, I also cut a speech bubble from Lawn Fawn's Chit Chat dies. I stamped the sentiment from Lawn Fawn's Starry Backdrops stamp.

I grabed a gray striped piece of patterned paper from Lawn Fawn's Let's Polka petite 6x6 paper pad. I cut it into two pieces that would frame the panel at the top and bottom. I adhered them to the front panel, then adhered the panel to the card base.

I attached the colorful robot and speech bubble to the panel with foam squares. A couple of blue enamel dots and the card was done! :)

Supplies:
Lawn Fawn stamp sets: Beep Boop Birthday, Starry Backdrops
Lawn Fawn dies: Beep Boop Birthday, Chit Chat
MFT Hybrid Ink in black licorice & steel blue
Ranger Archival Ink in jet black (sentiment)
MFT Heavyweight cardstock in steel blue
Lawn Fawn Let's Polka petite 6x6
Scrapbook Adhesives Thin 3D foam Squares
Copics (C2, C4, C6, 0, B41, B45, B37, Y38, YR04, R20)
Uniball Signo Broad white gel pen
My Mind's Eye Basics Blues enamel dots

Thursday, July 17, 2014

Sunflower Bouquet

Today's card uses a gorgeous stamp from Taylored Expressions - Sunflower Bouquet. I love sunflowers. They are one of my favorite flowers, and I find myself drawn to any stamp set that features sunflowers. So, when I saw this gorgeous bouquet in a mason jar, I just had to grab it.

I started by stamping the flowers onto some Copic marker paper with My Favorite Things hybrid ink. I colored them in using my Copics. I wanted the card to be cheery, so I used bright colors. I also used a white gel pen to add in a few highlights and extra details. After the image was colored in, I carefully cut around it with my scissors, leaving a small white border.

Using a frame die from Mama Elephant's Type It die set, I cut a piece of vellum into a scalloped rectangle. I adhered the flowers to the rectangle with foam squares.

For the base, I cut a sheet of Avery Elle's Fog cardstock and scored it in half to create a top-folding A2 card (4 1/4 by 5 1/2"). This cardstock is a warm gray with a slight yellow undertone, so it's perfect for the warm tones in the rest of the card.

For the background patterned paper, I used Studio Calico's Printshop! 6x6 paper pad. I cut it to be slightly smaller than the card base - 4 by 5 1/4", and adhered it straight onto the cardstock. Then, I adhered the flower panel with foam squares.

As a last touch, I scattered some sequins from Pretty Pink Posh's Summer sequins mix. The colors matched just perfectly!

Supplies:
Taylored Expressions Sunflower Bouquet stamp
My Favorite Things Hybrid Ink in black licorice
Mama Elephant Type It die set
Copic Mini Marker pad 70lbs
Copics: Y15, Y35, YR14, E23, E37, E47, YG13, YG17, Y11, R81, RV66, B00, B41, B91, B24
Bazzill 40lbs Vellum
Avery Elle Heavyweight cardstock in Fog
Studio Calico Printshop! 6x6 paper pad
Pretty Pink Posh Summer Sequins mix
Uniball Signo broad white gel pen
Scrapbook Adhesives 3D foam squares
Ranger Multi-Medium matte

Wednesday, July 16, 2014

SOG- Geisha

This card started with Some Odd Girl's Geisha Kaylee stamp, which is a really gorgeous and intricate stamp with lots of little details.

After stamping Kaylee onto Copic Marker paper, I colored her in with my Copics. Since she's a geisha, I wanted her to have alabaster skin - which meant getting away from my usual skin tones. This was a bit challenging, but I really love the result. I opted for a simple brown kimono, and added a bunch of red and blue for extra contrast. Once the coloring was done, I carefully cut around the image, leaving a small white border.

For the card base, I used Simon Says Stamp's Olive cardstock - a great dark neutral that worked with the other colors. I cut the sheet in half to create a standard A2 card (4 1/4 by 5 1/2"). I decided to dip into some of the first patterned paper I got - 12x12 K&Company Que Sera Sera paper.  I cut a piece of blue paper to measure 4 by 5 1/4.

I used my Bigshot and the biggest of my Sizzix circle dies to cut a circle out of the yellow paper. I adhered it to the right side of the panel and cut the extras. To make the yellow paper pop up a bit better, I went around it with my white gel pen. While I had my Bigshot out, I also cut a thanks sentiment from red cardstock using Simon Says Stamp's Thanks die.

I created a thin panel for the sentiment out of some scrap cardstock. I layered it with red cardstock and adhered it to the card. I adhered the "thanks" on top.

Since the card was colorful enough, I decided to add no other decorations.

Supplies:
Some Odd Girl Geisha Kaylee
MFT Hybrid Ink in Black Licorice
Sizzix Circle Framelits dies
Simon Says Stamp Thanks die
Simon Says Stamp Heavyweight 100#lbs cardstock in Olive
Avery Elle Heavyweight Cardstock in Cherry
K&Company Que Sera Sera 12x12 designer paper
Copics: Hair (BV11, BV25, BV29), Skin (E000, R20, R22, BV11, C2), Eyes (YG23, G07), Gold comb/chain (Y21, Y28), Kimono (E42, E44, E47, R05, R29, R59, W2, W4, 0), Flower (RV11, R43), Fan (B00, B24, B18)

Monday, July 14, 2014

SSS- Birthday Hogs & Kisses

When Simon Says Stamp launched their new This is the Life products, I jumped at the chance and grabbed a whole lot of them as soon as they launched -- which, by the way, shipped the morning after and arrived on my doorstep this very morning! Of course, I couldn't just put away all the supplies without playing with them a bit, so I whipped up a quick funny card. For this card, I will be using Birthday Farm Animals stamp set and its coordinating dies.

I started by preparing my base. I cut a piece of Simon Says Stamp Soft Navy cardstock in half and scored it to create a standard A2 card (4 1/4 by 5 1/2"). Since I was using navy as a base, I decided to go with nautical colors. So, I pulled out some white cardstock, a piece of Bazzill vellum, as well as some Lipstick Red cardstock.

Using my Bigshot, I cut the white cardstock with the smaller of Lawn Fawn's Stitched Party Banners. From the same set, I also cut out a round stitched circle from the vellum. Then, I cut a banner from the red cardstock, using Simon Says Stamp's Folded Banner die. Lastly, I stamped the birthday pig and cut him out with the coordinating die.

I colored in the pig, giving him a bright red balloon and a blue hat. I also stamped the sentiment onto the red banner using white pigment ink. To add a bit of interest, I added a piece of washi tape to the white panel.

The rest of the card came together very quickly. I tied a piece of hemp cord to the top of the card, then adhered all the layers together with foam squares. I hand-drew a border around the center panel with a white gel pen. I also drew in some stitches around the red sentiment banner. Lastly, I added two matching red enamel dots near the top of the white panel.

Supplies:
Simon Says Stamp Birthday Farm Animals and matching die
Simon Says Stamp Folded Banner die
Lawn Fawn Stitched Party Banners die
Simon Says Stamp Heavy 100#lbs cardstock in Soft Navy and Lipstick Red
MFT Hybrid Ink in Black Licorice
Hero Arts Unicorn White pigment ink
Neenah Solar White 80lbs cardstock
Bazzill 40lbs Vellum
Kelly Purkey Red Chevron washi tape
Hemptique Natural hemp cord
Copics (YR01, RV42, R22, R85, RV66, R05, R46, R59, E37, B91, B95, B45, Y11, Y35)
Uniball Signo broad white gel pen
Scrapbook Adhesives Foam Squares
Simple Stories Good Day Sunshine enamel dots

Sunday, July 13, 2014

Love You- Moulin Mae

Since the card I posted earlier features a stamp that you might not be able to get, I wanted to post a card with a stamp that you can get - and it's a very pretty stamp at that! This card features Moulin Mae, from Some Odd Girl.

I started by stamping Mae on a piece of Copic Marker paper and colored her in with my Copics. I wanted the color scheme to be feminine, so I worked with pinks and browns, and just a touch of silver/white. I have a weakness for white hair, so that's what Mae is sporting this time around. After she was colored, I cut her out and set her aside while I worked on the rest of the panels.

I created an A2 base from MFT's Primitive Cream cardstock. I also cut a piece of brown cardstock to measure slightly smaller (4 by 5 1/4), as well as a small brown panel measuring 2 1/2 by 4 1/2. I cut two pieces of patterned paper and adhered them to the panels. I chose a pink and cream stripe to go behind Mae and a subtle grey stripe for the background.

Since the card uses such feminine colors, I decided to have a love sentiment. Using MFT's Sweet Stack Labels die, I cut a background from brown cardstock and a circle from cream cardstock. I also used my Bigshot to cut out a brown "love you" sentiment from Simon Says Stamp's Love You die.

I adhered the circle to the label with foam squares, then adhered the sentiment using my Xyron Sticker Maker. Since the top was a bit empty, I added a small red heart. I adhered Mae to the pink panel with foam squares, and adhered all the panels together.

As a last touch, I added some enamel dots to the bottom of the card, as well as on each side of the circle sentiment.

Supplies:
Some Odd Girl Moulin Mae
MFT Heavyweight cardstock in Primitive Cream, Bazzill Canvas Cardstock in Chocolate, Copic Mini Marker pad 70lbs
Simon Says Stamp small Love You die, MFT Sweet Stack Labels die
My Mind's Eye Ashbury Heights 6x6, Simply Gorjuss Paper pack 6x6
Copics (B000, C2, C4, C6, B41, B45, E00, E11, E13, R20, R32, E33, E39, E29, R11, R43, RV34)
Freckled Fawn Enamel Dew Drop Stickers Pinks
My Mind's Eye Charmed enamel dots
Scrapbook Adhesives Thin 3D foam squares

Retro Kitchen Lulu

Whenever I'm buying a new stamp, I always have a person or an occasion in the back of my mind. That person is almost never me. Out of all the supplies I've bought, there's maybe 3 or 4 things that I got because they appealed to me and me alone. So, during my last big shopping splurge (yes, it was pretty huge trip - but in my defense, there were some major sales going on!), I bought a few stamps for just me. And I'm really glad I did, because at least one of the stamps seems to be gone. The adorable stamp in this card is from Stamping Bella and it's called Lulu's Two Pies. I wanted to link to it, but I couldn't find it anymore. I apologize for that!

I started this card by stamping Lulu on some Copic Marker Paper and coloring her in with Copic markers. She has a fantastic retro look, so I tried to go for retro colors - red, blue and a touch of yellow. After she was colored, I fussy-cut the image, leaving a small white border. Since the white of the marker paper was so much brighter than the cream color of the base and patterned paper, I went around the edges with E53 to soften the transition.

The rest of the card came together very easily.

I cut a piece of MFT's Primitive Cream cardstock in half, and scored it for a top-folding A2 card (4 1/4 by 5 1/2"). I also cut out a panel for the sentiment from the same cardstock, using EK Success Real Estate Sign paper punch. I used the mini round blending tool and Ranger Distress ink in Tea Dye around the edges of the sentiment panel, then stamped the sentiment in brown ink.

I cut a panel from Bazzill Peppermint cardstock to measure 4 by 5 1/4". The patterned paper is from Carta Bella's Homemade With Love collection. I chose the paper with pies, which was just perfectly matched with the stamp. After adhering two strips of paper together, I added a red polkadot ribbon to the top of the panel.

Lastly, I adhered the sentiment panel and Lulu to the card with foam squares. Since the card was rich in color and pattern, I didn't add any other embellishments.

Supplies:
Stamping Bella - Lulu's Two Pies
MFT Hybrid Ink in Black Licorice
Ranger Archival Ink in Coffee
Ranger Distress Ink in Tea Dye
Copic Marker Paper 70lbs
Copics (E00, E11, E13, C2, R05, R29, R59, Y21, B000, B00, B01, B45, YR27, E53, E23, 100 - Black)
MFT Heavyweight Cardstock in Primitive Cream
Carta Bella Homemade With Love 
EK Success Real Estate Sign paper punch
Scrapbook Adhesives Thin 3D foam squares

Saturday, July 12, 2014

ME- Protected

This is the third and final card in my Stamp Trio challenge, using Mama Elephant's In My Heart stamp. This time, I wanted to play with texture and dies. I had already stamped, colored and die-cut the boy and the girl while I was making the second card, so they were ready to use.

I started by preparing my card base. I cut a sheet of Simon Says Stamp Lemon cardstock in half, and scored it for a top-folding A2 card. Using the Cuttlebug Seeing Spots embossing folder, I added a large polka dot texture to the front.

While I had my Bigshot out, I cut out the rest of the panels I would be using. I used the stitched rectangle from Mama Elephant's Femme Frames die to cut a rectangle from Simon Says Stamp's Sea Glass cardstock. I cut a piece of white cardstock with Pretty Pink Posh's Stitched Duo I die, as well as the same shape out of Doodlebug vellum. Then, I used the stitched scallop border from Pretty Pink Posh's Stitched Borders I die to cut the vellum piece.

I layered the vellum to the bottom of the white cardstock and adhered it together with a bit of glue. I tied a piece of yellow twine from Pretty Pink Posh's Summer embellishment kit around the bottom of the panel. I attached the boy and the girl from Mama Elephant's In My Heart set to the panel with foam squares.

I then adhered the panels to the card. As a last touch, I added a few flower sequins from the summer embellishment kit near the sentiment.

Supplies:
Stamp: Mama Elephant In My Heart
Ink: MFT Hybrid Ink in Black licorice, Ranger Archival Ink in Jet Black (sentiment)
Dies: Mama Elephant Femme Frames, Pretty Pink Posh Stitched Duo I, Pretty Pink Posh Stitched Borders I
Cuttlebug A2 Embossing Folder Seeing Spots
Cardstock: Simon Says Stamp Heavy Cardstock in Lemon and Sea Glass, Neenah Solar White 110lbs
Doodlebug Sprinkles vellum in Coral
Copics
Pretty Pink Posh Summer Embellishment Kit

Thursday, July 10, 2014

ME- Thinking of You

This is the second card in my stamp trio challenge, using Mama Elephant's In My Heart stamp.

First, I quickly created a base for the card by cutting a sheet of Surf Blue cardstock in half. I scored it, making it into a standard A2 card.

I started by grabbing a sheet of Tim Holtz distress watercolor paper, which measures 4 1/4 by 5 1/2". Using distress inks and some water, I created a dreamy watercolor background. I had some warping from the water, so I decided to mat the background onto some cardstock.

I cut the panel down to measure 3 3/4 by 5", then adhered it to a piece of dark grey cardstock that measured 4 by 5 1/4". I adhered the entire panel to the base.

I placed the girl onto the background with some foam squares, and quickly sketched in a shadow underneath her.

For the sentiment panel, I started by sketching out a puffy cloud on a piece of white cardstock and cutting it out with my scissors. I stamped the sentiment in the middle, then adhered it to the card with foam squares. As a bit of a whimsical touch, I added some stitch lines just inside the border with a gel pen. I also drew in some round thought-bubble circles with a white gel pen directly on the watercolor panel.

Lastly, I adhered some Pretty Pink Posh gold and silver sequins to the top of the card. I think they kind of look like stars, and they sure shimmer and shine!

Supplies:
Stamp: Mama Elephant In My Heart
Ink: MFT Hybrid Ink in Black Licorice, Ranger Archival Ink in Jet Black and Vermillion, Ranger Distress Inkpads in Tea Dye, Broken China, Salty Ocean and Chipped Sapphire
Tim Holtz Distress Watercolor paper
Cardstock: Simon Says Stamp heavyweight cardstock in Surf Blue and Slate
Copics (E00, E11, E13, R20, R32, B00, Y11, Y35, E35, E37)
Pretty Pink Posh 4mm cupped sequins in Metallic Silver and Metallic Gold
Sakura Souffle gel pens (teal)
Uniball Signo broad white gel pen

Wednesday, July 9, 2014

Mama Elephant - Circus is Coming

It's time for another Stamp Trio Challenge! If you're new to my blog, you can read about the challenge a bit here.  This time, I will be working with the newly released Mama Elephant set In My Heart. This set was inspired by Operation Write Home, and it's filled with adorable images of little ones and sweet sentiments.


For this first card, I wanted to go with something bright and happy - and depart from my usual birthday/thankyou/hello set. I thought it might be fun to create a circus scene.

I started by stamping the boy and the girl from the In My Heart set and die-cut them with the matching dies, using my BigShot. I then colored them in with my Copics, and added mouths for a bit of extra expression. Since the images were small, it was pretty easy to color them in, using just a few colors. I also stamped a platform for the girl to stand on from Sweet Stamp Shop's Juggling Act, and colored it with Copics. I cut it out, leaving a fine white border to match the other die-cuts.

I prepared the card base, using Simon Says Stamp's Smoke cardstock, which I cut and scored in half to measure 4 1/4 by 5 1/2" (standard A2 size). I cut a piece of spotted patterned paper from My Mind's Eye Just Splendid paper pack to measure 3 3/4 by 5". I adhered it to the base, which left a lovely border around the outside of the card.

I drew a couple of wires at the top of the card with a black pen, and adhered the stamped elements with foam squares.

I stamped a simple sentiment on a piece of white cardstock and adhered it to the card with foam squares. As a last touch, I added a single enamel dot to the side of the sentiment panel.

Supplies:
Mama Elephant In My Heart stamp
Mama Elephant In My Heart coordinating dies
Sweet Stamp Shop Juggling Act
Sweet Stamp Shop Elephant Hearts
MFT Hybrid Ink in Black Licorice
Copics
Simon Says Stamp Smoke Heavy Cardstock
My Mind's Eye: Record It! Just Splendid 6x6
Teresa Collins  Enamel Dots Daily Stories
Scrapbook Adhesives Thin 3D foam squares
Sakura Pigma pen 0.3mm

Tuesday, July 8, 2014

Birthday cake Ava

Confession time! My favorite color is brown... When I say it out loud, it sounds a bit boring. I mean, it's not a bright or exotic color like turquoise or amethyst. And it doesn't really inspire exciting traits. It's dependable, solid, subdued. But it's still my very favorite color. It's a neutral that's not as harsh as black, and it has a warmth you don't get with gray. It goes with - and this is my favorite part - anything! Any other color you can think of looks great when matched with brown.

So, when I saw Stamping Bella's Uptown Girl Ava Loves to Celebrate stamp, I knew I wanted to use brown. And aquamarine - which, when paired with brown, really pops!

I started by stamping Ava with MFT Hybrid ink in Black Licorice on some Copic marker paper. I colored her in with Copic markers, and added a few highlights with a white gel pen. I trimmed it into a small rectangle.

For the base, I cut a piece of 8 1/2 x 11" Neenah Desert Storm cardstock in half to create a standard top-folding A2 card (4 1/4 x 5 1/2") card.

I cut two panels of paper from Simple Stories Sn@p Color Vibe paper pad, making sure they were 1/4" and 1/2" smaller than the card base. I layered them together, and adhered the stamp panel to the left side. I also stamped a Happy Birthday sentiment on the inside of the card, as there was no room to put it on the card front.

As a last touch, I scattered a few 4mm aquamarine sequins from Pretty Pink Posh to the right side of the card. This tied in the colors and shaped together just perfectly.

Supplies:
Stamping Bella Uptown Girl Ava Loves to Celebrate
MFT Hybrid Ink in Black Licorice
Copic Marker Paper 70lb
Neenah Desert Storm 100lb cardstock
Simple Stories Sn@p Color Vibe 6x6
Pretty Pink Posh 4mm sequins in Aquamarine
Copics: 0 (colorless blender), B00, BG01, BG07, C2, C4, E00, E11, E13, E15, E33, E37, E47, G14, R20, R32, R81, Y21, Y35, YR14
Sakura Gellyroll white gel pen
Ranger Studio Multi-matte

Saturday, July 5, 2014

Birdie Brown - Sending You Sunshine

In just a few days, My Favorite Things will be launching their new release, including a brand new Birdie Brown stamp set. It's very exciting, and I can hardly wait! So, I thought I would occupy my time by making a card with one of the older Birdie Brown sets - Sunflower Sweetheart.

I started by stamping the girl, flower cart and trio of sunflowers on some Copic marker paper, using MFT Hybrid ink in black licorice. I colored the images with my Copics, then carefully cut them out. This stamp set has a matching die set, but I didn't want a white border around the images, so I fussy-cut them with a pair of scissors.

After cutting them, I got to work on the panel. I die-cut a scalloped rectangle from brown cardstock, using Mama Elephant's Femme frames die. I used the stitched rectangle die from the same set to cut out a piece of plain white cardstock, and a piece of patterned paper from My Mind's Eye Ashbury Heights paper. I used the largest stitched scallop border from Lawn Fawn's Stitched Scalloped Borders die to cut the patterned paper in half.

I prepared a base from sunshine yellow cardstock, and adhered the panels together. I also adhered the girl and the layered cart and sunflowers to the front of the card. For the sentiment, I cut a small banner out of white cardstock and stamped in black ink. I used my scissors to create a fish-tail edge and adhered the sentiment to the card.

As a last step, I added some Wink of Stella glitter to the sunflowers, along with a few dots of white gel pen for highlight. I adhered 3 yellow enamel dots above the sentiment.

Supplies:
Stamp: MFT Birdie Brown: Sunflower Sweetheart
Cardstock: Simon Says Stamp Sunshine (base), Bazzill Java orange peel (brown), Neenah Solar White 80lbs 
Ink: MFT Hybrid Ink in black licorice
Paper: My Mind's Eye Market Street: Ashbury Heights 6x6, Copic 70lbs Mini Marker Pad
Copics: B000, C2, C4, C6, E00, E11, E13, E15, E23, E33, E35, E37, E57, E59, E47, G14, R08, R20, R46, R59, Y21, Y35, YG67 YR14, YR67
Zig Wink of Stella, clear
Sakura Gellyroll pen in opaque white

Friday, July 4, 2014

SOG- Milk & Cookies


When Some Odd Girl launched Cookies n Milk clear set, I knew it was something I had to have. My big gift to family for Christmas each year is home-baked cookies and what better way to decorate the bags and boxes than with a smiling cookie?!?

But the milk and cookie look so adorable, I just had to make a card that features them.

I stamped out the milk and the cookie on some Copic marker paper, and colored them in with my Copics. I used a rather large number of markers for the cookie, because I wanted to get the color just right - and my early attempt looked a bit too much like skin (which was creepy).

Just look at the number of browns and yellows in there!

After coloring them, I carefully cut them out and got to work on the rest of the card.

Using Mama Elephant Femme Frames dies, I cut a scalloped rectangle from Doodlebug sprinkles vellum and a stitched smaller rectangle out of patterned paper. I adhered them to my base, then added the cookie and milk with foam squares.

For the sentiment, I went really simple and stamped "We go together". I cut it down to a rectangle, then made an angled cut at the right edge for some interest.

Lastly, I sprinkled a few Sweetheart sequins around the card.

Supplies:
Stamp: Some Odd Girl Cookies n Milk
Ink: MFT Hybrid Ink in Black Licorice
Mama Elephant Femme Frames die
Cardstock: Neenah Solar White 110lbs
Paper: Doodlebug Sprinkles Vellum in Peacock, Project Life: Honey patterned paper
Copics
Pretty Pink Posh Sweetheart Sequins
Best Creation foam squares (large)

Tuesday, July 1, 2014

Happy Anniversary- Trav's Style

A while ago, I watched a video by Savannah O'Gwynn, where she talked about Travis' card style. His style has just 3 steps: Stamp, Ribbon, Done. Ever since I saw the video, I had this concept brewing in the back of my mind of how to make an interesting card with just one stamp and some ribbon.

So, I pulled out some apple green and aquamarine satin ribbon today, and things just kind of fell into place. Why not use the ribbon to make a faux patterned paper for the card?! And that's exactly what I did.

I did deviate just the slightest bit from Trav's style by creating a base and a slightly skinnier center panel. In my defense, this was mainly because I didn't want the inside of the card to show the ribbon ends, and just sticking a white panel on the inside would have made the card hang open (which drives me batty!).

Now, since I could only stamp one thing, I decided to stamp the sentiment - and to go bold. Winnie & Walter's The Big, The Bold and the Happy stamp was the perfect choice. I stamped the large "happy" in Avery Elle's Aquamarine pigment ink, as it was the perfect tone that's right between the two ribbon colors. More green than the blue, and more blue than the green. I stamped the word "anniversary in black.

Then I set to create the stripe pattern by alternating the green and the blue ribbon. I used my tape adhesive to adhere them directly to the panel, and secured the ends on the back with scotch tape. I then adhered the entire panel to the card front.

And that's all there is to it!

Supplies:
Winnie & Walter The Big, The Bold and the Happy
Avery Elle pigment ink in aquamarine
MFT Hybrid Ink in black licorice
Green Apple satin ribbon
Aquamarine satin ribbon