Showing posts with label Card Kit. Show all posts

Tuesday, January 8, 2019

Happy Yellow Flowers

As part of my project to use my stash as much as possible in 2019, I am planning to use each stamp set I own a few times to create some interesting projects.

I'm starting with a stamp set from Simon Says Stamp called Favorite Flowers. This stamp set was a part of a card kit, and while I did use a couple of the stamps from it in a card or two, I definitely didn't stamp everything out.

I opted for a simple creation, adding some of the lovely flowers and some foliage die-cuts. I like the palette of gold, yellow, gray and brown - I think it's both cheerful and bright without being too sweet.

Thanks for reading!
~Elle~


Saturday, November 3, 2018

Sending Love

I've got quite a few stamps that are in my collection because they came in an awesome kit. But I find that I haven't been using them enough - outside a few kit cards, that is - and I want to change that. So, I'll be adding a few interesting new challenges in the weeks to come to help me stretch my kit supplies and make some fun new creations. Be on the lookout!

Thanks for reading.
~Elle~

Wednesday, February 14, 2018

Sweetheart


Today's card features a little shaker tag that came as a part of a Simon Says Stamp card kit. I haven't gotten as many kits in 2017/18 as I have in the past years, but I still haven't used them as much as I would like. Though - I now think a part of that is just due to seeing soooooo many people do "1 kit, 10 cards" videos/blog posts that it leaves me wanting to do something entirely different.

I'm excited to pull out those stamps, dies, paper and embellishment now that time has gone by and use them in a completely different concept.

And, of course, as today is Valentine's day, this card seemed especially fitting.

Thanks for reading!
~Elle~

Monday, August 22, 2016

Stash Kit Project


 Stash Kit Project is a personal challenge created to help me focus on my existing stash and to make use of supplies I've purchased but did not use (or did not use enough). The idea behind this challenge is very simple: create a kit of coordinating stamps, paper and embellishments and make several cards throughout a month with it.

My kits will be similar to card kits you can get from Simon Says Stamp, but I will be adding several stamp sets instead of just one. I'm keeping the first kit pretty simple, just to give myself some time to get used to the process and to go over some other things I may need in future kits. I'm also going to keep track of everything I use with the kits, so I can make them portable for traveling or crafting on the go.

Want to play along with me?
Here's the basic rules:
1) As the goal of this project is to make use of supplies, you should only use what exists in your stash - no shopping for new products allowed!
2) Give yourself some choices, pick products that you've used before and loved, then mix them with products you've never used.
3)  Retired products are good! I encourage you to pick retired goodies as long as they inspire you to create something awesome. Tip: You can google the name of the product and find the product sheet to link to so your readers can see what it looks like before you've played with it.
4) Think small - fewer kit elements mean you have a better chance of completing your goal. You can always add extra items if you run out of everything, but you don't want to be stuck with half a kit to use up as the month winds down.
5) Pick a goal. How many cards will you make? This will both give you something to work toward and help you decide how big your kit needs to be.
6) Have fun! Simplest rule, but the most important one. If you're not enjoying the process and you're forcing yourself to make things, don't be afraid to take a step back. Treat it as a learning experience that will help you construct a better kit next month.

I also thought I'd share how my kits will be stored.
I purchased a set of A4 zipper bags from Amazon, and they're the perfect storage bags. I can add several stamps, a paper pad, some cardstock and embellishments. And since the set comes with 12 bags, I can set up the kits a month or two in advance if I need to.

If you decide to take part in the Stash Kit project, do let me know! I'd love to check out your blog/site and send some extra support your way. :)

Find a follow-up and more information in Part 2.

Thanks for reading!
~Elle~

Edit: I've added a picture for easy post pinning!

Wednesday, September 2, 2015

Make Your Own Card Kit -- Kit 1 review

Alright, so I finally found the slightest bit of time to create this post - even though it feels like the cards have been sitting on my desk for ages! To see how I made my kit, click here.

So, let me start with all the cards I created with this kit:


I ended up with 5 cards, which is pretty awesome. But I'm not a huge fan of all of them (which makes me feel a little underwhelmed). Some of the cards were very experimental and completely different from my usual style, so they're lacking my usual confidence. I did, however, learn quite a bit about both my own process and the way I should make my kits in the future.

So, let's get down to what I learned:
- I had too much patterned paper. At most, 5 cards should need 6 papers, so my 12 choices were just too much.
- I had too many embellishments. Not only did I use only a few of them, but I ended up mainly sticking with enamel dots because they fit most everything.
- I had too many stamp sets. I struggled to use as many of them as possible, and didn't feel like I did any single set justice. 
 - It was a good idea to have one focal piece. I made a real dent in the chipboard sticker set, though I did not use all of it yet. I'm going to try using it up in the future cards, too.
- Outside adhesive and a couple of inkpads, I didn't need to go outside the kit at all. It was very well-rounded in terms of giving me everything I needed. I definitely feel like I should continue to include all the different elements I included (but with less quantities).
-  Having the card bases cut and scored in advance saved a bit of time, but I need to start adding extra cardstock I can use for layering and die-cutting. Especially white cardstock - it's a staple!

Overall, I had a positive experience with the kit, even if it was a bit challenging to use. I did like that a lot of the material from the kit got used up, but I'm going to assemble the next kit better - just so I can have less left-overs. I'd also like to add some dies to the kit, as I've got to make a dent in those, too. And I think I want to add some inkpads into the mix, as well. I've got some inky colors I just love, but haven't used to their potential yet.

Lastly, I plan on making another kit soon and sharing what I picked out.

Thanks for reading!
~Elle~

Thursday, August 13, 2015

Make your own Card Kit 1

Every now and then I get a cleaning/organizing bug. I find myself going through my crafty supplies in an effort to make them easier and more convenient to use. And it really helps! Seeing everything I already own is a great reminder that I might not need the 30 shiny new stamps that were just released.

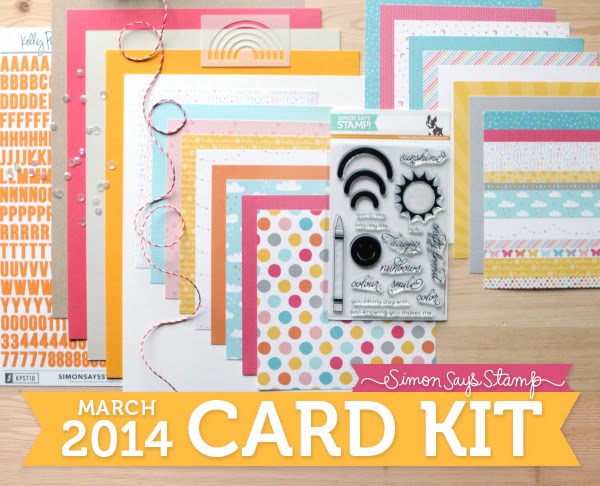
The last thing I organized was my card kits. I only get one card kit per month (from Simon Says Stamp), but it still stacks up over time. Originally, I simply left the kits in the box they came in and stacked them in the corner of my crafty closet, with a label on the side. However, this wasn't ideal because I'd forget what was in each kit and that meant I used them less. So, I started switching them to big ziploc bags.

The clear bags were a better solution, as I could see the stamp set, embellishments and colors of the kit much easier. It still wasn't ideal, though, because I still often forgot to look through the kits when I was searching for the perfect card supplies.

So, my latest organizing idea was to leave the last 3 months of card kits in ziploc bags, and put the rest of it away with my other supplies. So, stickers went with stickers, washi tape with washi tape, stamps into their pockets and stored with the rest of my stamps, and so on. So far, I'm liking this system much better, as it's giving me a chance to break out of the kit-only box and use the supplies more.

While doing this organization project, I felt really inspired to try my hand at making my own card kit. I figured this would be a great way to fine-tune my planning and design skills, as well as inspire me to use up some of my ever-growing supply stash.

Here are the contents of my very first kit and how I went about putting it together.

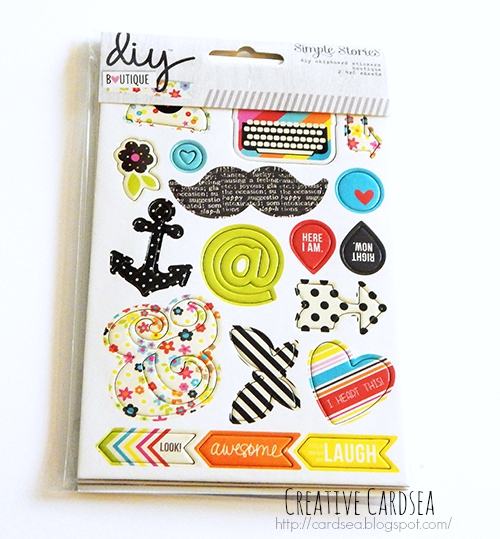
I think every kit needs to have a launching point of some sort -- whether that's a product, color scheme or topic/theme. I decided to start with this chipboard sticker set from Simple Stories DIY Boutique line. I've had this sticker set for a while and kept wanting to use it. But it never fit entirely in the card I was making, so it just sat there in my stash. I thought I might have a better chance of using it if I built a kit around it.

I chose the paper quite randomly, going for colors and tones that matched the stickers. Some papers were from the same line as the sticker, but the majority were simply from  my stash. I did not try to match the colors exactly, instead I went for choosing colors that had the right brightness and tones.


And that's a close-up of the different papers I chose. Since the sticker had a creamy off-white background, I chose to go with similar tones for the white.


Next, I prepared a few card bases that fit the tones of the patterned paper and sticker. These bases are already cut and folded into A2-sized cards (4¼x5½").

The first part of embellishments was a set of enamel dots. I grabbed the bright enamel dots from Freckled Fawn, as well as a black/gray and gold sets of enamel dots from Studio Calico. The colors of the enamel dots are not the exact match to the other supplies, but they do stand out great against the patterned paper I chose.

The second part of the embellishments was dipping into my wood veneer and button stash. I found some fun wood veneer and buttons in the same tones as the papers. I also grabbed a couple of flair, some black satin ribbon and a rainbow washi tape.

The last step was getting a few stamp sets that go along with the rest of the kit.
Since I like coloring, I grabbed two stamp sets that I could color. On the left is Evie from The Greeting Farm secret stamp club. On the right is Some Odd Girl's Hipster Mae. Both of them seem to fit the modern hipster vibe I got from the chipboard stickers.

Next, I grabbed a couple of stamp sets that are a little bit funny. On the left is Stuck on This from the Sweet Stamp Shop (now retired, sorry!) and Paper Smooches' Teen Routine is on the right.

Since there was a mustache on the sticker pack, I thought it might be good to add in a masculine stamp, so I chose Terrific Ties from My Favorite Things.

Lastly, I wanted to make sure that I had some good sentiments to work with, so I chose two stamp sets from Simon Says Stamp - Stripe Greetings on the left and Big Scripty Greetings on the right.

And that's all there is to this kit! I will be sharing the cards created with this kit as well as my thoughts about how well (or badly!) it worked for me soon.

Until next time... Thanks for reading!
~Elle~

Wednesday, August 27, 2014

I like big books & I cannot lie!

When I saw the reveal for Simon Says Stamp's September card kit, I was super excited! I'm a huge bookworm, and I've got several family members who work or volunteer at local libraries, so I knew straight away I'd be making great use of the kit. And then when I saw that the stamp set was a very graphic and modular set... Be still my heart!

This month, the kit has a set of 4x8 October Afternoon library themed papers, a mini inkpad in Gathered Twigs (which I did not have, woo!), a matching library sticker sheet, wood enamel dots and the standard cardstock and fabulous new stamp set. If you were a subscriber, you also received a roll of Kelly Purkey washi tape - mine had a name and date washi.

The papers included in this month's kit were of a bit of a different size - 4 by 8". By cutting them in half, I got two 4x4" paper panels. So, I decided to go with a different size for my card base, and cut and scored the cardstock into a 4 1/4 by 4 1/4" square card base. While I had my trimmer out, I also cut a sheet of library paper in half (i.e. 4x4" square).

I adhered the patterned paper onto the card base. Since I had a spare rectangle of cardstock leftover from the card base, I used it to create a panel where I could layer more of the patterned paper. So, I cut a piece of chevron paper to measure 2 by 4" and the kraft cardstock to measure 2 1/4 by 4". I adhered the chevron paper to the cardstock and then adhered the entire panel onto the card base with foam squares.

I wanted to add a stamp panel to the card in form of a tag. But none of the tag dies I had were the right size. They were either too skinny or too long. So, I grabbed one of the tag dies in Lawn Fawn's Tag It die set and used it on a piece of cream cardstock that came with the kit. After I ran it through the Bigshot, I lined up the die-cut piece and moved it down - so when I ran it through the Bigshot again, it would make for a shorter tag.

I stamped a few colorful books at the bottom of the tag, then the sentiment above. Lastly, I stamped a little red apple to tie in with the patterned paper colors. After the stamping was done, I used my mini blending tool and Tea Dye distress ink to go around the tag edges.

I added some hemp cord at the top of the tag, then adhered the tag to the card with foam squares. Lastly, I added one tiny wood enamel dot at the top of the chevron panel.

Supplies:
Simon Says Stamp September 2014 Card Kit
Stampin' Up Classic Inkpads in Daffodil Delight, Tempting Turquoise and Soft Suede
Lawn Fawn Tag It dies
Ranger Mini blending tool
Distress Inkpad in Tea Dye
Hemptique Natural Hemp Cord (single)
Scrapbook Adhesives 3D Foam Squares
Tombow Dot Adhesive Runner (pink)
Fiskars Premium Cut Line Paper Trimmer - 12"
Martha Stewart Mini Scoring Board

Saturday, July 26, 2014

SSS-August 2014 You're So Cool

Yesterday, I received my August card kit from Simon Says Stamp, and I just had to play with it straight away! We've got a fun summer treat theme, with ice cream and bright colors. The kit isn't sold out yet, so you can still grab it and enjoy the goodies! This month, the kit included Bo Bunny patterned paper, 2 distress markers, a piece of Tim Holtz distress watercolor paper and a few cute die-cuts.


Now onto my card... I created a standard top-folding A2 card base by cutting and scoring a piece of yellow cardstock from the kit in half.

I started by stamping the ice-cream onto the distress watercolor paper with MFT Hybrid Ink in black licorice. I colored a part of it in Peacock Feathers (which came in the kit), and used Gathered Twigs distress marker for the brown. I also stamped a little heart from the kit stamp and colored it in with Festive Berries. After it was dry, I carefully cut it out with scissors.

I wanted to play with some fun dies, so I pulled out Mama Elephant Femme frames to create a scalloped background panel out of the Bo Bunny paper from the kit. I adhered it to the card front.

I cut a tag out of white cardstock in the kit using Lawn Fawn's Tag You're It die. To tie in the rest of the card, I die-cut a small circle from the sunshine cardstock, and glued it to the top of the tag. I also added a bit of Lawn Fawn lime twine at the top.

I used the new Simon Says Stamp Frames die to cut a panel out of the yellow cardstock. The really cool thing about this new frames die is that it cut 2 pieces - a really thin frame and a matching decorative label. I decided to leave the label for the sentiment and use the frame on the tag to bring more attention to the ice-cream.

I stamped the sentiment from the kit stamp in plain black. It looked a bit too simple, so I used the Peacock Feathers distress marker to stamp the circle heart. I filled in the heart with festive berries marker. Once it was dry, I cut it out with a 1/2"round punch and adhered it under the sentiment with foam squares.

Using a glue pen, I adhered the thin frame to the tag, then popped up the ice-cream with some foam squares. I adhered it to the top of the label, then adhered the whole panel to the front of the card.

Supplies:
Simon Says Stamp August 2014 card kit
Simon Says Stamp Frames die
My Favorite Things Hybrid Ink in black licorice
Distress markers in Gathered Twigs and Festive Berries
Mama Elephant Femme Frames die
Lawn Fawn Tag You're It die
Lawn Fawn Lime Single Cord twine
1/2" circle paper punch
Scrapbook Adhesives 3D foam squares
Tombow Mono Liquid glue pen

Thursday, June 26, 2014

Thinking of You

I received my Simon Says Stamp card kit this morning, and just had to play with the goodies right away.

When they first unveiled the kit, I wasn't sure whether I wanted to get it or not. I actually already bought the patterned paper that comes with the kit, as well as the chevron washi tape. And I already had the Schoolhouse Red ink, which is similar to the ink in the kit. But I saw a few of the inspiration cards and videos, and decided it was something I wanted in my collection.

And I'm glad I got it! I love the stamp set, especially since the sentiments can be used elsewhere, and they're nice and bold (so they stamp and emboss great). Plus it's nice to just play around with the patterned paper and know I don't need to save any of it because I've got a back-up pad in my stash.

For this card, I wanted to make something that looked like a big envelope - without using an actual envelope.

I started by preparing the base by cutting a piece of red cardstock from the kit in half, and scoring/folding it to the standard A2 size (4 1/4 by 5 1/2"). I then cut a piece of the busy tiny chevron paper to measure 3 3/4 by 5". I adhered it to the base.

Then I got to work on the large mock envelope. I cut a piece of patterned paper to measure 2 3/4 by 3 3/4. I stamped "Thinking of You" in black near the bottom right, where the address would be. I also stamped the round "hello" with the Lipstick Red ink from the kit on a separate piece of white cardstock and cut it out with a circle paper punch. I adhered it to the top right of the envelope, so it would look like a stamp.

I used the skinny stamp to stamp the bottom of the envelope: once in lipstick red, and once in navy. I also added a puffy sticker from the kit to the upper left side of the envelope. The envelope wasn't popping from the page to my liking, so I matted it with a piece of plain black cardstock. I adhered it to the card base with foam squares.

I stamped a few of the envelopes on a piece of white cardstock, adding hearts to two of them. I tucked them under a corner of the large envelope, adhering them with my tape runner.

Lastly, I drew in a round dot border around the patterned paper panel for a bit of extra contrast. And voila! Card is done.

Supplies:
Simon Says Stamp July 2014 Card Kit
MFT Hybrid Ink in Nightshift Blue (navy), Ranger Archival Ink in Jet Black (sentiment)
Simon Says Stamp Black heavyweight #100lbs cardstock
Circle punch
Uniball Signo broad white gel pen
Best Creation big squares foam tape adhesive

Thursday, May 29, 2014

SSS - Love is Everything

Last week, I got my June Simon Says Stamp card kit, but between work and errands, I didn't really get a chance to play with it much.

This month's kit is themed around flowers and love. The stamp set has adorable modern scribbly flowers, as well as leaves, a wreath and a few curly bits you can use for extra decoration. The sentiments are a mix of Kristina Werner's script hand-writing and tiny typed text. The kit also comes with some wood veneer embellishments, washi tape and enamel dots.

For my card, I wanted to go really simple and use as few non-kit products as possible.

I started by cutting a piece of cardstock from the kit in half, and then scoring it in the middle to create my base. I then cut a piece of flowery patterned paper from the kit to 4x5 1/4 inches and adhered it to the base.

I cut a  strip of polka dot patternet paper and trimmed it to create a banner shape. I adhered it to the left corner of the card. Next, I added a piece of washy tape to the bottom of the panel.

I punched a piece of vanilla card-stock with my EK Success paper punch and stamped a sentiment from the kit stamp set. Using my foam blending tool, I lightly brushed the edges of the sentiment panel with tea dye distress ink. This made the panel pop better against the background, and it tied in the washi tape a bit more.

I decided to put a flower in the upper left corner of the card. I used Hemptique natural hemp cord twine to create some loops, then adhered the wood veneer from the card kit.

As a last touch, I added a medium-sized enamel dot from the kit to the front of the flower and a couple small enamel dots to the washi tape.

Supplies:
Simon Says Stamp June 2014 card kit You Are My Favorite
MFT Hybrid Ink in black licorice
Bazzill Vanilla Canvas Card Stock
EK Success Real Estate Sign Paper Punch
Ranger Distress Inkpad in Tea Dye
Ranger Foam Blending Tool
Hemptique Natural hemp cord twine
Scrapbook Adhesives Foam Squares

Thursday, May 1, 2014

SSS- May 2014 Card Kit - Date?

This month's kit from Simon Says Stamp is all about boys. It's got a fantastic stamp set, as well as a stencil, the new Ranger mini-blending tool and some distress ink.

Right after I got the set, I just had to make a quick and easy card to illustrate an idea that's been bouncing in my brain since the card kit reveal. Gaming night = awesome date night, so I wanted to make a cute card that asks the recipient for a date.

I started by cutting out a panel from the striped paper in the kit, and another panel out of white cardstock. I used the blending tool and the ink from the kit on the edges of the white paper. Then, I took out the stencil and smooshed some Hero Arts Tide Pool ink to create stars that are the same tone as the distress ink.

I stamped the controller twice in MFT's Hybrid ink, then colored them in with my copics. I carefully cut them out and attached them to the white panel with foam squares. I then drew in the loopy wire heart with a black marker.

For the sentiment, I chose to go with a custom sentiment - using Lawn Fawn's Milo's ABCs stamp set.

I adhered the striped paper at an angle, then added the white panel with foam squares. As a last touch, I added a hand-drawn white border around the card.

Supplies:
Simon Says Stamp Card Kit May 2014
Lawn Fawn's Milo's ABCs
Copics (W2, W4, W6 W8, G21, R22, R46, BV04)
Memento Tuxedo Black marker 
MFT Hybrid Ink in Black Licorice
Hero Arts Shadow Ink in Tide Pool
Uniball Signo White Gel Pen
Scrapbook Adhesives Foam Squares

Sunday, March 30, 2014

April Card Kit - You Brighten My Day

Simon Says Stamp's April card kit is themed around a light-bulb this month. The stamp set's got a ton of punny and cute little sayings, and it looks versatile enough to be used year-round. I will definitely be pulling it out next Valentine's for a cute "love you watts and watts" card.


Although I got this kit a few days ago, I didn't get a chance to play around with it until today. I think I had a bout of flu, as I was completely out of commission for a few days. Thankfully, I'm feeling much better now and I'm ready to create fun things once again. :)

I started by picking out the paper. A lot of the papers that come in the card kit have a really interesting look, with bright colors on one side and a black/white pattern on the other. I decided to make use of the contrast of black and white and pair it with yellow for a punch of color.

I started by creating the center panel by layering the polka-dot paper on each side of the gray wood-grain. After that, I stamped the solid light-bulb on a piece of plain white cardstock. I used two colors. First, I stamped with the yellow pigment ink. While the ink was still wet, I inked up the stamp with orange pigment ink and stamped it lightly on a piece of scrap paper to take off some of the color. Then, I stamped it onto the yellow image. It created a really great texture.

After heat-setting the solid bulb, I stamped the outline stamp in Versamark embossing ink. I used platinum embossing powder and zapped it with the heat gun. After it cooled, I cut it using my Sizzix round dies. I also cut out a larger circle from a piece of black cardstock and used it as a frame. Using a black pen, I drew a dotted border around the white circle.

I added the sentiment at the bottom of the card and embossed it with clear embossing powder. I used a highlighter to highlight the word "brighten" and to tie in the sentiment with the card.

Lastly, I added a few embelishments: a piece of hemp cord twine and a button at the top, as well as a few enamel dots from the kit at the bottom.

Supplies:
Simon Says Stamp April Card Kit
Cardstock: Bazzill Marshmallow, Simon Says Stamp 100# black cardstock
Ink: Memento Luxe in Dandelion (yellow), Mama Elephant in Orangeade (orange), Mama Elephant in Ocean (blue), Versamark embossing ink
Embossing Powder: Ranger super fine Clear Embossing Powder, Ranger Platinum embossing powder
Hemptique Natural Hemp Cord
Button
Highlighter


Thursday, February 27, 2014

Hello Sunshine - March 2014 Card Kit

I was so, so excited to get the March Card kit from Simon Says Stamp! I received it yesterday, and I had to make a card with it straight away! Not only is the stamp set a gorgeous and happy-themed with sunshine, rainbows and color, but it includes papers from Lawn Fawn's Hello Sunshine paper pack. That paper is on my must-have list. The kit also comes with a rainbow stencil, sequins and a spool of single cord twine.

Now onto the card...

As soon as I saw the stamp set, I knew I wanted to play around with colors and shapes. The kit comes with several pieces of cardstock. I made the base from Bazzill's Candy Hearts and used Lawn Fawn stitched journaling card die on a piece of Bazzill's Taffy cardstock to create the gray panel. For some visual interest, I made a peek window on the left side using the arrow/chevron die from the same set.

For stamping the happy sun stamp, I used Mama Elephant's Orangeade ink (rays) and Memento Luxe Dandelion (face). For the sentiment, I used Memento Luxe Bahama Blue ink. It turned out to be a great match to the blue paper from Lawn Fawn.

Supplies:
- Simon Says Stamp March 2014 Card Kit
- Stamp: Lawn Fawn Tons of Love (heart)
- Ink: Mama Elephant Orangeade, Memento Luxe Dandelion, Memento Luxe Bahama Blue, Memento Luxe Rose Bud (heart)
- Dies: Lawn Fawn Stitched Journaling Card, Sizzix Circles Die set
- Adhesive: Ranger Glossy Accents (sequins), Best Creation Foam Squares

Thursday, February 6, 2014

SSS- February Card Kit card #2

I pulled out the February Card Kit again today and made another card. I wanted to do something a little different and use a base other than Kraft.

This was a challenging card and I'm still not sure whether I like it or not. There are parts of it that turned out pretty good (stamping, butterflies), but I'm still wondering whether it's a bit too busy. Is there too much going on?

I'll set it aside for now and see if it will grow on me.

Supplies:
Simon Says Stamp February 2014 Floral Fun
Dies: SSS Chrissy Butterfly and Leanna Butterfly
Ink: Ranger Archival Ink in Rose Madder, Hero Arts Tide Pool Shadow Ink, Colorbox Fluid Chalk Ink in Chestnut Roan

Monday, January 27, 2014

SSS February Card Kit - Thankful

I got my Simon Says Stamp February card kit today, and it looks very pretty. One of the things I'm most excited about is that the stamp set has flowers. I don't have very many stamps that have small flowers on them, so this is a real treat for me.

Onto the card:
I started by cutting out a round circle in the card base with my Bigshot. I glued a piece of vellum inside, then glued a piece of light blue patterned paper over the vellum, so a hint of blue would be peeking through the window.

After that, I cut 2 long strips of craft card stock and crossed them in the middle of the window. It looked a bit plain, so I used my gel pen to create a wood grain-like texture. I also added small brown dots around the outside of the window to create a little bit of contrast.

The flowers were stamped using Ranger Archival ink in Saffron (yellow), Hero Arts Soft Blossom (pink flower fill), Ranger Archival ink Rose Madder (outline) and Simon Says Stamp Green Apple ink (stems, leaves). I fussy-cut around them and attached them to the card with dimensional squares.

I created the window box by layering a piece of green paper from the kit on top of a white piece of Bazzill Marshmallow card stock. I stamped small blue dots with Hero Arts Soft Stone ink.

Lastly, I stamped the Thankful sentiment from the kit stamp set in Simon Says Stamp Dark Chocolate ink. I outlined the letters in white gel pen to make them stand out a little more.The final touch was a simple hand-drawn border, using a brown pen.

Thursday, January 16, 2014

Simon Says Stamp - January Card Kit Card #2


For my second card, I wanted to do something a little different, so I made a folder-like card.

The pink card tucks into the craft card base, and the round window allows you a little peek at the cute alien.

Here's how the card looks when it's tucked in.

And here's a close look at the pink card insert.

I tried a few new techniques in this card:
- The tabs were made using my We-R-Memory-Keepers envelope punch.
- The round window was cut with my BigShot, using the circle framelits die
- I cut a square of velum paper that came in the kit into a square and glued it to the back of the circle cutout. Then I stamped the stitched heart with Memento Luxe Love Letter ink.
- Although the little alien has a fantastic grin on the stamp, I wanted him to be a little more shy. So, I created a mask for his mouth from a piece of post-it tape. I drew the shy smile with a pen.
- I used watercolors on the alien, just to give him a touch of color.
- The many many stitch lines on the craft base use a white gel pen.
- The white hearts at the front of the base are from Lawn Fawn.

Saturday, January 11, 2014

Simon Says Stamp -- January Card Kit Card 1

I signed up for the monthly card kit in December, and I made several cards with it. Unfortunately, in the busy busy busy Christmas season, I didn't get a chance to snap a picture before they were sent off.

I did, however, finally get my camera's battery charged and I managed to get a picture of the card I made with January's kit (which is sold out! Phew, I'm so glad I signed up for the subscription).

One of the things I wanted to challenge myself with while making this card was to use colors that aren't traditionally associated with Valentine's -- in this case, the ochre yellow and grey. And it made perfect sense with the little story I came up with as an inspiration for this card.

This card started out with the tickets. When I saw those tickets, the first thing that sprung to mind was an image of a shy boy asking a girl to be his valentine for the first time. I cut the yellow polkadot paper to look like a little pocket. I folded the side and bottom edges at 1/16th of an inch, which raised the pocket off the page a bit and gave me room to tuck in the Valentine tickets.

I used a black pen to draw in the stitching around the pocket and added a grey button to tie it in with the striped background. I drew more stitched lines in white gel pen, then stamped 2 stitched columns in saffron yellow ink.

Lastly, I stamped a little red heart with Memento Luxe Love Letter and drew stitch lines around it.

The sentiment is at the very bottom, small and shy (just like the boy is). I added a touch of red watercolor for emphasis.

And voila! A simple card that can be created again, and a secret sweet story to go along it.